

Owner's Manual - Smarthome
Owner's Manual - Smarthome
Owner's Manual - Smarthome

Create successful ePaper yourself
Turn your PDF publications into a flip-book with our unique Google optimized e-Paper software.
Seven: Programming for Use with Z-Wave Devices 67<br />
3. Press the button on the Z-Wave device for resetting the device (refer to the manufacturer’s<br />
instructions). The screen displays WORKING followed by SUCCESSFUL. The device is now<br />
removed from the network.<br />
4. Press the button if you wish to return to the Main screen.<br />
Setting Up Z-Wave Associations with Capable Devices<br />
An “Association” is a feature supported by certain Z-Wave devices where Z-Wave device other<br />
than the PE953 controller can be used to control other Z-Wave devices in the network (e.g., a<br />
Z-Wave switch that controls other Z-Wave devices).<br />
Within a PE653/953 network, setting up an association with one of these Z-Wave devices makes<br />
it possible to control Circuit 1 (the filter pump) of the PE653 in an ON/OFF basis along with<br />
lighting or other features being controlled by another Z-Wave device, independent of the Hand-<br />
Held Controller.<br />
NOTE: Before you can create an Association, the capable Z-Wave device must first be<br />
included in the network.<br />
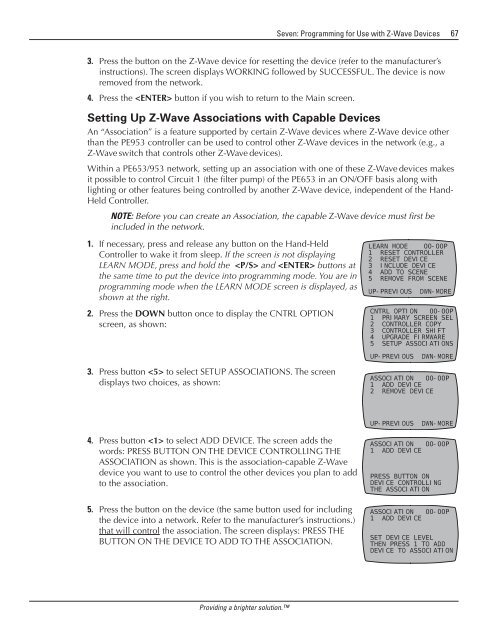
1. If necessary, press and release any button on the Hand-Held<br />
Controller to wake it from sleep. If the screen is not displaying<br />
LEARN MODE, press and hold the and buttons at<br />
the same time to put the device into programming mode. You are in<br />
programming mode when the LEARN MODE screen is displayed, as<br />
shown at the right.<br />
2. Press the DOWN button once to display the CNTRL OPTION<br />
screen, as shown:<br />
LEARN MODE 00-00P<br />
1 RESET CONTROLLER<br />
2 RESET DEVICE<br />
3 INCLUDE DEVICE<br />
4 ADD TO SCENE<br />
5 REMOVE FROM SCENE<br />
UP-PREVIOUS DWN-MORE<br />
CNTRL OPTION 00-00P<br />
1 PRIMARY SCREEN SEL<br />
2 CONTROLLER COPY<br />
3 CONTROLLER SHIFT<br />
4 UPGRADE FIRMWARE<br />
5 SETUP ASSOCIATIONS<br />
UP-PREVIOUS DWN-MORE<br />
3. Press button to select SETUP ASSOCIATIONS. The screen<br />
displays two choices, as shown:<br />
ASSOCIATION 00-00P<br />
1 ADD DEVICE<br />
2 REMOVE DEVICE<br />
UP-PREVIOUS DWN-MORE<br />
4. Press button to select ADD DEVICE. The screen adds the<br />
words: PRESS BUTTON ON THE DEVICE CONTROLLING THE<br />
ASSOCIATION as shown. This is the association-capable Z-Wave<br />
device you want to use to control the other devices you plan to add<br />
to the association.<br />
ASSOCIATION 00-00P<br />
1 ADD DEVICE<br />
PRESS BUTTON ON<br />
DEVICE CONTROLLING<br />
THE ASSOCIATION<br />
5.<br />
Press the button on the device (the same button used for including<br />
the device into a network. Refer to the manufacturer’s instructions.)<br />
that will control the association. The screen displays: PRESS THE<br />
BUTTON ON THE DEVICE TO ADD TO THE ASSOCIATION.<br />
ASSOCIATION 00-00P<br />
1 ADD DEVICE<br />
SET DEVICE LEVEL<br />
THEN PRESS 1 TO ADD<br />
DEVICE TO ASSOCIATION<br />
Providing a brighter solution.


