Fisher® FIELDVUE DVC6200 Digital Valve Controller
Fisher® FIELDVUE DVC6200 Digital Valve Controller
Fisher® FIELDVUE DVC6200 Digital Valve Controller

You also want an ePaper? Increase the reach of your titles
YUMPU automatically turns print PDFs into web optimized ePapers that Google loves.
Instruction Manual<br />
D103605X012<br />
Maintenance and Troubleshooting<br />
July 2012<br />
Component Replacement<br />
When replacing any of the components of the <strong>DVC6200</strong>, the maintenance should be performed in an instrument shop<br />
whenever possible. Make sure that the electrical wiring and pneumatic tubing is disconnected prior to disassembling<br />
the instrument.<br />
Removing the Module Base<br />
Refer to figure 7‐2 or 7‐4 for key number locations.<br />
WARNING<br />
To avoid personal injury or equipment damage from bursting of parts, turn off the supply pressure to the digital valve<br />
controller and bleed off any excess supply pressure before attempting to remove the module base assembly from the<br />
housing.<br />
1. Unscrew the four captive screws in the cover (key 43) and remove the cover from the module base (key 2).<br />
2. Using a 6 mm hex socket wrench, loosen the three‐socket head screws (key 38). These screws are captive in the<br />
module base by retaining rings (key 154).<br />
Note<br />
The module base is linked to the housing by two cable assemblies. Disconnect these cable assemblies after you pull the module<br />
base out of the housing.<br />
3. Pull the module base straight out of the housing (key 1). Once clear of the housing, swing the module base to the<br />
side of the housing to gain access to the cable assemblies.<br />
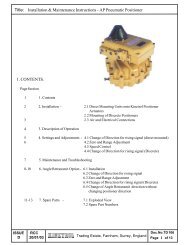
4. The digital valve controller/base unit has two cable assemblies, shown in figure 6‐1, which connect the module<br />
base, via the printed wiring board assembly, travel sensor and the terminal box. Disconnect these cable assemblies<br />
from the printed wiring board assembly on the back of the module base.<br />
Figure 6‐1. Printed Wiring Board Cable Connections<br />
TERMINAL<br />
BOX<br />
MODULE BASE ASSEMBLY<br />
PRINTED WIRING<br />
BOARD ASSEMBLY<br />
W9924-1<br />
HOUSING<br />
CABLE<br />
TO TERMINAL BOX<br />
CABLE TO TRAVEL SENSOR<br />
57