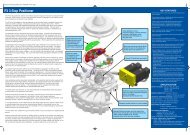
Fisher® FIELDVUE DVC6200 Digital Valve Controller
Fisher® FIELDVUE DVC6200 Digital Valve Controller
Fisher® FIELDVUE DVC6200 Digital Valve Controller

You also want an ePaper? Increase the reach of your titles
YUMPU automatically turns print PDFs into web optimized ePapers that Google loves.
Instruction Manual<br />
D103605X012<br />
Maintenance and Troubleshooting<br />
July 2012<br />
Printed Wiring Board (PWB) Assembly<br />
Refer to figure 7‐2 or 7‐4 for key number locations. The PWB assembly (key 50) is located on the back of the module<br />
base assembly (key 2).<br />
Note<br />
If the PWB assembly submodule is replaced, calibrate and configure the digital valve controller to maintain accuracy specifications.<br />
Removing the Printed Wiring Board Assembly<br />
1. Separate the module base from the housing by performing the Removing the Module Base procedure.<br />
2. Remove three screws (key 33).<br />
3. Lift the PWB assembly (key 50) straight out of the module base (key 2).<br />
4. Ensure that the O‐rings (key 40) remain in the pressure sensor bosses on the module base assembly (key 2) after the<br />
PWB assembly (key 50) has been removed.<br />
Replacing the Printed Wiring Board Assembly and Setting the DIP Switch<br />
1. Apply silicone lubricant to the pressure sensor O‐rings (key 40) and install them on the pressure sensor bosses in the<br />
module base assembly.<br />
2. Properly orient the PWB assembly (key 50) as you install it into the module base. The two electrical leads from the<br />
I/P converter (key 41) must guide into their receptacles in the PWB assembly and the pressure sensor bosses on the<br />
module base must fit into their receptacles in the PWB assembly.<br />
3. Push the PWB assembly (key 50) into its cavity in the module base.<br />
4. Install and tighten three screws (key 33) to a torque of 1 Nm (10.1 lbfin).<br />
5. Set the DIP switch on the PWB assembly according to table 6‐2.<br />
Table 6‐2. DIP Switch Configuration (1)<br />
Switch Label Operational Mode DIP Switch Position<br />
PT-PT 420 mA PointtoPoint Loop LEFT<br />
Multi 24 VDC MultiDrop Loop RIGHT<br />
1. Refer to figure 6‐4 for switch location.<br />
61