Fisher® FIELDVUE DVC6200 Digital Valve Controller
Fisher® FIELDVUE DVC6200 Digital Valve Controller
Fisher® FIELDVUE DVC6200 Digital Valve Controller

Create successful ePaper yourself
Turn your PDF publications into a flip-book with our unique Google optimized e-Paper software.
Maintenance and Troubleshooting<br />
July 2012<br />
Instruction Manual<br />
D103605X012<br />
Perform the following procedure to replace the gauges, tire valves, or pipe plugs. Refer to figure 7‐2 and 7‐3 for key<br />
number locations.<br />
1. Remove the front cover (key 43).<br />
2. Remove the gauge, pipe plug, or tire valve as follows:<br />
For gauges (key 47), the flats are on the gauge case. Use a wrench on the flats of the gauge to remove the gauge from<br />
the module base. For double‐acting instruments, to remove the supply gauge remove one of the output gauges.<br />
For pipe plugs (key 66) and tire valves (key 67), use a wrench to remove these from the module base.<br />
3. Apply zinc based anti-seize sealant (key 64) to the threads of the replacement gauges, pipe plugs, or tire valves.<br />
4. Using a wrench, screw the gauges, pipe plugs, or tire valves into the module base.<br />
Terminal Box<br />
Refer to figure 7‐2 or 7‐4 for key number locations.<br />
The terminal box is located on the housing and contains the terminal strip assembly for field wiring connections.<br />
Note<br />
The DVC6205 feedback connections terminal box (shown in figure 6‐6) is not a replaceable part. Do not remove the tamper proof<br />
paint on the screw.<br />
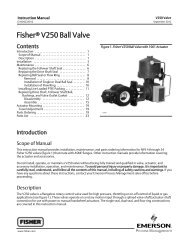
Figure 6‐6. Terminal Boxes<br />
MAIN TERMINAL<br />
BOX<br />
FEEDBACK CONNECTIONS<br />
TERMINAL BOX; NOT<br />
REPLACEABLE<br />
MAIN TERMINAL BOX<br />
X0338<br />
<strong>DVC6200</strong><br />
X0379<br />
DVC6205<br />
Removing the Terminal Box<br />
WARNING<br />
To avoid personal injury or property damage caused by fire or explosion, remove power to the instrument before removing<br />
the terminal box cover in an area which contains a potentially explosive atmosphere or has been classified as hazardous.<br />
1. Loosen the set screw (key 58) in the cap (key 4) so that the cap can be unscrewed from the terminal box.<br />
2. After removing the cap (key 4), note the location of field wiring connections and disconnect the field wiring from<br />
the terminal box.<br />
64