Fisher® FIELDVUE DVC6200 Digital Valve Controller
Fisher® FIELDVUE DVC6200 Digital Valve Controller
Fisher® FIELDVUE DVC6200 Digital Valve Controller

You also want an ePaper? Increase the reach of your titles
YUMPU automatically turns print PDFs into web optimized ePapers that Google loves.
Maintenance and Troubleshooting<br />
July 2012<br />
Instruction Manual<br />
D103605X012<br />
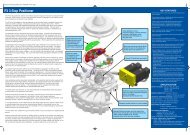
Replacing the Module Base<br />
Refer to figure 7‐2 or 7‐4 for key number locations.<br />
CAUTION<br />
To avoid affecting performance of the instrument, take care not to damage the module base seal or guide surface. Do not<br />
bump or damage the bare connector pins on the PWB assembly. Damaging either the module base or guide surface may<br />
result in material damage, which could compromise the instruments ability to maintain a pressure seal.<br />
Note<br />
To avoid affecting performance of the instrument, inspect the guide surface on the module and the corresponding seating area in<br />
the housing before installing the module base assembly. These surfaces must be free of dust, dirt, scratches, and contamination.<br />
Ensure the module base seal is in good condition. Do not reuse a damaged or worn seal.<br />
1. Ensure the module base seal (key 237) is properly installed in the housing (key 1). Ensure the O‐ring (key 12) is in<br />
place on the module base assembly.<br />
2. Connect the travel sensor and terminal box cable assemblies to the PWB assembly (key 50). Orientation of the<br />
connector is required.<br />
3. Insert the module base (key 2) into the housing (key 1).<br />
4. Install three socket head screws (key 38) in the module base into the housing. If not already installed, press three<br />
retaining rings (key 154) into the module base. Evenly tighten the screws in a crisscross pattern to a final torque of<br />
16 Nm (138 lbfin).<br />
WARNING<br />
Personal injury, property damage, or disruption of process control can result if the cable assemblies/wiring are damaged<br />
when attaching the cover to the module base assembly<br />
Ensure that the cable assemblies/wiring are positioned in the cavity of the module base so they do not get compressed or<br />
damaged when attaching the cover to the module base assembly in step 5.<br />
5. Attach the cover (key 43) to the module base assembly.<br />
Submodule Maintenance<br />
The module base of the <strong>DVC6200</strong> contains the following submodules: I/P converter, PWB assembly, and pneumatic<br />
relay. If problems occur, these submodules may be removed from the module base and replaced with new<br />
submodules. After replacing a submodule, the module base may be put back into service.<br />
CAUTION<br />
Exercise care when performing maintenance on the module base. Reinstall the cover to protect the I/P converter and<br />
gauges when servicing other submodules.<br />
In order to maintain accuracy specifications, do not strike or drop the I/P converter during submodule maintenance.<br />
58