PT-600 Mechanized Plasma Cutting Torch
PT-600 Mechanized Plasma Cutting Torch
PT-600 Mechanized Plasma Cutting Torch

You also want an ePaper? Increase the reach of your titles
YUMPU automatically turns print PDFs into web optimized ePapers that Google loves.
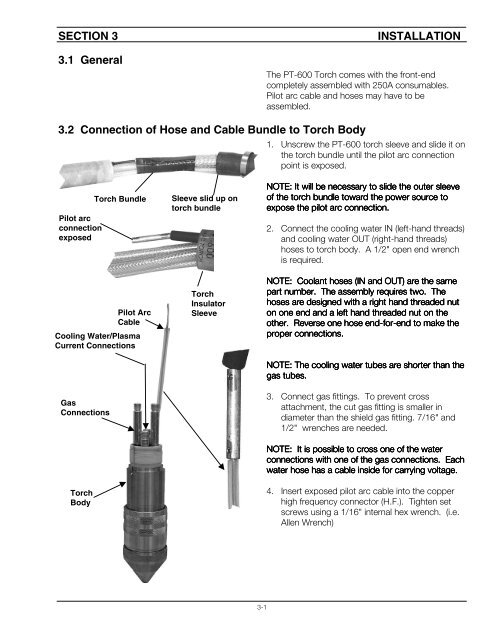
SECTION 3<br />
3.1 General<br />
INSTALLATION<br />
The <strong>PT</strong>-<strong>600</strong> <strong>Torch</strong> comes with the front-end<br />
completely assembled with 250A consumables.<br />
Pilot arc cable and hoses may have to be<br />
assembled.<br />
3.2 Connection of Hose and Cable Bundle to <strong>Torch</strong> Body<br />
1. Unscrew the <strong>PT</strong>-<strong>600</strong> torch sleeve and slide it on<br />
the torch bundle until the pilot arc connection<br />
point is exposed.<br />
Pilot arc<br />
connection<br />
exposed<br />
Cooling Water/<strong>Plasma</strong><br />
Current Connections<br />
Gas<br />
Connections<br />
<strong>Torch</strong><br />
Body<br />
<strong>Torch</strong> Bundle<br />
Pilot Arc<br />
Cable<br />
Sleeve slid up on<br />
torch bundle<br />
<strong>Torch</strong><br />
Insulator<br />
Sleeve<br />
NOTE: It will be necessary to slide the outer sleeve<br />
of the torch bundle toward the power source to<br />
expose the pilot arc connection.<br />
2. Connect the cooling water IN (left-hand threads)<br />
and cooling water OUT (right-hand threads)<br />
hoses to torch body. A 1/2" open end wrench<br />
is required.<br />
NOTE: Coolant hoses (IN and OUT) are the same<br />
part number. The assembly requires two. The<br />
hoses are designed with a right hand d threaded nut<br />
on one end and a left hand threaded nut on the<br />
other. Reverse one hose end-for<br />
for-end to make the<br />
proper connections.<br />
NOTE: The cooling water tubes are shorter than the<br />
gas tubes.<br />
3. Connect gas fittings. To prevent cross<br />
attachment, the cut gas fitting is smaller in<br />
diameter than the shield gas fitting. 7/16" and<br />
1/2" wrenches are needed.<br />
NOTE: It is possible to cross one of the water<br />
connections with one of the gas connections. Each<br />
water hose has a cable inside for carrying voltage.<br />
4. Insert exposed pilot arc cable into the copper<br />
high frequency connector (H.F.). Tighten set<br />
screws using a 1/16" internal hex wrench. (i.e.<br />
Allen Wrench)<br />
3-1