
You also want an ePaper? Increase the reach of your titles
YUMPU automatically turns print PDFs into web optimized ePapers that Google loves.
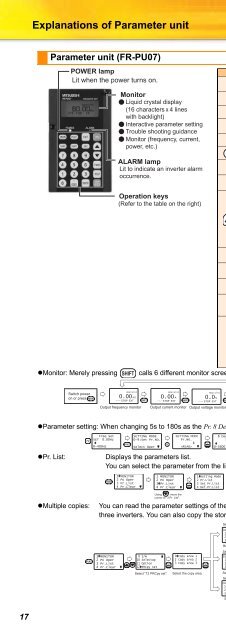
Explanations of Parameter unitParameter unit (FR-PU07)POWER lampLit when the power turns on.MonitorLiquid crystal display(16 characters 4 lineswith backlight)Interactive parameter settingTrouble shooting guidanceMonitor (frequency, current,power, etc.)ALARM lampLit to indicate an inverter alarmoccurrence.Operation keys(Refer to the table on the right)Keyto/DescriptionUse for parameter settingPress to choose the parameter setting mode.First priority monitor is displayed.In the initial setting, the output frequency is displayed.Operation cancel keyUsed to display the function menu.A variety of functions can be used on the function menu.Used to shift to the next item in the setting or monitoring mode.Used to enter a frequency, parameter number or set value.Inverter operates in the external operation mode.Used to select the PU operation mode to display the frequencysetting screen.• Used to keep on increasing or decreasing the runningfrequency. Hold down to vary the frequency.• Press either of these keys on the parameter setting modescreen to change the parameter setting value sequentially.• On the selecting screen, these keys are used to move the cursor.• Hold down and press either of these keys to advanceor return the display screen one page.Forward rotation command key.Reverse rotation command key.•Monitor: Merely pressingcalls 6 different monitor screens in sequence.• Stop command key.• Used to reset the inverter when an alarm occurs.• Used to write a set value in the setting mode.• Used as a clear key in the all parameter clear or alarm historyclear mode.• Used as a decimal point when entering numerical value.• Used as a parameter number read key in the setting mode.• Used as an item select key on the menu screen such asparameter list or monitoring list.• Used as an alarm definition display key in the alarm historydisplay mode.• Used as a command voltage read key in the calibration mode.•Parameter setting: When changing 5s to 180s as the Pr. 8 Deceleration time setting•Pr. List:Switch poweron or pressREAD:List0.00 Hz--- STOP EXTREAD:List0.00 A--- STOP EXTREAD:List0.0 V--- STOP EXTALARM HISTORYOutput frequency monitor Output current monitor Output voltage monitor Alarm historymonitorFreq SetSET 0.00Hz0~400HzSETTING MODE0~9:Set Pr.NO.Select OperSETTING MODEPr.NO.88 Dec.T15.0S0~3600Selective monitor(Running speed, motor torque, etc.from 16 different monitors)3-step monitorDisplays the parameters list.You can select the parameter from the list to read and write the parameter setting.8 Dec.T15.0S180S0~3600OTHERS8 Dec.T1180.0SCompleted0.00Hz0.00A0.0V--- STOP EXTTop two monitor types ofthe first priority monitor,output frequency, outputcurrent and output voltageare displayed in line9 Set THM2.55A0~500•Multiple copies:1 MONITOR2 PU Oper3 Pr.List4 Pr.Clear1 MONITOR2 PU Oper3 Pr.List4 Pr.ClearUsing , move thecursor to "3 Pr. List".1 Setting Mode2 Pr.List3 Set Pr.List4 Def.Pr.List1 Setting Mode2 Pr.List3 Set Pr.List4 Def.Pr.ListUsing , move thecursor to "2 Pr. List".0 Trq Bst11 Max.F12 Min.F13 VFbaseF10 Trq Bst16.0%0~30Parameter setting modeYou can read the parameter settings of the inverter into the FR-PU07 and store the settings of maximum.three inverters. You can also copy the stored parameter settings to another inverter of the same series.Select the "READ".1 MONITOR9 S/W2 PU Oper10 Selectop3 Pr.List11 Option4 Pr.Clear 12 PRCpy set1 Copy area 12 Copy area 23 Copy area 3Copy area 11 Read VFD2 Write VFD3 VerifingRead "1 Read VFD".Select the "WRITE".Copy area 11 Read VFD2 Write VFD3 VerifingName:012:Select CharREAD:Decide CharWRITE:DecideNameGive a name.012Area 1 to VFDWRITE:ExecutingESC:Cancel012Overwrite area 1WRITE:ExecutingESC:CancelWrite.Param CopyWritingCompletedPlease ResetParam CopyReadingCompletedSelect "12 PRCpy set".Select the copy area.Select "2 Write VFD".Select the "Verifying".Copy area 11 Read VFD2 Write VFD3 VerifingSelect "3 Verifing".012Verify Area 1WRITE:ExecutingESC:CancelParam CopyVerifyingPlease Wait17