Yotta RAID Software installation guide - Axus
Yotta RAID Software installation guide - Axus
Yotta RAID Software installation guide - Axus

You also want an ePaper? Increase the reach of your titles
YUMPU automatically turns print PDFs into web optimized ePapers that Google loves.
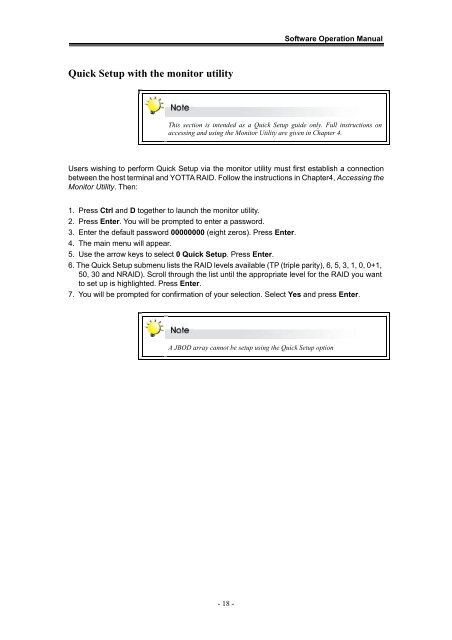
<strong>Software</strong> Operation ManualQuick Setup with the monitor utilityThis section is intended as a Quick Setup <strong>guide</strong> only. Full instructions onaccessing and using the Monitor Utility are given in Chapter 4.Users wishing to perform Quick Setup via the monitor utility must first establish a connectionbetween the host terminal and YOTTA <strong>RAID</strong>. Follow the instructions in Chapter4, Accessing theMonitor Utility. Then:1. Press Ctrl and D together to launch the monitor utility.2. Press Enter. You will be prompted to enter a password.3. Enter the default password 00000000 (eight zeros). Press Enter.4. The main menu will appear.5. Use the arrow keys to select 0 Quick Setup. Press Enter.6. The Quick Setup submenu lists the <strong>RAID</strong> levels available (TP (triple parity), 6, 5, 3, 1, 0, 0+1,50, 30 and N<strong>RAID</strong>). Scroll through the list until the appropriate level for the <strong>RAID</strong> you wantto set up is highlighted. Press Enter.7. You will be prompted for confirmation of your selection. Select Yes and press Enter.A JBOD array cannot be setup using the Quick Setup option- 18 -