Yotta RAID Software installation guide - Axus
Yotta RAID Software installation guide - Axus
Yotta RAID Software installation guide - Axus

You also want an ePaper? Increase the reach of your titles
YUMPU automatically turns print PDFs into web optimized ePapers that Google loves.
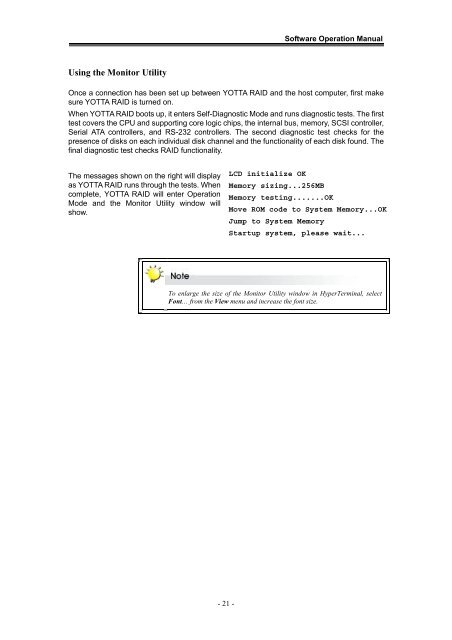
<strong>Software</strong> Operation ManualUsing the Monitor UtilityOnce a connection has been set up between YOTTA <strong>RAID</strong> and the host computer, first makesure YOTTA <strong>RAID</strong> is turned on.When YOTTA <strong>RAID</strong> boots up, it enters Self-Diagnostic Mode and runs diagnostic tests. The firsttest covers the CPU and supporting core logic chips, the internal bus, memory, SCSI controller,Serial ATA controllers, and RS-232 controllers. The second diagnostic test checks for thepresence of disks on each individual disk channel and the functionality of each disk found. Thefinal diagnostic test checks <strong>RAID</strong> functionality.The messages shown on the right will displayas YOTTA <strong>RAID</strong> runs through the tests. Whencomplete, YOTTA <strong>RAID</strong> will enter OperationMode and the Monitor Utility window willshow.LCD initialize OKMemory sizing...256MBMemory testing.......OKMove ROM code to System Memory...OKJump to System MemoryStartup system, please wait...To enlarge the size of the Monitor Utility window in HyperTerminal, selectFont… from the View menu and increase the font size.- 21 -