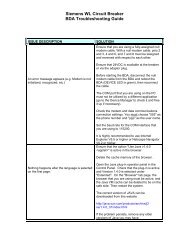
WL Circuit Breakers - Siemens
WL Circuit Breakers - Siemens
WL Circuit Breakers - Siemens

You also want an ePaper? Increase the reach of your titles
YUMPU automatically turns print PDFs into web optimized ePapers that Google loves.
Connecting the BDA<br />
<strong>WL</strong> <strong>Circuit</strong> Breaker<br />
To operate the BDA, it must be<br />
connected to the target system (e.g.<br />
a PC) on one side and a circuit breaker<br />
on the other. Different scenarios are<br />
possible depending on the application.<br />
For <strong>WL</strong> <strong>Circuit</strong> <strong>Breakers</strong>, two basic methods<br />
are available for connecting the BDA,<br />
temporary or permanent installation.<br />
Temporary<br />
If the BDA is to be used as a local<br />
configuration tool and several circuit<br />
breakers are to be set in succession, the<br />
local front interface of the trip unit can<br />
be used. The cable required is supplied<br />
with the BDA. An additional 24V DC power<br />
supply unit is also required if the circuit<br />
breaker is not yet supplied with power<br />
via the CubicleBUS. For this purpose, a<br />
voltage connection is located on the top<br />
of the BDA next to the interface to the<br />
circuit breaker.<br />
In temporary mode, the BDA can be quickly<br />
secured to any metal surface using the<br />
supplied magnetic holder.<br />
Note: Do not use the supplied magnetic holder<br />
where it can fall into energized parts.<br />
Permanent<br />
The trip unit interface through the front<br />
connection is not suitable if a BDA or BDA<br />
Plus is to be permanently connected to a<br />
<strong>WL</strong> <strong>Circuit</strong> Breaker. The connection on<br />
the last CubicleBUS module, such as the<br />
COM15/COM16 module, or one of the<br />
other modules is more suitable. In this<br />
case, a cable is supplied with the BDA<br />
that can be connected directly to the RJ45<br />
plug-in contact of the CubicleBUS module.<br />
Figure<br />
5-2<br />
Top<br />
Bottom<br />
24 V DC power supply<br />
Typically, a BDA Plus is used for permanent<br />
installation. The DIN rail installation kit<br />
supplied is used to secure the device.<br />
The principle regarding the power supply is<br />
the same as for temporary operation: if the<br />
CubicleBUS is supplied with power the BDA<br />
will also operate without an extra power<br />
supply unit. Otherwise, the BDA must be<br />
connected to a 24V DC power supply unit.<br />
Connection to the circuit breaker<br />
RS232 plug for PPP connection Ethernet interface RESET button<br />
The physical BDA interfaces. The connection to the circuit breaker and optional power supply are<br />
on the top, while the RS232 interface (or the Ethernet interface in the case of BDA Plus) and the<br />
RESET button are on the bottom.<br />
5/5 <strong>WL</strong> PROFIBUS/MODBUS Communication and Electronic Accessories