NanoLC 1D Plus and 2D System Operator's Manual - Eksigent
NanoLC 1D Plus and 2D System Operator's Manual - Eksigent
NanoLC 1D Plus and 2D System Operator's Manual - Eksigent
- No tags were found...

You also want an ePaper? Increase the reach of your titles
YUMPU automatically turns print PDFs into web optimized ePapers that Google loves.
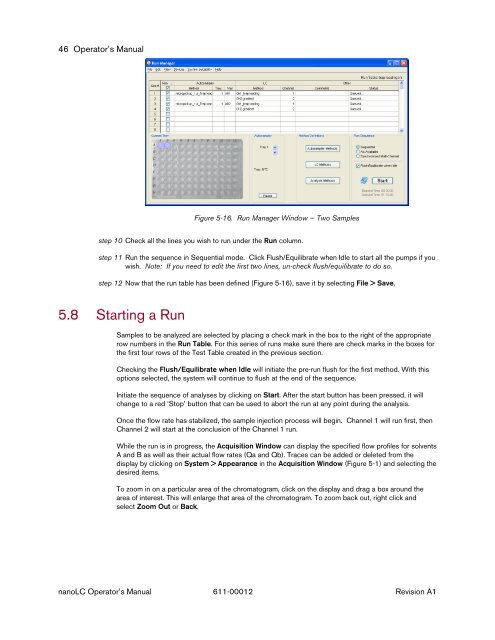
46 Operator’s <strong>Manual</strong>Figure 5-16. Run Manager Window — Two Samplesstep 10 Check all the lines you wish to run under the Run column.step 11 Run the sequence in Sequential mode. Click Flush/Equilibrate when Idle to start all the pumps if youwish. Note: If you need to edit the first two lines, un-check flush/equilibrate to do so.step 12 Now that the run table has been defined (Figure 5-16), save it by selecting File > Save.5.8 Starting a RunSamples to be analyzed are selected by placing a check mark in the box to the right of the appropriaterow numbers in the Run Table. For this series of runs make sure there are check marks in the boxes forthe first four rows of the Test Table created in the previous section.Checking the Flush/Equilibrate when Idle will initiate the pre-run flush for the first method. With thisoptions selected, the system will continue to flush at the end of the sequence.Initiate the sequence of analyses by clicking on Start. After the start button has been pressed, it willchange to a red ‘Stop’ button that can be used to abort the run at any point during the analysis.Once the flow rate has stabilized, the sample injection process will begin. Channel 1 will run first, thenChannel 2 will start at the conclusion of the Channel 1 run.While the run is in progress, the Acquisition Window can display the specified flow profiles for solventsA <strong>and</strong> B as well as their actual flow rates (Qa <strong>and</strong> Qb). Traces can be added or deleted from thedisplay by clicking on <strong>System</strong> > Appearance in the Acquisition Window (Figure 5-1) <strong>and</strong> selecting thedesired items.To zoom in on a particular area of the chromatogram, click on the display <strong>and</strong> drag a box around thearea of interest. This will enlarge that area of the chromatogram. To zoom back out, right click <strong>and</strong>select Zoom Out or Back.nanoLC Operator’s <strong>Manual</strong> 611-00012 Revision A1