36e Operator's Manual 2013.pdf - Marlow-Hunter, LLC
36e Operator's Manual 2013.pdf - Marlow-Hunter, LLC
36e Operator's Manual 2013.pdf - Marlow-Hunter, LLC
- No tags were found...

You also want an ePaper? Increase the reach of your titles
YUMPU automatically turns print PDFs into web optimized ePapers that Google loves.
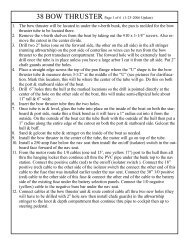
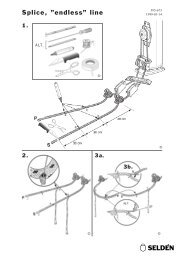
<strong>Hunter</strong> e36 • Sails and Riggingat this time. Tighten or loosen the reverse diagonals toachieve this.2. Step the mast with all shrouds attached but with theturnbuckles completely loosened (if the mast was notalready stepped).3. Attach the jib halyard to a cleat on the bow to supportthe mast in a raked position (the masthead should beabout 2’-0” [~6cm] behind the step). Attach the verticalsand tighten them until you can just see the hole for thecotter pin in the turnbuckle. Tighten the jib halyard untilyou can attach the forestay. At this point the mastheadshould be raked so that a weight hung on the main halyardhangs about 1’ behind the mast step.4. Use the main halyard to check that the mast is centeredfrom side to side. Pull it tight and mark the halyardnext to the verticals chainplate. Now do the sameto the other side to see if the marks line up. If not,tighten and/or loosen the verticals until the marks lineup. Once the masthead is centered, begin tighteningthe verticals until the turnbuckles are approximately halfclosed. While tightening the verticals you may noticethe bend in the mast increasing. Now you can tightenthe lowers, which will tend to straighten the lower partof the mast. Be sure to tighten port and starboard sidesevenly.5. Now you should tighten the headstay until it isapproximately half closed as well. This should inducethe appropriate amount of headstay tension. Never useanything more than a pair of wrenches to tighten yourrigging. If you use an extended piece of pipe on thehandle of a wrench you can over tighten the rigging anddo damage to the mast or rigging.6. It is necessary to go up the mast in a bosun’s chairto tighten the number 2 diagonal shroud (D2 or intermediateshroud). Always use caution when “going aloft”.You should always use a mountain climbing harnessor Bosun’s Chair intended for this use. Always tie intothe harness with the halyard using a bowline and thensecure the shackle as a back up as the knot is morereliable than a mechanical fastener. The person hoistingyou aloft should keep the halyard stopper closed toprevent falls. Good communication between the twoof you is also important. Tighten the D2 until it has justbecome tight and then add two complete turns. Whileat the first spreader, look up the back of the mast to seeif it is straight (rather than bent from side to side). If it isnot straight then adjust the appropriate D2 to straightenit.7. Have the person on deck carefully lower you. Theyshould keep the halyard wrapped at least twice aroundthe winch and should always have one hand able tostop the halyard from running free. Once on deck lookup the back of the mast and see if it is straight (ratherthan bent from side to side). If not then adjust the lowers(D1) until it is.8. If you have the standard rig you need to attach thestruts at this time. Attach the lower end of the strut tothe smaller hole in the chainplate. Adjust the length byturning the ball joint bearing in the upper end of the strutuntil the holes in the pin can be attached. It is normalto have some play between the strut and the chainplateand strut bracket9. The final test is to go sailing in 10-15 knots of wind. Ifwhen sailing upwind, the shrouds on the leeward sideare slack then tighten them to remove about half theslack keeping note of the number of turns. Then tackand do the same to the other side. Do this until youare happy with the tension and the leeward side doesnot get loose when the boat is heeled. Now sight upthe mast to be sure it is still relatively straight from sideto side. If it is not then adjust to appropriate riggingto correct it. For example: if the mast is straight untilthe upper spreader and then hooks to the windwardside then you will have to revisit steps 6 and 7 above.Remember to always tighten the leeward shroud, tackand tighten the new leeward shroud the same amount.This prevents damage to the turnbuckles and is alsomuch easier to do. Keep in mind it is also possible tohave something too tight such as a diagonal shroud.10. . At this point you should have adequate headstaytension. The sails are built for an average of14” [350mm] of headstay sag, possibly more or lessdepending upon light or heavy air. The bend in the standardmast should be about 4” [100mm] and 1” [25mm]in the furling mast and it should be nearly straight fromside to side when sailing upwind. If any of these are nottrue then revisit the appropriate step above to correct it.If the sag in the headstay is too much then adding tensionto the verticals will fix it.11. . Once the rig is tuned you should make sure to addthe cotter pins to all the rigging bending back the endsand taping them to prevent snagged lines, sails and fingers.Note:Remember that rigging, like everything else, canage. As it gets older it may need to be replaced. Thefrequency for which this becomes necessary dependson the climate and conditions in which the boat is sailed.For example: if you sail in the Caribbean it should bereplaced every 2-3 years compared to every 10 for thegreat lakes. You should consult a professional rigger foradvice.12.5