EMCO WinNC SINUMERIK 810/820 T Software Description ...
EMCO WinNC SINUMERIK 810/820 T Software Description ...
EMCO WinNC SINUMERIK 810/820 T Software Description ...
You also want an ePaper? Increase the reach of your titles
YUMPU automatically turns print PDFs into web optimized ePapers that Google loves.
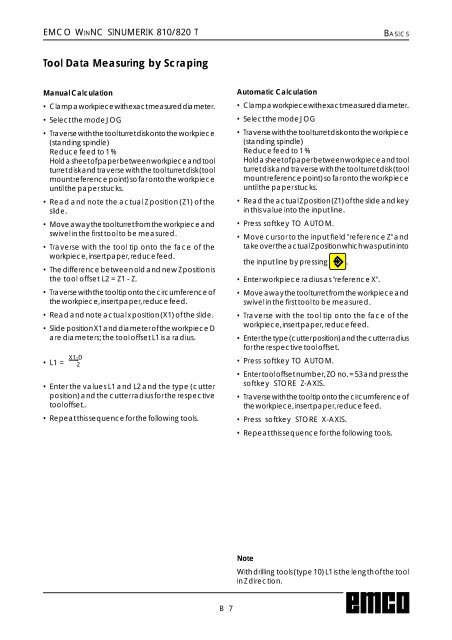
<strong>EMCO</strong> WINNC <strong>SINUMERIK</strong> <strong>810</strong>/<strong>820</strong> TBASICSTool Data Measuring by ScrapingManual Calculation• Clamp a workpiece with exact measured diameter.• Select the mode JOG• Traverse with the tool turret disk onto the workpiece(standing spindle)Reduce feed to 1 %Hold a sheet of paper between workpiece and toolturret disk and traverse with the tool turret disk (toolmount reference point) so far onto the workpieceuntil the paper stucks.• Read and note the actual Z position (Z1) of theslide.• Move away the tool turret from the workpiece andswivel in the first tool to be measured.• Traverse with the tool tip onto the face of theworkpiece, insert paper, reduce feed.• The difference between old and new Z position isthe tool offset L2 = Z1 - Z.• Traverse with the tool tip onto the circumference ofthe workpiece, insert paper, reduce feed.• Read and note actual x position (X1) of the slide.• Slide position X1 and diameter of the workpiece Dare diameters; the tool offset L1 is a radius.• L1 = X1-D 2• Enter the values L1 and L2 and the type (cutterposition) and the cutter radius for the respectivetool offset..• Repeat this sequence for the following tools.Automatic Calculation• Clamp a workpiece with exact measured diameter.• Select the mode JOG• Traverse with the tool turret disk onto the workpiece(standing spindle)Reduce feed to 1 %Hold a sheet of paper between workpiece and toolturret disk and traverse with the tool turret disk (toolmount reference point) so far onto the workpieceuntil the paper stucks.• Read the actual Z position (Z1) of the slide and keyin this value into the input line.• Press softkey TO AUTOM.• Move cursor to the input field "reference Z" andtake over the actual Z position which was put in intothe input line by pressing .• Enter workpiece radius as "reference X".• Move away the tool turret from the workpiece andswivel in the first tool to be measured.• Traverse with the tool tip onto the face of theworkpiece, insert paper, reduce feed.• Enter the type (cutter position) and the cutter radiusfor the respective tool offset.• Press softkey TO AUTOM.• Enter tool offset number, ZO no. = 53 and press thesoftkey STORE Z-AXIS.• Traverse with the tool tip onto the circumference ofthe workpiece, insert paper, reduce feed.• Press softkey STORE X-AXIS.• Repeat this sequence for the following tools.NoteWith drilling tools (type 10) L1 is the length of the toolin Z direction.B 7


