

i-m-a-g-i-n-efx-august

Create successful ePaper yourself
Turn your PDF publications into a flip-book with our unique Google optimized e-Paper software.
Your questions answered...<br />
Question<br />
How do I go<br />
about painting<br />
huge waves?<br />
Pedro Pereira Barros, Brazil<br />
As a final touch I add some<br />
white brush strokes here and<br />
there, where the waves<br />
break on the rocks.<br />
Answer<br />
Sara replies<br />
As with most of my<br />
painting projects, I start<br />
by gathering some marine<br />
photo references, to ensure<br />
that I’ve got a good grasp of the<br />
subject matter. I also find it useful to<br />
look at the work of great seascape<br />
painters from history, whatever<br />
artistic movement they belonged to.<br />
Marine waves are usually caused by<br />
wind that generate ripples across the<br />
sea surface. As the ripple effect<br />
increases, the sea surface starts to<br />
form a crest that then falls on itself in<br />
a shape that’s more or less comparable<br />
to an irregular pipe.<br />
I have to consider this tubular shape<br />
when illustrating waves, so I paint the<br />
light and shadow as I would for a<br />
cylinder, with a soft shadow in the<br />
lower part and in the hollow body.<br />
I also bear in mind the transparency<br />
of the water. In the upper part of the<br />
wave, near the crest, the water will be<br />
thinner as it comes to a point – and it<br />
catches the light, too. This means the<br />
blue-green colour needs to be more<br />
vibrant and saturated in this area.<br />
In this WIP I’ve almost<br />
finished the waves.<br />
I just have to smooth<br />
some brush strokes in<br />
the white areas where<br />
they’re breaking.<br />
Artist’s secret<br />
Base a custom spray<br />
brush on a paint splatter<br />
I create a new brush by splashing some<br />
traditional watercolour black paint on<br />
a sheet, and taking a photograph of<br />
that. This will help to make the spray<br />
generated by the waves look realistic.<br />
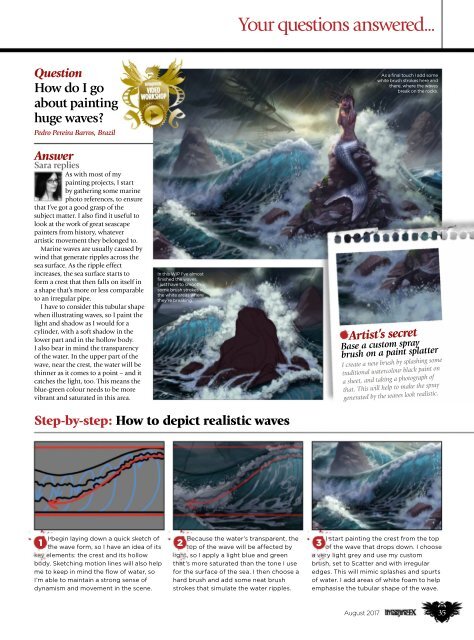
Step-by-step: How to depict realistic waves<br />
I begin laying down a quick sketch of<br />
1<br />
the wave form, so I have an idea of its<br />
key elements: the crest and its hollow<br />
body. Sketching motion lines will also help<br />
me to keep in mind the flow of water, so<br />
I’m able to maintain a strong sense of<br />
dynamism and movement in the scene.<br />
Because the water’s transparent, the<br />
2<br />
top of the wave will be affected by<br />
light, so I apply a light blue and green<br />
that’s more saturated than the tone I use<br />
for the surface of the sea. I then choose a<br />
hard brush and add some neat brush<br />
strokes that simulate the water ripples.<br />
I start painting the crest from the top<br />
3<br />
of the wave that drops down. I choose<br />
a very light grey and use my custom<br />
brush, set to Scatter and with irregular<br />
edges. This will mimic splashes and spurts<br />
of water. I add areas of white foam to help<br />
emphasise the tubular shape of the wave.<br />
August 2017<br />
35


