

i-m-a-g-i-n-efx-august

Create successful ePaper yourself
Turn your PDF publications into a flip-book with our unique Google optimized e-Paper software.
Core skills Rebelle<br />
The inner ring shows the chosen<br />
colour, the lower half of the outer<br />
ring the starting colour, and the<br />
upper half the results of the mix.<br />
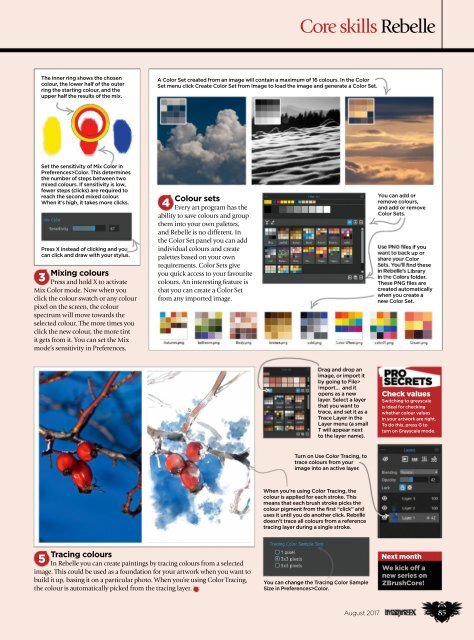
A Color Set created from an image will contain a maximum of 16 colours. In the Color<br />
Set menu click Create Color Set from Image to load the image and generate a Color Set.<br />
Set the sensitivity of Mix Color in<br />
Preferences>Color. This determines<br />
the number of steps between two<br />
mixed colours. If sensitivity is low,<br />
fewer steps (clicks) are required to<br />
reach the second mixed colour.<br />
When it’s high, it takes more clicks.<br />
Press X instead of clicking and you<br />
can click and draw with your stylus.<br />
Mixing colours<br />
3<br />
Press and hold X to activate<br />
Mix Color mode. Now when you<br />
click the colour swatch or any colour<br />
pixel on the screen, the colour<br />
spectrum will move towards the<br />
selected colour. The more times you<br />
click the new colour, the more tint<br />
it gets from it. You can set the Mix<br />
mode’s sensitivity in Preferences.<br />
Colour sets<br />
4<br />
Every art program has the<br />
ability to save colours and group<br />
them into your own palettes,<br />
and Rebelle is no different. In<br />
the Color Set panel you can add<br />
individual colours and create<br />
palettes based on your own<br />
requirements. Color Sets give<br />
you quick access to your favourite<br />
colours. An interesting feature is<br />
that you can create a Color Set<br />
from any imported image.<br />
You can add or<br />
remove colours,<br />
and add or remove<br />
Color Sets.<br />
Use PNG files if you<br />
want to back up or<br />
share your Color<br />
Sets. You’ll find these<br />
in Rebelle’s Library<br />
in the Colors folder.<br />
These PNG files are<br />
created automatically<br />
when you create a<br />
new Color Set.<br />
Drag and drop an<br />
image, or import it<br />
by going to File><br />
Import… and it<br />
opens as a new<br />
layer. Select a layer<br />
that you want to<br />
trace, and set it as a<br />
Trace Layer in the<br />
Layer menu (a small<br />
T will appear next<br />
to the layer name).<br />
check values<br />
Switching to greyscale<br />
is ideal for checking<br />
whether colour values<br />
in your artwork are right.<br />
To do this, press G to<br />
turn on Grayscale mode.<br />
Turn on Use Color Tracing, to<br />
trace colours from your<br />
image into an active layer.<br />
When you’re using Color Tracing, the<br />
colour is applied for each stroke. This<br />
means that each brush stroke picks the<br />
colour pigment from the first “click” and<br />
uses it until you do another click. Rebelle<br />
doesn’t trace all colours from a reference<br />
tracing layer during a single stroke.<br />
Tracing colours<br />
5<br />
In Rebelle you can create paintings by tracing colours from a selected<br />
image. This could be used as a foundation for your artwork when you want to<br />
build it up, basing it on a particular photo. When you’re using Color Tracing,<br />
the colour is automatically picked from the tracing layer.<br />
You can change the Tracing Color Sample<br />
Size in Preferences>Color.<br />
next month<br />
X We kick off a<br />
new series on<br />
Zbrushcore!<br />
August 2017<br />
85


