Planetary Geology pdf - NASA
Planetary Geology pdf - NASA
Planetary Geology pdf - NASA

You also want an ePaper? Increase the reach of your titles
YUMPU automatically turns print PDFs into web optimized ePapers that Google loves.
Exercise<br />
Five<br />
Purpose<br />
To illustrate the similarities and differences in<br />
craters formed by three different cratering processes:<br />
impact, volcanic explosion, and volcanic eruption.<br />
Materials<br />
For each student group: tray (kitty litter box),<br />
very fine sand, safety goggles (for all students), marbles,<br />
slingshot, video camera, VCR and TV, black<br />
posterboard (2Õ x 3Õ), 3-foot-long narrow diameter<br />
flexible plastic tubing, bicycle pump, thin skinned<br />
balloons, hose clamp, sheet of heavy clear plastic (to<br />
protect the camera)<br />
Part A: Impact Cratering Process<br />
Exercise Five: Comparative Cratering Processes<br />
Name<br />
Comparative<br />
Cratering Processes<br />
Procedure and Questions<br />
EG-1998-03-109-HQ Activities in <strong>Planetary</strong> <strong>Geology</strong> for the Physical and Earth Sciences<br />
69<br />
Introduction<br />
In examining a planetary surface, it is important<br />
to identify the processes that shaped the surface.<br />
Not all craters form by impact processes; some<br />
result from volcanic explosions and volcanic eruptions.<br />
This exercise examines the crater forms which<br />
result from these three processes: impact, explosion,<br />
and eruption.<br />
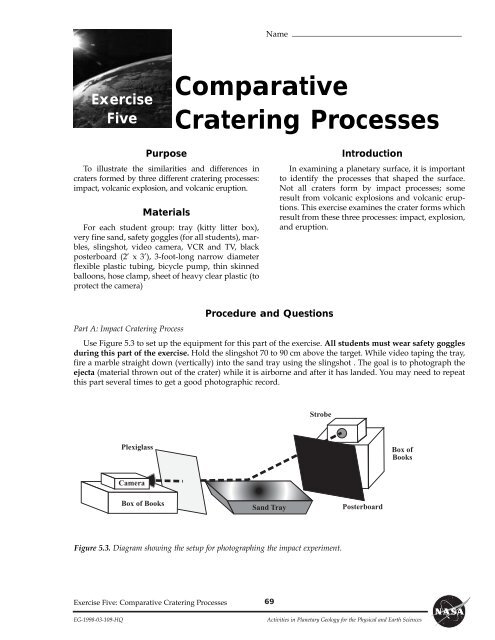
Use Figure 5.3 to set up the equipment for this part of the exercise. All students must wear safety goggles<br />
during this part of the exercise. Hold the slingshot 70 to 90 cm above the target. While video taping the tray,<br />
fire a marble straight down (vertically) into the sand tray using the slingshot . The goal is to photograph the<br />
ejecta (material thrown out of the crater) while it is airborne and after it has landed. You may need to repeat<br />
this part several times to get a good photographic record.<br />
Plexiglass<br />
Camera<br />
Box of Books<br />
Strobe<br />
Sand Tray Posterboard<br />
Figure 5.3. Diagram showing the setup for photographing the impact experiment.<br />
Box of<br />
Books