General Design Principles for DuPont Engineering Polymers - Module
General Design Principles for DuPont Engineering Polymers - Module
General Design Principles for DuPont Engineering Polymers - Module

Create successful ePaper yourself
Turn your PDF publications into a flip-book with our unique Google optimized e-Paper software.
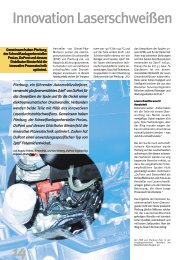
d) At the end of the welding period, the cross-slide<br />
moves back again to release the part a1, which<br />
immediately begins to rotate.<br />
e) The motor is switched off (or the spindle<br />
disengaged).<br />
f) Pressure must be kept up by means of the springloaded<br />
point <strong>for</strong> a short time, the duration of<br />
which will depend on the solidification properties<br />
of the particular plastic, be<strong>for</strong>e the parts can be<br />
taken out.<br />
Figure 11.01 Pivot welding on a lathe<br />
b a a1 c<br />
e d<br />
This sequence is often made simpler by not removing<br />
the stop e at the end of the welding cycle, but by<br />
merely disengaging or switching off. Since, however,<br />
the moving masses in the machine are generally fairly<br />
considerable, they will not decelerate fast enough, and<br />
the weld surfaces will be subjected to shear stresses<br />
during solidification, often resulting in either lowstrength<br />
or leaking joints.<br />
In general, the narrower the melting temperature range<br />
of the plastic, the more quickly does the relative<br />
velocity of the two parts have to be reduced to zero; in<br />
other words, either the fixed partner must be rapidly<br />
accelerated, or else the rotating partner must be<br />
quickly stopped.<br />
Using a lathe <strong>for</strong> spinwelding is not really a production<br />
method, but it can be used sometimes <strong>for</strong> prototypes<br />
or pre-production runs. It is, however, a very<br />
good way of welding caps and threaded nipples onto<br />
the end of long tubes. For this purpose the tailstock is<br />
replaced by a spring-loaded jig which grips the tube<br />
and at the same time exerts pressure on it; although<br />
the lathe needs to be fitted with a clutch and a quickacting<br />
brake, because a long tube cannot be released<br />
and allowed to spin.<br />
Pivot Welding on Drilling Machines<br />
Components up to 60 mm in diameter can very easily<br />
be welded on table-type drilling machines with<br />
special-purpose tools. This is the most suitable method<br />
<strong>for</strong> pre-production runs, hand-machined prototypes, or<br />
78<br />
repair jobs. The process can be made fully automatic,<br />
but this is not sufficiently economical to be worthwhile.<br />
Some practice is needed to obtain uni<strong>for</strong>m<br />
welds, because the welding times and pressures are<br />
influenced by the human factor.<br />
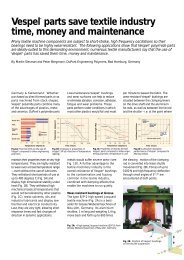
The tool shown in Figure 11.02 has an interchangeable<br />
tooth crown a whose diameter must match that of<br />
the plastic part. With a set of three or four such<br />
crowns it is possible to weld parts ranging from about<br />
12 to 60 mm in diameter.<br />
Figure 11.02 Pivot welding on drilling machines<br />
b<br />
The pressure of the point can be adjusted, by the<br />
knurled nut b, to suit the joint surface. The tightness<br />
and strength of the weld will depend on the pressure,<br />
and the correct pressure must be determined by<br />
experiment.<br />
To make a weld, the drill spindle is lowered slowly<br />
until the tooth crown is still a few millimeters above<br />
the plastic part (see Figure 11.03a). Contact should<br />
then be made sharply, to prevent the teeth from<br />
shaving off the material, and so that the part starts<br />
rotating immediately. In the <strong>for</strong>m shown in Figure<br />
11.03b, the pressure should be kept as constant as<br />
possible until a uni<strong>for</strong>m flash appears. Then the tooth<br />
crown is pulled up as sharply as possible (see Figure<br />
11.03c) until the teeth disengage, but with the point<br />
still pressed against the part until the plastic has<br />
hardened sufficiently.<br />
a