

Audio Interface / Mobile Preamp - zZounds.com
Audio Interface / Mobile Preamp - zZounds.com
Audio Interface / Mobile Preamp - zZounds.com

You also want an ePaper? Increase the reach of your titles
YUMPU automatically turns print PDFs into web optimized ePapers that Google loves.
Tutorials<br />
TIP . . .<br />
If you have two or more<br />
hard disks, it’s better to<br />
store audio files on a disk<br />
that isn’t running your OS.<br />
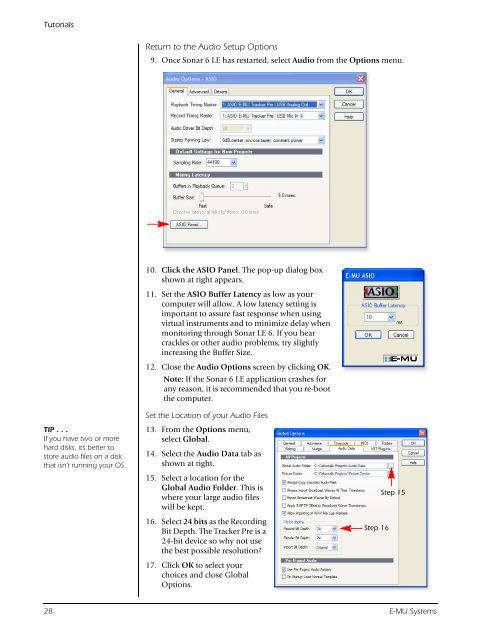
Return to the <strong>Audio</strong> Setup Options<br />
9. Once Sonar 6 LE has restarted, select <strong>Audio</strong> from the Options menu.<br />
10. Click the ASIO Panel. The pop-up dialog box<br />
shown at right appears.<br />
11. Set the ASIO Buffer Latency as low as your<br />
<strong>com</strong>puter will allow. A low latency setting is<br />
important to assure fast response when using<br />
virtual instruments and to minimize delay when<br />
monitoring through Sonar LE 6. If you hear<br />
crackles or other audio problems, try slightly<br />
increasing the Buffer Size.<br />
12. Close the <strong>Audio</strong> Options screen by clicking OK.<br />
Note: If the Sonar 6 LE application crashes for<br />
any reason, it is re<strong>com</strong>mended that you re-boot<br />
the <strong>com</strong>puter.<br />
Set the Location of your <strong>Audio</strong> Files<br />
13. From the Options menu,<br />
select Global.<br />
14. Select the <strong>Audio</strong> Data tab as<br />
shown at right.<br />
15. Select a location for the<br />
Global <strong>Audio</strong> Folder. This is<br />
where your large audio files<br />
will be kept.<br />
16. Select 24 bits as the Recording<br />
Bit Depth. The Tracker Pre is a<br />
24-bit device so why not use<br />
the best possible resolution?<br />
17. Click OK to select your<br />
choices and close Global<br />
Options.<br />
Step 16<br />
Step 15<br />
28 E-MU Systems


