

Audio Interface / Mobile Preamp - zZounds.com
Audio Interface / Mobile Preamp - zZounds.com
Audio Interface / Mobile Preamp - zZounds.com

You also want an ePaper? Increase the reach of your titles
YUMPU automatically turns print PDFs into web optimized ePapers that Google loves.
Tutorials<br />
7. Open the Preferences via the Options menu (PC) or Live menu (OS X) and<br />
choose the Record/Warp/Launch tab. Set the Count-in to any value other<br />
than “None.” Live doesn’t start recording until the count-in period has elapsed<br />
and gives you time to get ready after pressing “Record.” Close the Window.<br />
8. Delete all the Clips in your MIDI track. (Select a clip and hit backspace to<br />
delete it.)<br />
• If your MIDI interface isn’t already connected, you’ll have to quit Ableton<br />
Live Lite 6, connect the MIDI interface, then restart Ableton Live Lite 6 before<br />
continuing.<br />
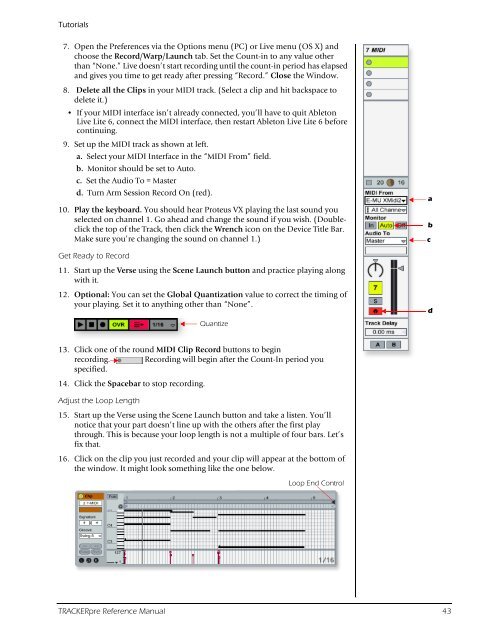
9. Set up the MIDI track as shown at left.<br />
a. Select your MIDI <strong>Interface</strong> in the “MIDI From” field.<br />
b. Monitor should be set to Auto.<br />
c. Set the <strong>Audio</strong> To = Master<br />
d. Turn Arm Session Record On (red).<br />
10. Play the keyboard. You should hear Proteus VX playing the last sound you<br />
selected on channel 1. Go ahead and change the sound if you wish. (Doubleclick<br />
the top of the Track, then click the Wrench icon on the Device Title Bar.<br />
Make sure you’re changing the sound on channel 1.)<br />
Get Ready to Record<br />
11. Start up the Verse using the Scene Launch button and practice playing along<br />
with it.<br />
12. Optional: You can set the Global Quantization value to correct the timing of<br />
your playing. Set it to anything other than “None”.<br />
Quantize<br />
13. Click one of the round MIDI Clip Record buttons to begin<br />
recording. Recording will begin after the Count-In period you<br />
specified.<br />
14. Click the Spacebar to stop recording.<br />
Adjust the Loop Length<br />
15. Start up the Verse using the Scene Launch button and take a listen. You’ll<br />
notice that your part doesn’t line up with the others after the first play<br />
through. This is because your loop length is not a multiple of four bars. Let’s<br />
fix that.<br />
16. Click on the clip you just recorded and your clip will appear at the bottom of<br />
the window. It might look something like the one below.<br />
Loop End Control<br />
TRACKERpre Reference Manual 43<br />
a<br />
b<br />
c<br />
d


