- Page 2:
Switching Basics and Intermediate R
- Page 6:
Trademark Acknowledgments All terms
- Page 10:
Dedications To my wife Becky, and m
- Page 14:
Contents at a Glance Chapter 1: Int
- Page 18:
Task 16: Configure the Fast Etherne
- Page 22:
DR/BDR Election Exercise 114 Journa
- Page 26:
Comprehensive Lab 2-7: OSPF Configu
- Page 30:
LAN Switches 237 Vocabulary Exercis
- Page 34:
Task 3: Verify Connectivity 283 Tas
- Page 38:
Task 5: Look at the Switches’ Spa
- Page 42:
Task 2: Configure the Hosts Attache
- Page 46:
Challenge Lab 9-6: Advanced Switchi
- Page 50:
Introduction Switching Basics and I
- Page 54:
Work through the Study Guide and La
- Page 58:
CHAPTER 1 Introduction to Classless
- Page 62:
Vocabulary Exercise: Matching Chapt
- Page 66:
Class C Subnetting Scenario Use the
- Page 70:
Prefix Length Use Exercises Use the
- Page 74:
2. 192.168.35.142/29 IP address 110
- Page 78:
4. Use subnet 4 from the last quest
- Page 82:
Figure 1-1 Addressing Design Exerci
- Page 86:
List the address space that is stil
- Page 90:
Figure 1-7 Addressing Design Scenar
- Page 94:
VLSM Addressing Design Scenario 3 C
- Page 98:
Device Interface IP Address Subnet
- Page 102:
For the solution shown in Figure 1-
- Page 106:
First IP 192.168.1.0 11000000.10101
- Page 110:
Figure 1-17 Summary Route Exercise
- Page 114:
Figure 1-19 Summary Route Exercise
- Page 118:
Concept Questions List at least thr
- Page 122:
Figure 1-22 Mom and Pop’s Stop &
- Page 126:
Students should be well versed in u
- Page 130:
Lab Exercises Command Reference In
- Page 134:
Table 1-2 IP Address Range for 192.
- Page 138:
Table 1-8 IP Address Range for 192.
- Page 142:
To finish our visual, we label all
- Page 146:
Task 1: Basic Router Configuration
- Page 150:
Figure 1-29 HyperTerminal Interface
- Page 154:
Task 8: Configure Hostname and Pass
- Page 158:
Task 17: Configure the IP Host Stat
- Page 162:
Curriculum Lab 1-3: Converting RIPv
- Page 166:
BHM(config)#interface serial 0 BHM(
- Page 170:
Curriculum Lab 1-4: Verifying RIPv2
- Page 174:
Task 7: Verify that the Internetwor
- Page 178:
Have they changed now that RIPv2 is
- Page 182:
i - IS-IS, L1 - IS-IS level-1, L2 -
- Page 186:
Redistributing: rip Default version
- Page 190:
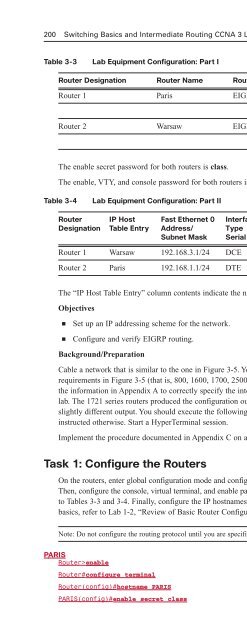
The enable, VTY, and console passwo
- Page 194:
policy Policy routing rip RIP proto
- Page 198:
Will the routing table be updated t
- Page 202:
Objectives ■ Review basic router
- Page 206:
Task 3: Verify Connectivity Step 1.
- Page 210:
RTA have a default route. ISP canno
- Page 214:
area E1 - OSPF external type 1, E2
- Page 218:
! logging synchronous login end RTA
- Page 222:
! no shutdown interface Serial0/0 !
- Page 226:
! line con 0 exec-timeout 30 0 pass
- Page 230:
Step 2. Each simulated LAN requires
- Page 234:
C 10.1.8.128 is directly connected,
- Page 238:
RTA(config-if)#ip summary-address r
- Page 242:
Now configure RTB to summarize the
- Page 246:
password cisco logging synchronous
- Page 250:
ip host ISP 209.165.201.1 ip host R
- Page 254:
CHAPTER 2 Single-Area OSPF The Stud
- Page 258:
Vocabulary Exercise: Completion Com
- Page 262:
The term link simply refers to the
- Page 266:
Figure 2-1d Loop-free Topology for
- Page 270:
Learn the OSPF Commands Exercise 1.
- Page 274:
11. The DR/BDR election is based on
- Page 278:
The Cisco IOS uses the 10 8 /bps fo
- Page 282:
Figure 2-6 Propagating a Default Ro
- Page 286:
Network DR/BDR Election? Which Rout
- Page 290:
Command Description Router#show ip
- Page 294:
BERLIN Router>enable Router#configu
- Page 298:
Step 3. Ping from one of the connec
- Page 302:
Table 2-3 Lab Equipment Configurati
- Page 306:
BRASILIA(config-line)#login BRASILI
- Page 310:
Are entries in the routing table? N
- Page 314:
Task 14: Verify OSPF Interface Conf
- Page 318:
Objectives ■ Set up an IP address
- Page 322:
Step 2. Each workstation should be
- Page 326:
Step 2. Examine the running configu
- Page 330:
Step 5. Verify or explain the previ
- Page 334:
Dublin(config-line)#password cisco
- Page 338:
Washington(config)#router ospf 1 Wa
- Page 342:
Curriculum Lab 2-5: Configuring OSP
- Page 346:
Sydney(config)#ip host Rome 192.168
- Page 350:
Task 7: Observe OSPF Traffic Step 1
- Page 354:
After you complete the previous ste
- Page 358:
Task 2: Configure the Area 0 OSPF R
- Page 362:
Task 5: Verify Connectivity Ping fr
- Page 366:
Task 11: Verify Connectivity from t
- Page 370:
Equipment The topology shown in Fig
- Page 374:
Success rate is 100 percent (5/5),
- Page 378:
Number of interfaces in this area i
- Page 382:
no ip domain-lookup ip host RTB 192
- Page 386:
! interface Serial0/1 ! description
- Page 390:
exec-timeout 0 0 password cisco log
- Page 394:
Table 2-16 LAN Addressing Specifica
- Page 398:
login line vty 0 4 ! exec-timeout 0
- Page 402:
hostname REMOTE ! enable secret cla
- Page 406: CHAPTER 3 EIGRP and Troubleshooting
- Page 410: Vocabulary Exercise: Completion Dir
- Page 414: RTA(config)#router eigrp 100 RTA(co
- Page 418: C 172.16.0.0/18 is directly connect
- Page 422: In the shaded entry for 192.168.1.1
- Page 426: Troubleshooting EIGRP Normal EIGRP
- Page 430: P 172.16.0.0/18, 1 successors, FD i
- Page 434: It means that this router is runnin
- Page 438: Internet Research Exercise The CCNA
- Page 442: Protocol Value Network Layer Protoc
- Page 446: Curriculum Lab 3-1: Configuring EIG
- Page 450: PARIS(config-if)#exit PARIS(config)
- Page 454: Task 6: Configure EIGRP Routing on
- Page 460: 202 Switching Basics and Intermedia
- Page 464: 204 Switching Basics and Intermedia
- Page 468: 206 Switching Basics and Intermedia
- Page 472: 208 Switching Basics and Intermedia
- Page 476: 210 Switching Basics and Intermedia
- Page 480: 212 Switching Basics and Intermedia
- Page 484: 214 Switching Basics and Intermedia
- Page 488: 216 Switching Basics and Intermedia
- Page 492: 218 Switching Basics and Intermedia
- Page 496: 220 Switching Basics and Intermedia
- Page 500: 222 Switching Basics and Intermedia
- Page 504: 224 Switching Basics and Intermedia
- Page 508:
226 Switching Basics and Intermedia
- Page 512:
228 Switching Basics and Intermedia
- Page 516:
230 Switching Basics and Intermedia
- Page 520:
This page intentionally left blank
- Page 524:
234 Switching Basics and Intermedia
- Page 528:
236 Switching Basics and Intermedia
- Page 532:
238 Switching Basics and Intermedia
- Page 536:
240 Switching Basics and Intermedia
- Page 540:
This page intentionally left blank
- Page 544:
244 Switching Basics and Intermedia
- Page 548:
246 Switching Basics and Intermedia
- Page 552:
248 Switching Basics and Intermedia
- Page 556:
250 Switching Basics and Intermedia
- Page 560:
252 Switching Basics and Intermedia
- Page 564:
254 Switching Basics and Intermedia
- Page 568:
256 Switching Basics and Intermedia
- Page 572:
258 Switching Basics and Intermedia
- Page 576:
260 Switching Basics and Intermedia
- Page 580:
262 Switching Basics and Intermedia
- Page 584:
264 Switching Basics and Intermedia
- Page 588:
266 Switching Basics and Intermedia
- Page 592:
268 Switching Basics and Intermedia
- Page 596:
270 Switching Basics and Intermedia
- Page 600:
272 Switching Basics and Intermedia
- Page 604:
274 Switching Basics and Intermedia
- Page 608:
276 Switching Basics and Intermedia
- Page 612:
278 Switching Basics and Intermedia
- Page 616:
280 Switching Basics and Intermedia
- Page 620:
282 Switching Basics and Intermedia
- Page 624:
284 Switching Basics and Intermedia
- Page 628:
286 Switching Basics and Intermedia
- Page 632:
288 Switching Basics and Intermedia
- Page 636:
290 Switching Basics and Intermedia
- Page 640:
292 Switching Basics and Intermedia
- Page 644:
294 Switching Basics and Intermedia
- Page 648:
296 Switching Basics and Intermedia
- Page 652:
298 Switching Basics and Intermedia
- Page 656:
300 Switching Basics and Intermedia
- Page 660:
302 Switching Basics and Intermedia
- Page 664:
304 Switching Basics and Intermedia
- Page 668:
306 Switching Basics and Intermedia
- Page 672:
308 Switching Basics and Intermedia
- Page 676:
310 Switching Basics and Intermedia
- Page 680:
312 Switching Basics and Intermedia
- Page 684:
314 Switching Basics and Intermedia
- Page 688:
316 Switching Basics and Intermedia
- Page 692:
318 Switching Basics and Intermedia
- Page 696:
320 Switching Basics and Intermedia
- Page 700:
322 Switching Basics and Intermedia
- Page 704:
324 Switching Basics and Intermedia
- Page 708:
326 Switching Basics and Intermedia
- Page 712:
328 Switching Basics and Intermedia
- Page 716:
330 Switching Basics and Intermedia
- Page 720:
332 Switching Basics and Intermedia
- Page 724:
334 Switching Basics and Intermedia
- Page 728:
336 Switching Basics and Intermedia
- Page 732:
338 Switching Basics and Intermedia
- Page 736:
This page intentionally left blank
- Page 740:
342 Switching Basics and Intermedia
- Page 744:
344 Switching Basics and Intermedia
- Page 748:
346 Switching Basics and Intermedia
- Page 752:
348 Switching Basics and Intermedia
- Page 756:
350 Switching Basics and Intermedia
- Page 760:
352 Switching Basics and Intermedia
- Page 764:
354 Switching Basics and Intermedia
- Page 768:
356 Switching Basics and Intermedia
- Page 772:
358 Switching Basics and Intermedia
- Page 776:
360 Switching Basics and Intermedia
- Page 780:
362 Switching Basics and Intermedia
- Page 784:
364 Switching Basics and Intermedia
- Page 788:
366 Switching Basics and Intermedia
- Page 792:
368 Switching Basics and Intermedia
- Page 796:
370 Switching Basics and Intermedia
- Page 800:
372 Switching Basics and Intermedia
- Page 804:
374 Switching Basics and Intermedia
- Page 808:
376 Switching Basics and Intermedia
- Page 812:
378 Switching Basics and Intermedia
- Page 816:
380 Switching Basics and Intermedia
- Page 820:
382 Switching Basics and Intermedia
- Page 824:
384 Switching Basics and Intermedia
- Page 828:
386 Switching Basics and Intermedia
- Page 832:
388 Switching Basics and Intermedia
- Page 836:
390 Switching Basics and Intermedia
- Page 840:
392 Switching Basics and Intermedia
- Page 844:
394 Switching Basics and Intermedia
- Page 848:
396 Switching Basics and Intermedia
- Page 852:
398 Switching Basics and Intermedia
- Page 856:
400 Switching Basics and Intermedia
- Page 860:
402 Switching Basics and Intermedia
- Page 864:
404 Switching Basics and Intermedia
- Page 868:
406 Switching Basics and Intermedia
- Page 872:
408 Switching Basics and Intermedia
- Page 876:
410 Switching Basics and Intermedia
- Page 880:
412 Switching Basics and Intermedia
- Page 884:
414 Switching Basics and Intermedia
- Page 888:
416 Switching Basics and Intermedia
- Page 892:
418 Switching Basics and Intermedia
- Page 896:
420 Switching Basics and Intermedia
- Page 900:
422 Switching Basics and Intermedia
- Page 904:
424 Switching Basics and Intermedia
- Page 908:
426 Switching Basics and Intermedia
- Page 912:
428 Switching Basics and Intermedia
- Page 916:
430 Switching Basics and Intermedia
- Page 920:
432 Switching Basics and Intermedia
- Page 924:
434 Switching Basics and Intermedia
- Page 928:
436 Switching Basics and Intermedia
- Page 932:
438 Switching Basics and Intermedia
- Page 936:
440 Switching Basics and Intermedia
- Page 940:
442 Switching Basics and Intermedia
- Page 944:
444 Switching Basics and Intermedia
- Page 948:
446 Switching Basics and Intermedia
- Page 952:
448 Switching Basics and Intermedia
- Page 956:
450 Switching Basics and Intermedia
- Page 960:
452 Switching Basics and Intermedia
- Page 964:
454 Switching Basics and Intermedia
- Page 968:
456 Switching Basics and Intermedia
- Page 972:
458 Switching Basics and Intermedia
- Page 976:
460 Switching Basics and Intermedia
- Page 980:
462 Switching Basics and Intermedia
- Page 984:
464 Switching Basics and Intermedia
- Page 988:
466 Switching Basics and Intermedia
- Page 992:
468 Switching Basics and Intermedia
- Page 996:
This page intentionally left blank
- Page 1000:
472 Switching Basics and Intermedia
- Page 1004:
This page intentionally left blank
- Page 1008:
476 Switching Basics and Intermedia
- Page 1012:
478 Switching Basics and Intermedia
- Page 1016:
480 Switching Basics and Intermedia
- Page 1020:
482 Switching Basics and Intermedia
- Page 1024:
484 Switching Basics and Intermedia
- Page 1028:
486 Switching Basics and Intermedia
- Page 1032:
488 Switching Basics and Intermedia
- Page 1036:
490 Switching Basics and Intermedia
- Page 1040:
492 Switching Basics and Intermedia
- Page 1044:
494 Switching Basics and Intermedia
- Page 1048:
496 Switching Basics and Intermedia
- Page 1052:
498 Switching Basics and Intermedia
- Page 1056:
500 Switching Basics and Intermedia
- Page 1060:
502 Switching Basics and Intermedia
- Page 1064:
504 Switching Basics and Intermedia
- Page 1068:
506 Switching Basics and Intermedia
- Page 1072:
508 Switching Basics and Intermedia
- Page 1076:
510 Switching Basics and Intermedia
- Page 1080:
512 Switching Basics and Intermedia
- Page 1084:
514 Switching Basics and Intermedia
- Page 1088:
516 Switching Basics and Intermedia
- Page 1092:
518 Switching Basics and Intermedia
- Page 1096:
520 Switching Basics and Intermedia
- Page 1100:
522 Switching Basics and Intermedia