LTI TRUCAM LASER MEASUREMENT DEVICE - Tele-Traffic
LTI TRUCAM LASER MEASUREMENT DEVICE - Tele-Traffic
LTI TRUCAM LASER MEASUREMENT DEVICE - Tele-Traffic

Create successful ePaper yourself
Turn your PDF publications into a flip-book with our unique Google optimized e-Paper software.
Roadside Offset<br />
The Roadside Offset is equal to the distance from the location where you<br />
are taking the DBC measurement to the mid-point or centre of the road<br />
where the vehicle is travelling.<br />
The offset is used to eliminate any bias in the DBC calculation due to the<br />
cosine effect (page 31).<br />
As Figure 52 shows, when DBC is enabled the System Setup Screen<br />
includes a Road Offset value located in the bottom right corner.<br />
When entering the Roadside Offset, keep in mind that the minimum<br />
capture distance is a 2.5-to-1 ratio.<br />
• Example: If your Roadside Offset is 10 metres, the minimum capture distance to either target vehicle<br />
would be 10 metres x 2.5 = 25 metres.<br />
Use the TruCAM to measure the Roadside Offset Distance or manually enter the Roadside Offset Distance.<br />
• The default value is 5.0 metres.<br />
• Manual entry: valid range limit between 1.0 and 100.0 metres.<br />
• Previous Laser entry range limits for minimum range recording are ignored.<br />
Changes to the System Setup Screen are not saved until you tap or press the soft key.<br />
<br />
However, unsaved changes are valid until the TruCAM is powered OFF.<br />
Entering the Roadside Offset:<br />
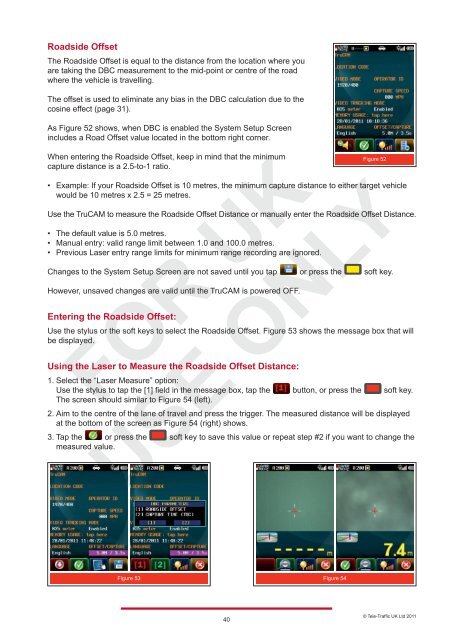
Use the stylus or the soft keys to select the Roadside Offset. Figure 53 shows the message box that will<br />
be displayed.<br />
Using the Laser to Measure the Roadside Offset Distance:<br />
1. Select the “Laser Measure” option:<br />
Use the stylus to tap the [1] field in the message box, tap the button, or press the soft key.<br />
The screen should similar to Figure 54 (left).<br />
2. Aim to the centre of the lane of travel and press the trigger. The measured distance will be displayed<br />
at the bottom of the screen as Figure 54 (right) shows.<br />
3. Tap the <br />
or press the soft key to save this value or repeat step #2 if you want to change the<br />
measured value.<br />
Figure 53 Figure 54<br />
40<br />
<br />
Figure 52<br />
© <strong>Tele</strong>-<strong>Traffic</strong> UK Ltd 2011