LTI TRUCAM LASER MEASUREMENT DEVICE - Tele-Traffic
LTI TRUCAM LASER MEASUREMENT DEVICE - Tele-Traffic
LTI TRUCAM LASER MEASUREMENT DEVICE - Tele-Traffic

Create successful ePaper yourself
Turn your PDF publications into a flip-book with our unique Google optimized e-Paper software.
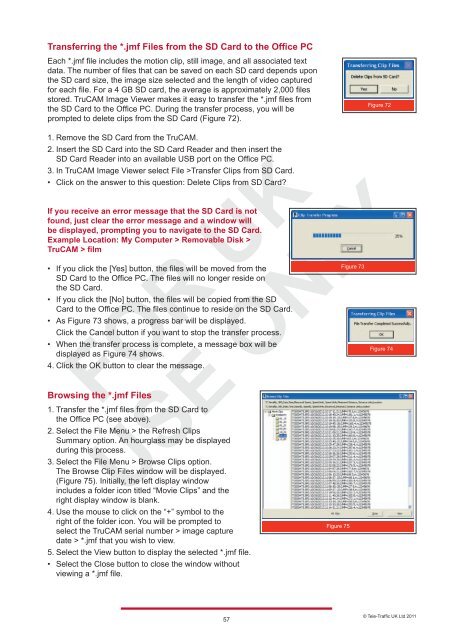
Transferring the *.jmf Files from the SD Card to the Office PC<br />
Each *.jmf file includes the motion clip, still image, and all associated text<br />
data. The number of files that can be saved on each SD card depends upon<br />
the SD card size, the image size selected and the length of video captured<br />
for each file. For a 4 GB SD card, the average is approximately 2,000 files<br />
stored. TruCAM Image Viewer makes it easy to transfer the *.jmf files from<br />
the SD Card to the Office PC. During the transfer process, you will be<br />
prompted to delete clips from the SD Card (Figure 72).<br />
1. Remove the SD Card from the TruCAM.<br />
2. Insert the SD Card into the SD Card Reader and then insert the<br />
SD Card Reader into an available USB port on the Office PC.<br />
3. In TruCAM Image Viewer select File >Transfer Clips from SD Card.<br />
• Click on the answer to this question: Delete Clips from SD Card?<br />
If you receive an error message that the SD Card is not<br />
found, just clear the error message and a window will<br />
be displayed, prompting you to navigate to the SD Card.<br />
Example Location: My Computer > Removable Disk ><br />
TruCAM > film<br />
• If you click the [Yes] button, the files will be moved from the<br />
SD Card to the Office PC. The files will no longer reside on<br />
the SD Card.<br />
• If you click the [No] button, the files will be copied from the SD<br />
Card to the Office PC. The files continue to reside on the SD Card.<br />
• As Figure 73 shows, a progress bar will be displayed.<br />
Click the Cancel button if you want to stop the transfer process.<br />
• When the transfer process is complete, a message box will be<br />
displayed as Figure 74 shows.<br />
4. Click the OK button to clear the message.<br />
Browsing the *.jmf Files<br />
1. Transfer the *.jmf files from the SD Card to<br />
the Office PC (see above).<br />
2. Select the File Menu > the Refresh Clips<br />
Summary option. An hourglass may be displayed<br />
during this process.<br />
3. Select the File Menu > Browse Clips option.<br />
The Browse Clip Files window will be displayed.<br />
(Figure 75). Initially, the left display window<br />
includes a folder icon titled “Movie Clips” and the<br />
right display window is blank.<br />
4. Use the mouse to click on the “+” symbol to the<br />
right of the folder icon. You will be prompted to<br />
select the TruCAM serial number > image capture<br />
date > *.jmf that you wish to view.<br />
5. Select the View button to display the selected *.jmf file.<br />
• Select the Close button to close the window without<br />
viewing a *.jmf file.<br />
57<br />
Figure 75<br />
Figure 73<br />
Figure 72<br />
Figure 74<br />
© <strong>Tele</strong>-<strong>Traffic</strong> UK Ltd 2011