General Information on Track Circuits - RGS Online
General Information on Track Circuits - RGS Online
General Information on Track Circuits - RGS Online

Create successful ePaper yourself
Turn your PDF publications into a flip-book with our unique Google optimized e-Paper software.
Railway Group Approved Code of Practice<br />
GK/RC0752<br />
Issue Two<br />
Date December 1998<br />
Page E12 of 52<br />
Withdrawn Document<br />
Unc<strong>on</strong>trolled When Printed<br />
<str<strong>on</strong>g>General</str<strong>on</strong>g> <str<strong>on</strong>g>Informati<strong>on</strong></str<strong>on</strong>g> <strong>on</strong> <strong>Track</strong> <strong>Circuits</strong><br />
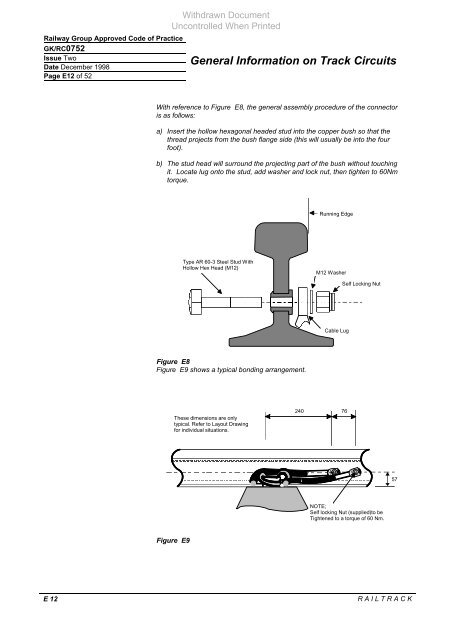
With reference to Figure E8, the general assembly procedure of the c<strong>on</strong>nector<br />
is as follows:<br />
a) Insert the hollow hexag<strong>on</strong>al headed stud into the copper bush so that the<br />
thread projects from the bush flange side (this will usually be into the four<br />
foot).<br />
b) The stud head will surround the projecting part of the bush without touching<br />
it. Locate lug <strong>on</strong>to the stud, add washer and lock nut, then tighten to 60Nm<br />
torque.<br />
Type AR 60-3 Steel Stud With<br />
Hollow Hex Head (M12)<br />
Figure E8<br />
Figure E9 shows a typical b<strong>on</strong>ding arrangement.<br />
These dimensi<strong>on</strong>s are <strong>on</strong>ly<br />
typical. Refer to Layout Drawing<br />
for individual situati<strong>on</strong>s.<br />
Figure E9<br />
Running Edge<br />
M12 Washer<br />
Cable Lug<br />
Self Locking Nut<br />
E 12 R A I L T R A C K<br />
240<br />
76<br />
NOTE;<br />
Self locking Nut (supplied)to be<br />
Tightened to a torque of 60 Nm.<br />
57