General Information on Track Circuits - RGS Online
General Information on Track Circuits - RGS Online
General Information on Track Circuits - RGS Online

Create successful ePaper yourself
Turn your PDF publications into a flip-book with our unique Google optimized e-Paper software.
Railway Group Approved Code of Practice<br />
GK/RC0752<br />
Issue Two<br />
Date December 1998<br />
Page E16 of 52<br />
Withdrawn Document<br />
Unc<strong>on</strong>trolled When Printed<br />
<str<strong>on</strong>g>General</str<strong>on</strong>g> <str<strong>on</strong>g>Informati<strong>on</strong></str<strong>on</strong>g> <strong>on</strong> <strong>Track</strong> <strong>Circuits</strong><br />
Flange clips may also be obtained for larger cable sizes:<br />
Descripti<strong>on</strong> Catalogue No.<br />
Flange clip, 15mm, BRS–SM 849 (2) : 86/43498<br />
Aster and TI21 <strong>Track</strong> <strong>Circuits</strong><br />
Flange clip, 23mm, BRS–SM 849 (3) : 86/43499<br />
Inductive Loop Reed <strong>Track</strong> <strong>Circuits</strong><br />
Cable Terminati<strong>on</strong> Label<br />
TCABRB (1)<br />
Flange<br />
Clip<br />
`L' Plate<br />
Stainless Steel<br />
Washer & Locking Nut<br />
Heat Shrink Sleeve<br />
Stainless Steel<br />
Washer & Nut<br />
E 16 R A I L T R A C K<br />
76mm<br />
Two Holes<br />
7.2 Dia.<br />
57 + 2mm<br />
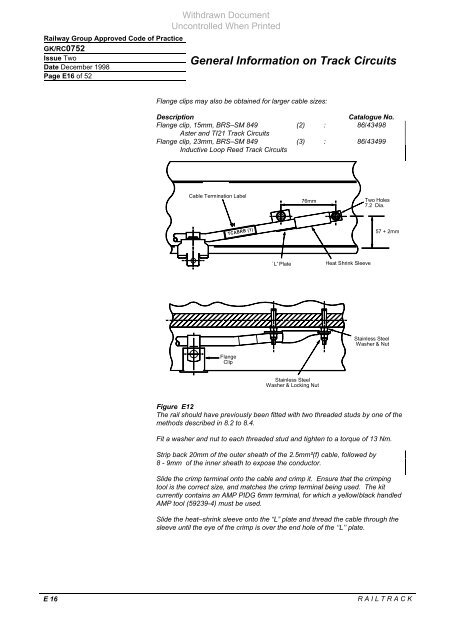
Figure E12<br />
The rail should have previously been fitted with two threaded studs by <strong>on</strong>e of the<br />
methods described in 8.2 to 8.4.<br />
Fit a washer and nut to each threaded stud and tighten to a torque of 13 Nm.<br />
Strip back 20mm of the outer sheath of the 2.5mm²(f) cable, followed by<br />
8 - 9mm of the inner sheath to expose the c<strong>on</strong>ductor.<br />
Slide the crimp terminal <strong>on</strong>to the cable and crimp it. Ensure that the crimping<br />
tool is the correct size, and matches the crimp terminal being used. The kit<br />
currently c<strong>on</strong>tains an AMP PIDG 6mm terminal, for which a yellow/black handled<br />
AMP tool (59239-4) must be used.<br />
Slide the heat–shrink sleeve <strong>on</strong>to the “L” plate and thread the cable through the<br />
sleeve until the eye of the crimp is over the end hole of the ‘‘L’’ plate.