Operating Instructions HDD Recorder DMR-HW120 - CCL Computers
Operating Instructions HDD Recorder DMR-HW120 - CCL Computers
Operating Instructions HDD Recorder DMR-HW120 - CCL Computers

You also want an ePaper? Increase the reach of your titles
YUMPU automatically turns print PDFs into web optimized ePapers that Google loves.
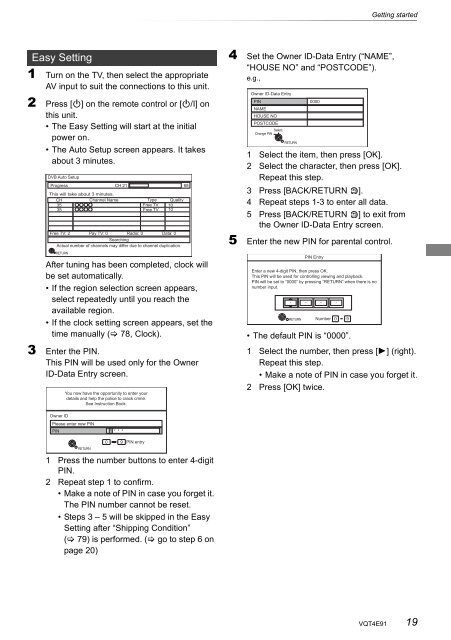
Easy Setting<br />
1 Turn on the TV, then select the appropriate<br />
AV input to suit the connections to this unit.<br />
2 Press [Í] on the remote control or [Í/I] on<br />
this unit.<br />
• The Easy Setting will start at the initial<br />
power on.<br />
• The Auto Setup screen appears. It takes<br />
about 3 minutes.<br />
DVB Auto Setup<br />
Progress<br />
This will take about 3 minutes.<br />
CH 21 68<br />
CH<br />
Channel Name<br />
Type Quality<br />
35<br />
35<br />
Free TV<br />
Free TV<br />
10<br />
10<br />
Free TV: 2 Pay TV: 0 Radio: 0<br />
Searching<br />
Data: 0<br />
Actual number of channels may differ due to channel duplication.<br />
RETURN<br />
After tuning has been completed, clock will<br />
be set automatically.<br />
• If the region selection screen appears,<br />
select repeatedly until you reach the<br />
available region.<br />
• If the clock setting screen appears, set the<br />
time manually ( 78, Clock).<br />
3 Enter the PIN.<br />
This PIN will be used only for the Owner<br />
ID-Data Entry screen.<br />
Owner ID<br />
Please enter new PIN<br />
PIN<br />
You now have the opportunity to enter your<br />
details and help the police to crack crime.<br />
See Instruction Book.<br />
RETURN<br />
* * * *<br />
0 9 PIN entry<br />
1 Press the number buttons to enter 4-digit<br />
PIN.<br />
2 Repeat step 1 to confirm.<br />
• Make a note of PIN in case you forget it.<br />
The PIN number cannot be reset.<br />
• Steps 3 – 5 will be skipped in the Easy<br />
Setting after “Shipping Condition”<br />
( 79) is performed. ( go to step 6 on<br />
page 20)<br />
4 Set the Owner ID-Data Entry (“NAME”,<br />
“HOUSE NO” and “POSTCODE”).<br />
e.g.,<br />
Owner ID-Data Entry<br />
PIN 0000<br />
NAME<br />
HOUSE NO<br />
POSTCODE<br />
Select<br />
Change PIN<br />
RETURN<br />
Getting started<br />
1 Select the item, then press [OK].<br />
2 Select the character, then press [OK].<br />
Repeat this step.<br />
3 Press [BACK/RETURN ].<br />
4 Repeat steps 1-3 to enter all data.<br />
5 Press [BACK/RETURN ] to exit from<br />
the Owner ID-Data Entry screen.<br />
5 Enter the new PIN for parental control.<br />
-<br />
PIN Entry<br />
Enter a new 4-digit PIN, then press OK.<br />
This PIN will be used for controlling viewing and playback.<br />
PIN will be set to “0000” by pressing “RETURN” when there is no<br />
number input.<br />
RETURN<br />
- - -<br />
Number 0 9<br />
• The default PIN is “0000”.<br />
1 Select the number, then press [1] (right).<br />
Repeat this step.<br />
• Make a note of PIN in case you forget it.<br />
2 Press [OK] twice.<br />
VQT4E91 19