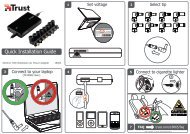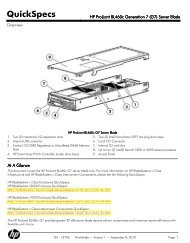
Operating Instructions HDD Recorder DMR-HW120 - CCL Computers
Operating Instructions HDD Recorder DMR-HW120 - CCL Computers
Operating Instructions HDD Recorder DMR-HW120 - CCL Computers

You also want an ePaper? Increase the reach of your titles
YUMPU automatically turns print PDFs into web optimized ePapers that Google loves.
Manual Skip<br />
Skip forward 1 minute:<br />
Press [MANUAL SKIP +60s].<br />
Skip backward 10 seconds:<br />
Press [MANUAL SKIP -10s].<br />
<br />
• DivX and MKV: Manual Skip is not effective.<br />
Skipping the specified time<br />
1 Press [TIME SLIP].<br />
2 Select the time with [3, 4].<br />
• Press and hold [3, 4] to change the time by<br />
10-minute.<br />
3 Press [OK].<br />
• Play skips the specified time.<br />
<br />
• DivX, MKV, AVCHD, MP4 and MPEG2 ([USB]): Skipping<br />
the specified time is not effective.<br />
Skipping the title or chapter<br />
Press [SKIP :] or [SKIP 9].<br />
<br />
• [<strong>HDD</strong>] [USB_<strong>HDD</strong>]: It will not skip the title. But the title in the<br />
grouped titles will be skipped. ( 37)<br />
To create Chapter Marks<br />
[<strong>HDD</strong>] [USB_<strong>HDD</strong>]<br />
During the playback or pause<br />
Press [CHAPTER].<br />
To delete the Chapter Mark<br />
[<strong>HDD</strong>] [USB_<strong>HDD</strong>]<br />
1 While paused<br />
Press [SKIP :] or [SKIP 9] and skip to<br />
the location you want to delete.<br />
2 Press [CHAPTER].<br />
3 Select “Yes”, then press [OK].<br />
Changing audio<br />
Playing back video<br />
Select the desired audio with “Multi Audio” in the<br />
Content menu ( 66).<br />
Switching subtitles<br />
[<strong>HDD</strong>] [USB_<strong>HDD</strong>]:<br />
1 Press [STTL ].<br />
2 Select “On” or “Off”.<br />
• If you want to switch the subtitle language,<br />
select it in the Content menu ( 66).<br />
DivX and MKV:<br />
Display with “Subtitles” in the Content menu<br />
( 66).<br />
Listening to the Audio Description<br />
[<strong>HDD</strong>] [USB_<strong>HDD</strong>]<br />
1 Press [AD].<br />
2 Select “Audio Description” and set to<br />
“Automatic”.<br />
3 Select “Volume”, then adjust the volume with<br />
[2, 1].<br />
<br />
• When “Dolby Digital / Dolby Digital Plus”, “MPEG” or<br />
“HE-AAC” is set to “Bitstream”, the Audio Description may<br />
not work. Set them to “PCM” ( 74, Digital Audio Output).<br />
• You can also set “Audio Description” active in the Setup<br />
menu. ( 72)<br />
Aspect<br />
You can switch the screen mode.<br />
Refer to “Switching the aspect ratio of the<br />
screen”. ( 81)<br />
VQT4E91 41