Operating Instructions HDD Recorder DMR-HW120 - CCL Computers
Operating Instructions HDD Recorder DMR-HW120 - CCL Computers
Operating Instructions HDD Recorder DMR-HW120 - CCL Computers

You also want an ePaper? Increase the reach of your titles
YUMPU automatically turns print PDFs into web optimized ePapers that Google loves.
Getting started<br />
Settings<br />
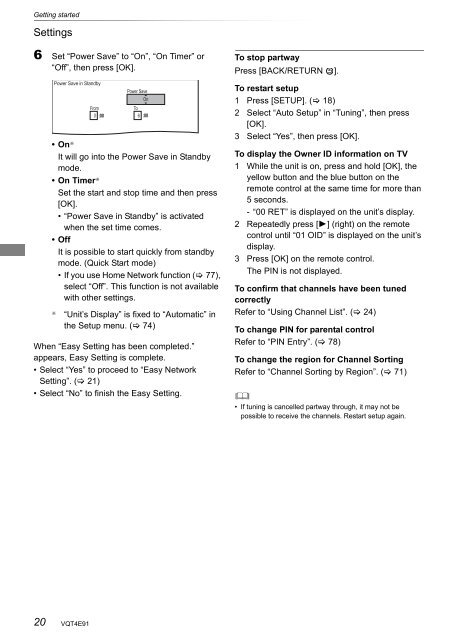
6 Set “Power Save” to “On”, “On Timer” or<br />
“Off”, then press [OK].<br />
20<br />
Power Save in Standby<br />
Power Save<br />
On<br />
From To<br />
0 6<br />
•On §<br />
It will go into the Power Save in Standby<br />
mode.<br />
•On Timer §<br />
Set the start and stop time and then press<br />
[OK].<br />
• “Power Save in Standby” is activated<br />
when the set time comes.<br />
•Off<br />
It is possible to start quickly from standby<br />
mode. (Quick Start mode)<br />
• If you use Home Network function ( 77),<br />
select “Off”. This function is not available<br />
with other settings.<br />
§ “Unit’s Display” is fixed to “Automatic” in<br />
the Setup menu. ( 74)<br />
When “Easy Setting has been completed.”<br />
appears, Easy Setting is complete.<br />
• Select “Yes” to proceed to “Easy Network<br />
Setting”. ( 21)<br />
• Select “No” to finish the Easy Setting.<br />
VQT4E91<br />
To stop partway<br />
Press [BACK/RETURN ].<br />
To restart setup<br />
1 Press [SETUP]. ( 18)<br />
2 Select “Auto Setup” in “Tuning”, then press<br />
[OK].<br />
3 Select “Yes”, then press [OK].<br />
To display the Owner ID information on TV<br />
1 While the unit is on, press and hold [OK], the<br />
yellow button and the blue button on the<br />
remote control at the same time for more than<br />
5 seconds.<br />
- “00 RET” is displayed on the unit’s display.<br />
2 Repeatedly press [1] (right) on the remote<br />
control until “01 OID” is displayed on the unit’s<br />
display.<br />
3 Press [OK] on the remote control.<br />
The PIN is not displayed.<br />
To confirm that channels have been tuned<br />
correctly<br />
Refer to “Using Channel List”. ( 24)<br />
To change PIN for parental control<br />
Refer to “PIN Entry”. ( 78)<br />
To change the region for Channel Sorting<br />
Refer to “Channel Sorting by Region”. ( 71)<br />
<br />
• If tuning is cancelled partway through, it may not be<br />
possible to receive the channels. Restart setup again.