Operating Instructions HDD Recorder DMR-HW120 - CCL Computers
Operating Instructions HDD Recorder DMR-HW120 - CCL Computers
Operating Instructions HDD Recorder DMR-HW120 - CCL Computers

You also want an ePaper? Increase the reach of your titles
YUMPU automatically turns print PDFs into web optimized ePapers that Google loves.
Easy Network Setting<br />
After completing “Easy Setting”, you can continue<br />
with “Easy Network Setting”.<br />
Preparation<br />
• Before beginning wireless connection setup<br />
Obtain your Network name (SSID).<br />
An SSID (Service Set IDentification) is a name<br />
used by wireless LAN to identify a particular<br />
network. Transmission is possible if the SSID<br />
matches for both devices.<br />
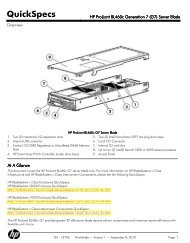
1 Select “Wired” or “Wireless”, then press<br />
[OK].<br />
[HW220]<br />
Easy Network Setting<br />
Settings and tests for connection required<br />
for home network and the Internet will be<br />
conducted.<br />
First, please select a connection mode.<br />
Current setting : Wired<br />
LAN cable connection:<br />
Connect a LAN cable to the unit and select “Wired”.<br />
Wireless LAN connection:<br />
Select “Wireless”.<br />
Wired<br />
Wireless<br />
OK<br />
RETURN<br />
• [<strong>HW120</strong>] If “Wireless LAN Adaptor is not<br />
connected.” is displayed, check that the<br />
Wireless LAN Adaptor is fully inserted.<br />
Alternatively, disconnect and reconnect it.<br />
If there is still no change in the display,<br />
consult your dealer for advice.<br />
2 Follow the on-screen instructions and make<br />
the following confirmation and settings.<br />
“Wired” connection:<br />
- Home Network Connection Check<br />
- Home Network function<br />
- Internet Connection Test<br />
“Wireless” connection:<br />
- Wireless Settings<br />
- Home Network Connection Check<br />
- Home Network function<br />
- Internet Connection Test<br />
3 When “Easy Network Setting is finished.”<br />
appears.<br />
Press [OK].<br />
Getting started<br />
Connection method to wireless access point<br />
Search for wireless network:<br />
1 Select “Search for wireless network”, then<br />
press [OK].<br />
2 The available wireless networks will be<br />
displayed. Select your network name and<br />
press [OK].<br />
- If your Network name is not displayed search<br />
again by pressing the red button on the<br />
remote control.<br />
- Stealth SSID will not be displayed. Enter<br />
manually by using “Wireless Settings”.<br />
( 68, 76)<br />
• If your wireless network is encrypted, Encryption<br />
Key Input Screen will be displayed.<br />
Input the encryption key of your network.<br />
WPS (PUSH button):<br />
If your Wireless router supports WPS (PUSH<br />
button), you can easily perform the settings by<br />
pressing WPS button on it.<br />
WPS (Wi-Fi Protected Setup) is a standard that<br />
facilitates settings relating to the connection and<br />
security of wireless LAN devices.<br />
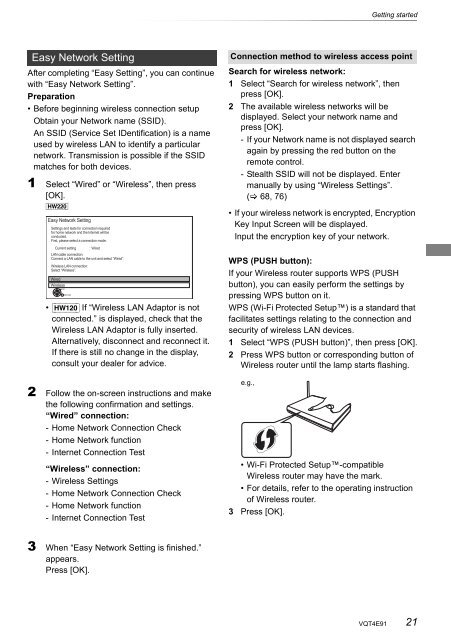
1 Select “WPS (PUSH button)”, then press [OK].<br />
2 Press WPS button or corresponding button of<br />
Wireless router until the lamp starts flashing.<br />
e.g.,<br />
• Wi-Fi Protected Setup-compatible<br />
Wireless router may have the mark.<br />
• For details, refer to the operating instruction<br />
of Wireless router.<br />
3 Press [OK].<br />
VQT4E91 21