

Digital Video Recorder, H.264 Models: DMR-5008/500 (8-Channel ...
Digital Video Recorder, H.264 Models: DMR-5008/500 (8-Channel ...
Digital Video Recorder, H.264 Models: DMR-5008/500 (8-Channel ...

Create successful ePaper yourself
Turn your PDF publications into a flip-book with our unique Google optimized e-Paper software.
16<br />
User’s Manual<br />
NOTE: When opening the saved .txt file, setting to the proper character encoding and using fixed width fonts<br />
will be required to read the file properly.<br />
Highlighting Clear All Data and pressing the button will clear all video data. You will be asked to verify that you<br />
wish to clear all data before the DVR erases the video data. Clear All Data will not clear the System Log.<br />
Highlighting System Shutdown and pressing the button. The Shutdown screen displays asking you to confirm<br />
whether or not you want to shut the system down.<br />
Date/Time<br />
After selecting Shutdown and pressing the button, a screen will appear telling you<br />
when it is safe to disconnect power.<br />
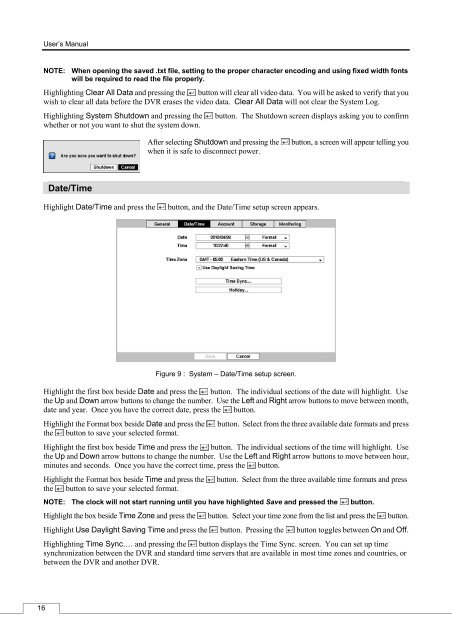
Highlight Date/Time and press the button, and the Date/Time setup screen appears.<br />
Figure 9 : System – Date/Time setup screen.<br />
Highlight the first box beside Date and press the button. The individual sections of the date will highlight. Use<br />
the Up and Down arrow buttons to change the number. Use the Left and Right arrow buttons to move between month,<br />
date and year. Once you have the correct date, press the button.<br />
Highlight the Format box beside Date and press the button. Select from the three available date formats and press<br />
the button to save your selected format.<br />
Highlight the first box beside Time and press the button. The individual sections of the time will highlight. Use<br />
the Up and Down arrow buttons to change the number. Use the Left and Right arrow buttons to move between hour,<br />
minutes and seconds. Once you have the correct time, press the button.<br />
Highlight the Format box beside Time and press the button. Select from the three available time formats and press<br />
the button to save your selected format.<br />
NOTE: The clock will not start running until you have highlighted Save and pressed the button.<br />
Highlight the box beside Time Zone and press the button. Select your time zone from the list and press the button.<br />
Highlight Use Daylight Saving Time and press the button. Pressing the button toggles between On and Off.<br />
Highlighting Time Sync.… and pressing the button displays the Time Sync. screen. You can set up time<br />
synchronization between the DVR and standard time servers that are available in most time zones and countries, or<br />
between the DVR and another DVR.


