

Digital Video Recorder, H.264 Models: DMR-5008/500 (8-Channel ...
Digital Video Recorder, H.264 Models: DMR-5008/500 (8-Channel ...
Digital Video Recorder, H.264 Models: DMR-5008/500 (8-Channel ...

You also want an ePaper? Increase the reach of your titles
YUMPU automatically turns print PDFs into web optimized ePapers that Google loves.
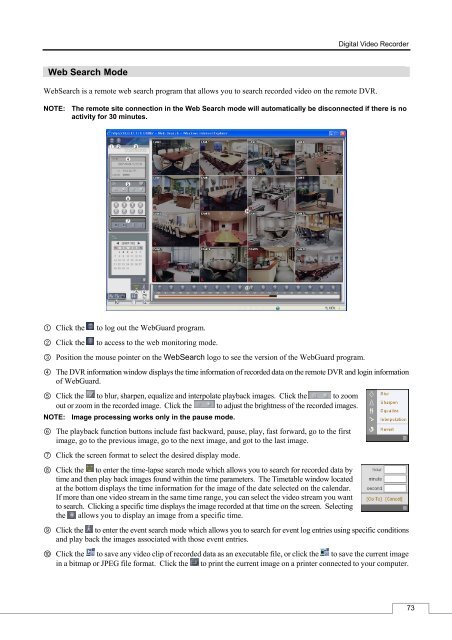
Web Search Mode<br />
<strong>Digital</strong> <strong>Video</strong> <strong>Recorder</strong><br />
WebSearch is a remote web search program that allows you to search recorded video on the remote DVR.<br />
NOTE: The remote site connection in the Web Search mode will automatically be disconnected if there is no<br />
activity for 30 minutes.<br />
① Click the to log out the WebGuard program.<br />
② Click the to access to the web monitoring mode.<br />
③ Position the mouse pointer on the WebSearch logo to see the version of the WebGuard program.<br />
④ The DVR information window displays the time information of recorded data on the remote DVR and login information<br />
of WebGuard.<br />
⑤ Click the to blur, sharpen, equalize and interpolate playback images. Click the to zoom<br />
out or zoom in the recorded image. Click the to adjust the brightness of the recorded images.<br />
NOTE: Image processing works only in the pause mode.<br />
⑥ The playback function buttons include fast backward, pause, play, fast forward, go to the first<br />
image, go to the previous image, go to the next image, and got to the last image.<br />
⑦ Click the screen format to select the desired display mode.<br />
⑧ Click the to enter the time-lapse search mode which allows you to search for recorded data by<br />
time and then play back images found within the time parameters. The Timetable window located<br />
at the bottom displays the time information for the image of the date selected on the calendar.<br />
If more than one video stream in the same time range, you can select the video stream you want<br />
to search. Clicking a specific time displays the image recorded at that time on the screen. Selecting<br />
the allows you to display an image from a specific time.<br />
⑨ Click the to enter the event search mode which allows you to search for event log entries using specific conditions<br />
and play back the images associated with those event entries.<br />
⑩ Click the to save any video clip of recorded data as an executable file, or click the to save the current image<br />
in a bitmap or JPEG file format. Click the to print the current image on a printer connected to your computer.<br />
73


