

Digital Video Recorder, H.264 Models: DMR-5008/500 (8-Channel ...
Digital Video Recorder, H.264 Models: DMR-5008/500 (8-Channel ...
Digital Video Recorder, H.264 Models: DMR-5008/500 (8-Channel ...

You also want an ePaper? Increase the reach of your titles
YUMPU automatically turns print PDFs into web optimized ePapers that Google loves.
26<br />
User’s Manual<br />
Highlight Archive On and press the button to toggle between On and Off.<br />
NOTE: If you have not set up a storage device for archiving, a message appears notifying you of this.<br />
Select the Days and Time Range you want archived.<br />
You can accept the Archive Data Range by leaving the default checkmarks in the Last Archived and Continue boxes.<br />
If you wish to enter specific times and dates in From and To, toggle the checkmarks Off and then enter the time and<br />
date.<br />
Highlight Recycle and press the button to toggle between On and Off. When Recycle is On and the storage device<br />
is full, the newest archived video data will overwrite the oldest archived data. When Recycle is Off, the DVR will stop<br />
archiving video data until more space is made available.<br />
CAUTION: When the Recycle is On, changing the start date and time for archiving will delete all<br />
archived data after the hanged start date and time.<br />
Network Setup<br />
General<br />
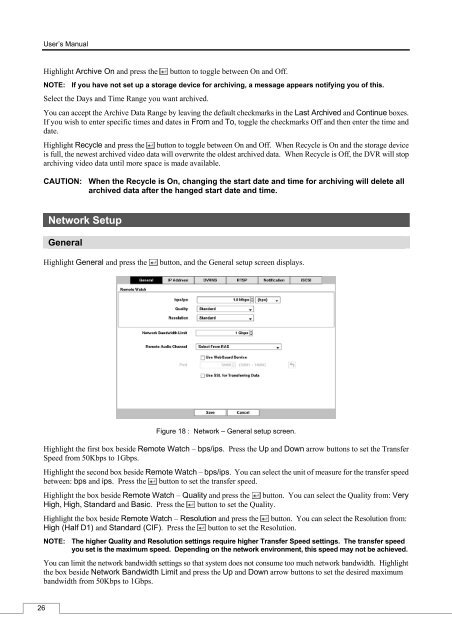
Highlight General and press the button, and the General setup screen displays.<br />
Figure 18 : Network – General setup screen.<br />
Highlight the first box beside Remote Watch – bps/ips. Press the Up and Down arrow buttons to set the Transfer<br />
Speed from 50Kbps to 1Gbps.<br />
Highlight the second box beside Remote Watch – bps/ips. You can select the unit of measure for the transfer speed<br />
between: bps and ips. Press the button to set the transfer speed.<br />
Highlight the box beside Remote Watch – Quality and press the button. You can select the Quality from: Very<br />
High, High, Standard and Basic. Press the button to set the Quality.<br />
Highlight the box beside Remote Watch – Resolution and press the button. You can select the Resolution from:<br />
High (Half D1) and Standard (CIF). Press the button to set the Resolution.<br />
NOTE: The higher Quality and Resolution settings require higher Transfer Speed settings. The transfer speed<br />
you set is the maximum speed. Depending on the network environment, this speed may not be achieved.<br />
You can limit the network bandwidth settings so that system does not consume too much network bandwidth. Highlight<br />
the box beside Network Bandwidth Limit and press the Up and Down arrow buttons to set the desired maximum<br />
bandwidth from 50Kbps to 1Gbps.


