

Digital Video Recorder, H.264 Models: DMR-5008/500 (8-Channel ...
Digital Video Recorder, H.264 Models: DMR-5008/500 (8-Channel ...
Digital Video Recorder, H.264 Models: DMR-5008/500 (8-Channel ...

Create successful ePaper yourself
Turn your PDF publications into a flip-book with our unique Google optimized e-Paper software.
20<br />
User’s Manual<br />
If you want to erase recorded data on the selected device,<br />
highlight Clear and press the button. You will be asked<br />
whether or not you want to delete the data.<br />
If you want to use a USB hard disk drive, highlight Use and<br />
press the button after connecting the device. Highlight<br />
Don’t Use and press the button if you want to stop using<br />
the device.<br />
CAUTION: Do NOT disconnect the USB cable or the power from the device while copying video clips.<br />
If the USB cable is disconnected while copying video clips, archived data might be lost.<br />
Highlight the boxes beside Mirror and press the button. The DVR can be set up to mirror Source disks to designated<br />
Dest. (destination) disks selected from internal hard disk drives. Refer to the Chapter 4 – Disk Mirroring for further<br />
information on setting up disk mirroring.<br />
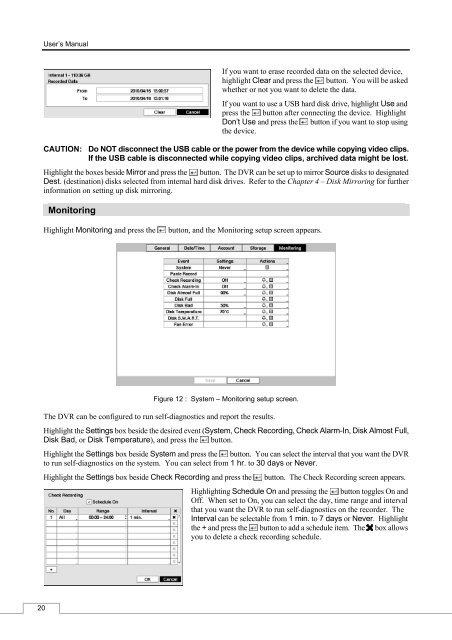
Monitoring<br />
Highlight Monitoring and press the button, and the Monitoring setup screen appears.<br />
Figure 12 : System – Monitoring setup screen.<br />
The DVR can be configured to run self-diagnostics and report the results.<br />
Highlight the Settings box beside the desired event (System, Check Recording, Check Alarm-In, Disk Almost Full,<br />
Disk Bad, or Disk Temperature), and press the button.<br />
Highlight the Settings box beside System and press the button. You can select the interval that you want the DVR<br />
to run self-diagnostics on the system. You can select from 1 hr. to 30 days or Never.<br />
Highlight the Settings box beside Check Recording and press the button. The Check Recording screen appears.<br />
Highlighting Schedule On and pressing the button toggles On and<br />
Off. When set to On, you can select the day, time range and interval<br />
that you want the DVR to run self-diagnostics on the recorder. The<br />
Interval can be selectable from 1 min. to 7 days or Never. Highlight<br />
the + and press the button to add a schedule item. The box allows<br />
you to delete a check recording schedule.


