

Digital Video Recorder, H.264 Models: DMR-5008/500 (8-Channel ...
Digital Video Recorder, H.264 Models: DMR-5008/500 (8-Channel ...
Digital Video Recorder, H.264 Models: DMR-5008/500 (8-Channel ...

You also want an ePaper? Increase the reach of your titles
YUMPU automatically turns print PDFs into web optimized ePapers that Google loves.
Chapter 4 — Operation<br />
<strong>Digital</strong> <strong>Video</strong> <strong>Recorder</strong><br />
NOTE: This chapter assumes your DVR has been installed and configured. If it has not, please refer to Chapters<br />
2 and 3.<br />
The DVR’s controls are similar to a VCR. As with a VCR, the main functions are recording and playing back video.<br />
However, you have much greater control over recording and playing back video. You can establish recording schedules<br />
based on time of day and day of the week. The DVR allows you to search through the recorded video using much<br />
more sophisticated tools than those available with VCRs. Additional DVR features that are not available with VCRs<br />
are remote control and viewing, and recording video at the same time you are watching previously recorded video.<br />
The front panel controls are described in Chapter 3 — Configuration.<br />
Turning on the Power<br />
Once you have installed the DVR following the instructions in Chapter 2 — Installation, it is ready to record.<br />
NOTE: Depending on the monitor display mode between HD mode and SD mode, the menu layout of monitor<br />
screen will be different. For simplicity, the menus and descriptions in this manual refer to the HD display<br />
mode.<br />
Live Monitoring<br />
As soon as the DVR completes its initialization process, it will begin showing live video on the attached monitor and<br />
playing live audio through the attached speaker. The default mode is to display all cameras at once. Pressing any camera<br />
button will cause that camera to display full screen. It displays live video and plays live audio until the user enters<br />
another mode.<br />
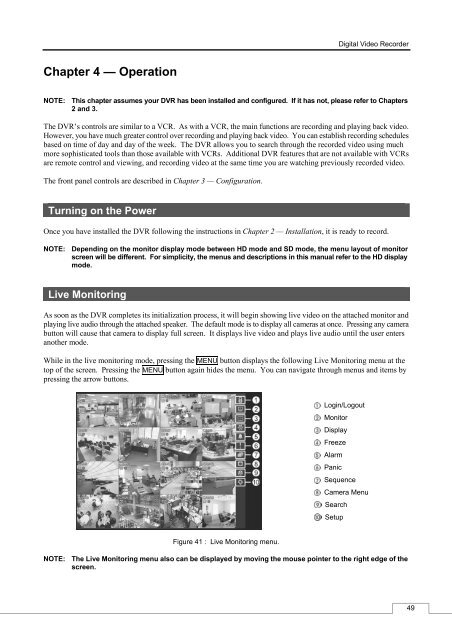
While in the live monitoring mode, pressing the MENU button displays the following Live Monitoring menu at the<br />
top of the screen. Pressing the MENU button again hides the menu. You can navigate through menus and items by<br />
pressing the arrow buttons.<br />
Figure 41 : Live Monitoring menu.<br />
Login/Logout<br />
Monitor<br />
Display<br />
Freeze<br />
Alarm<br />
Panic<br />
Sequence<br />
Camera Menu<br />
Search<br />
Setup<br />
NOTE: The Live Monitoring menu also can be displayed by moving the mouse pointer to the right edge of the<br />
screen.<br />
49


