

Digital Video Recorder, H.264 Models: DMR-5008/500 (8-Channel ...
Digital Video Recorder, H.264 Models: DMR-5008/500 (8-Channel ...
Digital Video Recorder, H.264 Models: DMR-5008/500 (8-Channel ...

You also want an ePaper? Increase the reach of your titles
YUMPU automatically turns print PDFs into web optimized ePapers that Google loves.
<strong>Digital</strong> <strong>Video</strong> <strong>Recorder</strong><br />
While in the PTZ mode, pressing the MENU button and selecting (Advanced PTZ) in the menu<br />
displaying at the top of the screen displays the Advanced PTZ menu.<br />
Set the feature you wish to control by selecting it from the menu. Refer to the camera manufacturer’s<br />
instructions for the proper settings. Depending on the camera specifications, some features may not<br />
be supported.<br />
You can use a mouse for convenient PTZ control. Click the left mouse button on the image and move that image in<br />
the direction you want to by dragging the mouse. Use the mouse wheel to zoom in and out. Position the mouse pointer<br />
at the bottom of the screen, and the following PTZ toolbar will display.<br />
Event Monitoring<br />
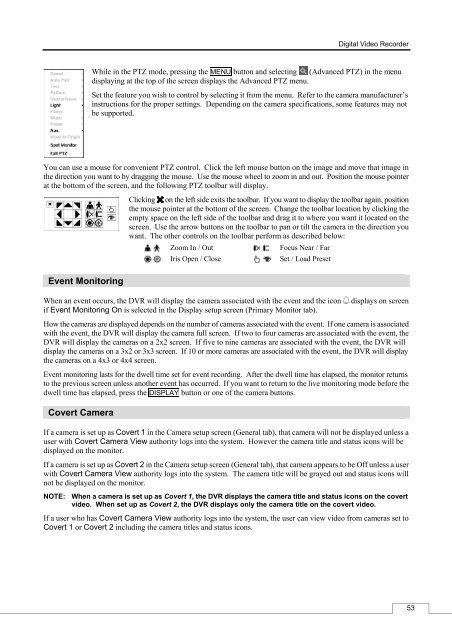
Clicking on the left side exits the toolbar. If you want to display the toolbar again, position<br />
the mouse pointer at the bottom of the screen. Change the toolbar location by clicking the<br />
empty space on the left side of the toolbar and drag it to where you want it located on the<br />
screen. Use the arrow buttons on the toolbar to pan or tilt the camera in the direction you<br />
want. The other controls on the toolbar perform as described below:<br />
Zoom In / Out Focus Near / Far<br />
Iris Open / Close Set / Load Preset<br />
When an event occurs, the DVR will display the camera associated with the event and the icon displays on screen<br />
if Event Monitoring On is selected in the Display setup screen (Primary Monitor tab).<br />
How the cameras are displayed depends on the number of cameras associated with the event. If one camera is associated<br />
with the event, the DVR will display the camera full screen. If two to four cameras are associated with the event, the<br />
DVR will display the cameras on a 2x2 screen. If five to nine cameras are associated with the event, the DVR will<br />
display the cameras on a 3x2 or 3x3 screen. If 10 or more cameras are associated with the event, the DVR will display<br />
the cameras on a 4x3 or 4x4 screen.<br />
Event monitoring lasts for the dwell time set for event recording. After the dwell time has elapsed, the monitor returns<br />
to the previous screen unless another event has occurred. If you want to return to the live monitoring mode before the<br />
dwell time has elapsed, press the DISPLAY button or one of the camera buttons.<br />
Covert Camera<br />
If a camera is set up as Covert 1 in the Camera setup screen (General tab), that camera will not be displayed unless a<br />
user with Covert Camera View authority logs into the system. However the camera title and status icons will be<br />
displayed on the monitor.<br />
If a camera is set up as Covert 2 in the Camera setup screen (General tab), that camera appears to be Off unless a user<br />
with Covert Camera View authority logs into the system. The camera title will be grayed out and status icons will<br />
not be displayed on the monitor.<br />
NOTE: When a camera is set up as Covert 1, the DVR displays the camera title and status icons on the covert<br />
video. When set up as Covert 2, the DVR displays only the camera title on the covert video.<br />
If a user who has Covert Camera View authority logs into the system, the user can view video from cameras set to<br />
Covert 1 or Covert 2 including the camera titles and status icons.<br />
53


