Digital Video Recorder, H.264 Models: DMR-5008/500 (8-Channel ...
Digital Video Recorder, H.264 Models: DMR-5008/500 (8-Channel ...
Digital Video Recorder, H.264 Models: DMR-5008/500 (8-Channel ...
Create successful ePaper yourself
Turn your PDF publications into a flip-book with our unique Google optimized e-Paper software.
50<br />
User’s Manual<br />
Live Monitoring Menu<br />
Login/Logout<br />
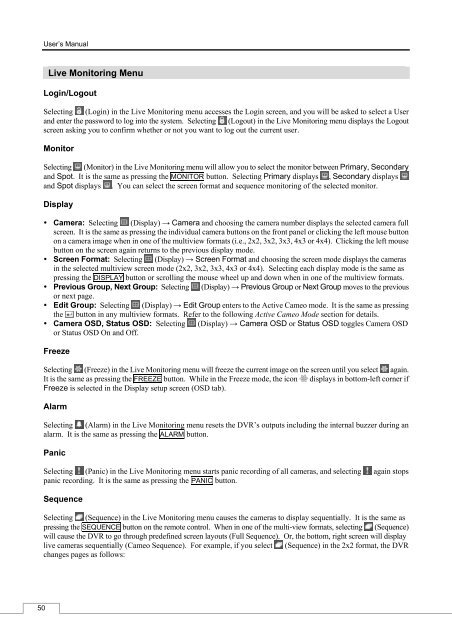
Selecting (Login) in the Live Monitoring menu accesses the Login screen, and you will be asked to select a User<br />
and enter the password to log into the system. Selecting (Logout) in the Live Monitoring menu displays the Logout<br />
screen asking you to confirm whether or not you want to log out the current user.<br />
Monitor<br />
Selecting (Monitor) in the Live Monitoring menu will allow you to select the monitor between Primary, Secondary<br />
and Spot. It is the same as pressing the MONITOR button. Selecting Primary displays , Secondary displays<br />
and Spot displays . You can select the screen format and sequence monitoring of the selected monitor.<br />
Display<br />
Camera: Selecting (Display) → Camera and choosing the camera number displays the selected camera full<br />
screen. It is the same as pressing the individual camera buttons on the front panel or clicking the left mouse button<br />
on a camera image when in one of the multiview formats (i.e., 2x2, 3x2, 3x3, 4x3 or 4x4). Clicking the left mouse<br />
button on the screen again returns to the previous display mode.<br />
Screen Format: Selecting (Display) → Screen Format and choosing the screen mode displays the cameras<br />
in the selected multiview screen mode (2x2, 3x2, 3x3, 4x3 or 4x4). Selecting each display mode is the same as<br />
pressing the DISPLAY button or scrolling the mouse wheel up and down when in one of the multiview formats.<br />
Previous Group, Next Group: Selecting (Display) → Previous Group or Next Group moves to the previous<br />
or next page.<br />
Edit Group: Selecting (Display) → Edit Group enters to the Active Cameo mode. It is the same as pressing<br />
the button in any multiview formats. Refer to the following Active Cameo Mode section for details.<br />
Camera OSD, Status OSD: Selecting (Display) → Camera OSD or Status OSD toggles Camera OSD<br />
or Status OSD On and Off.<br />
Freeze<br />
Selecting (Freeze) in the Live Monitoring menu will freeze the current image on the screen until you select again.<br />
It is the same as pressing the FREEZE button. While in the Freeze mode, the icon displays in bottom-left corner if<br />
Freeze is selected in the Display setup screen (OSD tab).<br />
Alarm<br />
Selecting (Alarm) in the Live Monitoring menu resets the DVR’s outputs including the internal buzzer during an<br />
alarm. It is the same as pressing the ALARM button.<br />
Panic<br />
Selecting (Panic) in the Live Monitoring menu starts panic recording of all cameras, and selecting again stops<br />
panic recording. It is the same as pressing the PANIC button.<br />
Sequence<br />
Selecting (Sequence) in the Live Monitoring menu causes the cameras to display sequentially. It is the same as<br />
pressing the SEQUENCE button on the remote control. When in one of the multi-view formats, selecting (Sequence)<br />
will cause the DVR to go through predefined screen layouts (Full Sequence). Or, the bottom, right screen will display<br />
live cameras sequentially (Cameo Sequence). For example, if you select (Sequence) in the 2x2 format, the DVR<br />
changes pages as follows:


