

Operation and Maintenance Manual for
Operation and Maintenance Manual for
Operation and Maintenance Manual for

Create successful ePaper yourself
Turn your PDF publications into a flip-book with our unique Google optimized e-Paper software.
• Be careful not to damage (avoid excessive twisting, bending, etc.) the sensor<br />
leads when removing the sensor from the pipe fitting.<br />
• The conductivity st<strong>and</strong>ard solution may be used <strong>for</strong> temperature calibration when<br />
combining the temperature <strong>and</strong> conductivity calibrations.<br />
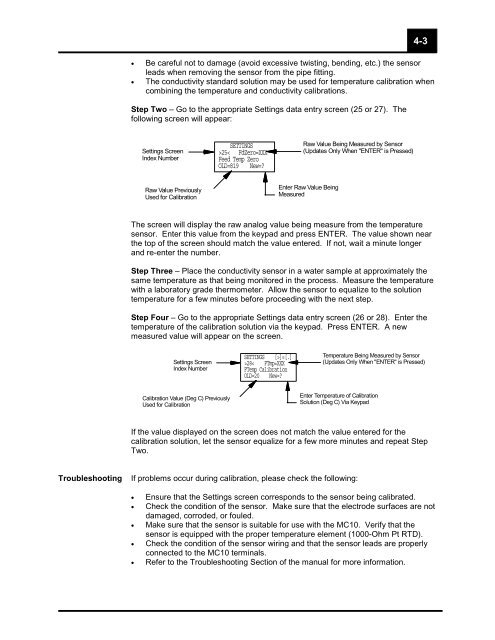
Step Two – Go to the appropriate Settings data entry screen (25 or 27). The<br />
following screen will appear:<br />
Settings Screen<br />
Index Number<br />
Raw Value Previously<br />
Used <strong>for</strong> Calibration<br />
The screen will display the raw analog value being measure from the temperature<br />
sensor. Enter this value from the keypad <strong>and</strong> press ENTER. The value shown near<br />
the top of the screen should match the value entered. If not, wait a minute longer<br />
<strong>and</strong> re-enter the number.<br />
Step Three – Place the conductivity sensor in a water sample at approximately the<br />
same temperature as that being monitored in the process. Measure the temperature<br />
with a laboratory grade thermometer. Allow the sensor to equalize to the solution<br />
temperature <strong>for</strong> a few minutes be<strong>for</strong>e proceeding with the next step.<br />
Step Four – Go to the appropriate Settings data entry screen (26 or 28). Enter the<br />
temperature of the calibration solution via the keypad. Press ENTER. A new<br />
measured value will appear on the screen.<br />
Settings Screen<br />
Index Number<br />
Calibration Value (Deg C) Previously<br />
Used <strong>for</strong> Calibration<br />
SETTINGS<br />
>25< FdZero=XXX<br />
Feed Temp Zero<br />
OLD=819 New=?<br />
SETTINGS [>]=[.]<br />
>28< FTmp=XXX<br />
FTemp Calibration<br />
OLD=20 New=?<br />
If the value displayed on the screen does not match the value entered <strong>for</strong> the<br />
calibration solution, let the sensor equalize <strong>for</strong> a few more minutes <strong>and</strong> repeat Step<br />
Two.<br />
Troubleshooting If problems occur during calibration, please check the following:<br />
Raw Value Being Measured by Sensor<br />
(Updates Only When "ENTER" is Pressed)<br />
Enter Raw Value Being<br />
Measured<br />
Temperature Being Measured by Sensor<br />
(Updates Only When "ENTER" is Pressed)<br />
Enter Temperature of Calibration<br />
Solution (Deg C) Via Keypad<br />
• Ensure that the Settings screen corresponds to the sensor being calibrated.<br />
• Check the condition of the sensor. Make sure that the electrode surfaces are not<br />
damaged, corroded, or fouled.<br />
• Make sure that the sensor is suitable <strong>for</strong> use with the MC10. Verify that the<br />
sensor is equipped with the proper temperature element (1000-Ohm Pt RTD).<br />
• Check the condition of the sensor wiring <strong>and</strong> that the sensor leads are properly<br />
connected to the MC10 terminals.<br />
• Refer to the Troubleshooting Section of the manual <strong>for</strong> more in<strong>for</strong>mation.<br />
4-3


