- Page 1 and 2:
Release 8 User Guide Second Edition
- Page 3 and 4:
Contents JMP User Guide 1 Prelimina
- Page 5 and 6:
iii Data Filter Control Panel . . .
- Page 7 and 8:
v Editing Data Table Rows using the
- Page 9 and 10:
vii Example of Tabulating Data . .
- Page 11 and 12:
ix Closing and Saving Sessions . .
- Page 13:
xi C The Analyze Menu . . . . . . .
- Page 16 and 17:
xiv Linda Blazek, Michael Friendly,
- Page 19 and 20:
Chapter 1 Preliminaries JMP Statist
- Page 21 and 22:
Chapter 1 Preliminaries 3 What You
- Page 23 and 24:
Chapter 1 Preliminaries 5 Learning
- Page 25 and 26:
Chapter 2 Creating and Opening File
- Page 27 and 28:
Chapter 2 Creating and Opening File
- Page 29 and 30:
Chapter 2 Creating and Opening File
- Page 31 and 32:
Chapter 2 Creating and Opening File
- Page 33 and 34:
Chapter 2 Creating and Opening File
- Page 35 and 36:
Chapter 2 Creating and Opening File
- Page 37 and 38:
Chapter 2 Creating and Opening File
- Page 39 and 40:
Chapter 2 Creating and Opening File
- Page 41 and 42:
Chapter 2 Creating and Opening File
- Page 43 and 44:
Chapter 2 Creating and Opening File
- Page 45 and 46:
Chapter 2 Creating and Opening File
- Page 47 and 48:
Chapter 2 Creating and Opening File
- Page 49 and 50:
Chapter 2 Creating and Opening File
- Page 51 and 52:
Chapter 2 Creating and Opening File
- Page 53 and 54:
Chapter 2 Creating and Opening File
- Page 55 and 56:
Chapter 2 Creating and Opening File
- Page 57 and 58:
. Chapter 2 Creating and Opening Fi
- Page 59 and 60:
Chapter 2 Creating and Opening File
- Page 61 and 62:
Chapter 2 Creating and Opening File
- Page 63:
Chapter 2 Creating and Opening File
- Page 66 and 67:
Contents Elements of JMP Data Table
- Page 68 and 69:
50 Entering, Editing, and Managing
- Page 70 and 71:
52 Entering, Editing, and Managing
- Page 72 and 73:
54 Entering, Editing, and Managing
- Page 74 and 75:
56 Entering, Editing, and Managing
- Page 76 and 77:
58 Entering, Editing, and Managing
- Page 78 and 79:
60 Entering, Editing, and Managing
- Page 80 and 81:
62 Entering, Editing, and Managing
- Page 82 and 83:
64 Entering, Editing, and Managing
- Page 84 and 85:
66 Entering, Editing, and Managing
- Page 86 and 87:
68 Entering, Editing, and Managing
- Page 88 and 89:
70 Entering, Editing, and Managing
- Page 90 and 91:
72 Entering, Editing, and Managing
- Page 92 and 93:
74 Entering, Editing, and Managing
- Page 94 and 95:
76 Entering, Editing, and Managing
- Page 96 and 97:
78 Entering, Editing, and Managing
- Page 98 and 99:
80 Entering, Editing, and Managing
- Page 100 and 101:
82 Entering, Editing, and Managing
- Page 102 and 103:
84 Entering, Editing, and Managing
- Page 104 and 105:
86 Entering, Editing, and Managing
- Page 106 and 107:
88 Entering, Editing, and Managing
- Page 108 and 109:
90 Entering, Editing, and Managing
- Page 110 and 111:
92 Entering, Editing, and Managing
- Page 112 and 113:
94 Entering, Editing, and Managing
- Page 114 and 115:
96 Entering, Editing, and Managing
- Page 116 and 117:
98 Entering, Editing, and Managing
- Page 118 and 119:
100 Entering, Editing, and Managing
- Page 120 and 121:
102 Entering, Editing, and Managing
- Page 122 and 123:
104 Entering, Editing, and Managing
- Page 124 and 125:
106 Entering, Editing, and Managing
- Page 126 and 127:
Contents Saving Data Tables . . . .
- Page 128 and 129:
110 Saving Tables, Reports, and Ses
- Page 130 and 131:
112 Saving Tables, Reports, and Ses
- Page 132 and 133:
114 Saving Tables, Reports, and Ses
- Page 134 and 135:
116 Saving Tables, Reports, and Ses
- Page 136 and 137:
118 Saving Tables, Reports, and Ses
- Page 138 and 139:
120 Saving Tables, Reports, and Ses
- Page 140 and 141:
122 Saving Tables, Reports, and Ses
- Page 142 and 143:
124 Saving Tables, Reports, and Ses
- Page 144 and 145:
126 Saving Tables, Reports, and Ses
- Page 146 and 147:
128 Saving Tables, Reports, and Ses
- Page 148 and 149:
Contents Assigning Characteristics
- Page 150 and 151:
132 Properties and Characteristics
- Page 152 and 153:
134 Properties and Characteristics
- Page 154 and 155:
136 Properties and Characteristics
- Page 156 and 157:
138 Properties and Characteristics
- Page 158 and 159:
140 Properties and Characteristics
- Page 160 and 161:
142 Properties and Characteristics
- Page 162 and 163:
144 Properties and Characteristics
- Page 164 and 165:
146 Properties and Characteristics
- Page 166 and 167:
148 Properties and Characteristics
- Page 168 and 169:
150 Properties and Characteristics
- Page 170 and 171:
152 Properties and Characteristics
- Page 172 and 173:
154 Properties and Characteristics
- Page 174 and 175:
156 Properties and Characteristics
- Page 176 and 177:
158 Properties and Characteristics
- Page 178 and 179:
160 Properties and Characteristics
- Page 180 and 181:
162 Properties and Characteristics
- Page 182 and 183:
164 Properties and Characteristics
- Page 184 and 185:
166 Properties and Characteristics
- Page 187 and 188:
All analyses produce report windows
- Page 189 and 190:
Chapter 6 Output Reports 171 Editin
- Page 191 and 192:
Chapter 6 Output Reports 173 Editin
- Page 193 and 194:
Chapter 6 Output Reports 175 Editin
- Page 195 and 196:
Chapter 6 Output Reports 177 Printi
- Page 197 and 198:
Chapter 6 Output Reports 179 Saving
- Page 199 and 200:
Chapter 6 Output Reports 181 Format
- Page 201 and 202:
Chapter 6 Output Reports 183 Format
- Page 203 and 204:
Chapter 6 Output Reports 185 Select
- Page 205 and 206: Chapter 6 Output Reports 187 Using
- Page 207 and 208: Chapter 6 Output Reports 189 Using
- Page 209 and 210: Chapter 6 Output Reports 191 Using
- Page 211 and 212: Chapter 6 Output Reports 193 Using
- Page 213 and 214: Chapter 6 Output Reports 195 Alteri
- Page 215 and 216: Chapter 6 Output Reports 197 Alteri
- Page 217 and 218: Chapter 6 Output Reports 199 Alteri
- Page 219 and 220: Chapter 6 Output Reports 201 Alteri
- Page 221 and 222: Chapter 6 Output Reports 203 Alteri
- Page 223 and 224: Chapter 6 Output Reports 205 Alteri
- Page 225 and 226: Chapter 6 Output Reports 207 Alteri
- Page 227 and 228: Chapter 6 Output Reports 209 Alteri
- Page 229 and 230: Chapter 6 Output Reports 211 Adding
- Page 231 and 232: Chapter 6 Output Reports 213 Adding
- Page 233 and 234: Chapter 6 Output Reports 215 Adding
- Page 235 and 236: Chapter 6 Output Reports 217 Adding
- Page 237 and 238: Chapter 6 Output Reports 219 Adding
- Page 239 and 240: Chapter 7 Reshaping Data Subset, Co
- Page 241 and 242: Chapter 7 Reshaping Data 223 Creati
- Page 243 and 244: Chapter 7 Reshaping Data 225 Sortin
- Page 245 and 246: Chapter 7 Reshaping Data 227 Stacki
- Page 247 and 248: Chapter 7 Reshaping Data 229 Stacki
- Page 249 and 250: Chapter 7 Reshaping Data 231 Stacki
- Page 251 and 252: Chapter 7 Reshaping Data 233 Splitt
- Page 253 and 254: Chapter 7 Reshaping Data 235 Splitt
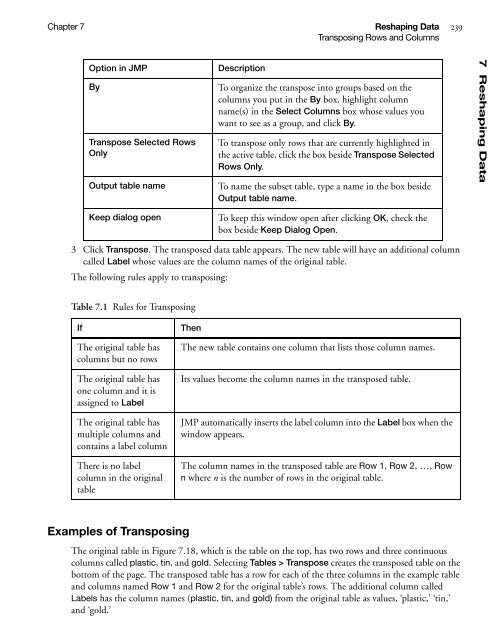
- Page 255: Chapter 7 Reshaping Data 237 Transp
- Page 259 and 260: Chapter 7 Reshaping Data 241 Concat
- Page 261 and 262: Chapter 7 Reshaping Data 243 Concat
- Page 263 and 264: Chapter 7 Reshaping Data 245 Joinin
- Page 265 and 266: Chapter 7 Reshaping Data 247 Joinin
- Page 267 and 268: Chapter 7 Reshaping Data 249 Joinin
- Page 269 and 270: Chapter 7 Reshaping Data 251 Joinin
- Page 271 and 272: Chapter 7 Reshaping Data 253 Joinin
- Page 273 and 274: Chapter 7 Reshaping Data 255 Joinin
- Page 275 and 276: Chapter 7 Reshaping Data 257 Updati
- Page 277: Chapter 7 Reshaping Data 259 Updati
- Page 280 and 281: Contents Summarizing Columns. . . .
- Page 282 and 283: 264 Summarizing Data Chapter 8 Summ
- Page 284 and 285: 266 Summarizing Data Chapter 8 Summ
- Page 286 and 287: 268 Summarizing Data Chapter 8 Summ
- Page 288 and 289: 270 Summarizing Data Chapter 8 Tabu
- Page 290 and 291: 272 Summarizing Data Chapter 8 Tabu
- Page 292 and 293: 274 Summarizing Data Chapter 8 Tabu
- Page 294 and 295: 276 Summarizing Data Chapter 8 Tabu
- Page 296 and 297: 278 Summarizing Data Chapter 8 Tabu
- Page 298 and 299: 280 Summarizing Data Chapter 8 Tabu
- Page 300 and 301: 282 Summarizing Data Chapter 8 Tabu
- Page 302 and 303: 284 Summarizing Data Chapter 8 Tabu
- Page 304 and 305: Contents Creating a Formula . . . .
- Page 306 and 307:
288 Formula Editor Chapter 9 Refere
- Page 308 and 309:
290 Formula Editor Chapter 9 Insert
- Page 310 and 311:
292 Formula Editor Chapter 9 Adding
- Page 312 and 313:
294 Formula Editor Chapter 9 Using
- Page 314 and 315:
296 Formula Editor Chapter 9 Using
- Page 316 and 317:
298 Formula Editor Chapter 9 Using
- Page 318 and 319:
300 Formula Editor Chapter 9 Using
- Page 320 and 321:
302 Formula Editor Chapter 9 Using
- Page 322 and 323:
304 Formula Editor Chapter 9 Using
- Page 324 and 325:
306 Formula Editor Chapter 9 Using
- Page 326 and 327:
308 Formula Editor Chapter 9 Using
- Page 328 and 329:
310 Formula Editor Chapter 9 Orderi
- Page 330 and 331:
312 Formula Editor Chapter 9 Using
- Page 332 and 333:
314 Formula Editor Chapter 9 Using
- Page 334 and 335:
316 Formula Editor Chapter 9 Editin
- Page 336 and 337:
318 Formula Editor Chapter 9 Custom
- Page 338 and 339:
320 Formula Editor Chapter 9 Custom
- Page 340 and 341:
322 Formula Editor Chapter 9 Exampl
- Page 342 and 343:
324 Formula Editor Chapter 9 Exampl
- Page 344 and 345:
326 Formula Editor Chapter 9 Exampl
- Page 346 and 347:
328 Formula Editor Chapter 9 Glossa
- Page 348 and 349:
Contents Changing Startup Preferenc
- Page 350 and 351:
332 Personalizing JMP Chapter 10 Ch
- Page 352 and 353:
334 Personalizing JMP Chapter 10 Ch
- Page 354 and 355:
336 Personalizing JMP Chapter 10 Ch
- Page 356 and 357:
338 Personalizing JMP Chapter 10 Ch
- Page 358 and 359:
340 Personalizing JMP Chapter 10 Ch
- Page 360 and 361:
342 Personalizing JMP Chapter 10 Ch
- Page 362 and 363:
344 Personalizing JMP Chapter 10 Cu
- Page 364 and 365:
346 Personalizing JMP Chapter 10 Sp
- Page 366 and 367:
348 Personalizing JMP Chapter 10 Ad
- Page 368 and 369:
350 Personalizing JMP Chapter 10 Cu
- Page 370 and 371:
352 Personalizing JMP Chapter 10 Sp
- Page 372 and 373:
354 Personalizing JMP Chapter 10 Pe
- Page 374 and 375:
356 Personalizing JMP Chapter 10 Pe
- Page 376 and 377:
358 Personalizing JMP Chapter 10 Pe
- Page 378 and 379:
360 Personalizing JMP Chapter 10 Pe
- Page 380 and 381:
362 Personalizing JMP Chapter 10 Pe
- Page 382 and 383:
364 Personalizing JMP Chapter 10 Pe
- Page 384 and 385:
366 Personalizing JMP Chapter 10 Me
- Page 386 and 387:
368 Personalizing JMP Chapter 10 Cu
- Page 388 and 389:
370 Personalizing JMP Chapter 10 Cu
- Page 390 and 391:
372 Personalizing JMP Chapter 10 Cu
- Page 392 and 393:
374 Personalizing JMP Chapter 10 Sa
- Page 394 and 395:
376 Personalizing JMP Chapter 10 Sa
- Page 396 and 397:
Contents Connecting to SAS. . . . .
- Page 398 and 399:
380 SAS Integration Chapter 11 Conn
- Page 400 and 401:
382 SAS Integration Chapter 11 Conn
- Page 402 and 403:
384 SAS Integration Chapter 11 Open
- Page 404 and 405:
386 SAS Integration Chapter 11 Open
- Page 406 and 407:
388 SAS Integration Chapter 11 Open
- Page 408 and 409:
390 SAS Integration Chapter 11 Runn
- Page 410 and 411:
392 SAS Integration Chapter 11 Subm
- Page 412 and 413:
394 SAS Integration Chapter 11 Retr
- Page 415 and 416:
Appendix A JMP Starter A Review of
- Page 417 and 418:
Appendix A JMP Starter 399 Overview
- Page 419 and 420:
Appendix A JMP Starter 401 The Basi
- Page 421 and 422:
Appendix A JMP Starter 403 The Mode
- Page 423 and 424:
Appendix A JMP Starter 405 The Mult
- Page 425 and 426:
Appendix A JMP Starter 407 The Grap
- Page 427 and 428:
Appendix A JMP Starter 409 The Grap
- Page 429 and 430:
Appendix A JMP Starter 411 The Meas
- Page 431 and 432:
Appendix A JMP Starter 413 The DOE
- Page 433 and 434:
Appendix A JMP Starter 415 The Tabl
- Page 435:
Appendix A JMP Starter 417 The SAS
- Page 438 and 439:
Contents The JMP Menu (Macintosh On
- Page 440 and 441:
422 Main Menu Appendix B The File M
- Page 442 and 443:
424 Main Menu Appendix B The Edit M
- Page 444 and 445:
426 Main Menu Appendix B The Edit M
- Page 446 and 447:
428 Main Menu Appendix B The Rows M
- Page 448 and 449:
430 Main Menu Appendix B The Cols M
- Page 450 and 451:
432 Main Menu Appendix B The DOE Me
- Page 452 and 453:
434 Main Menu Appendix B The Analyz
- Page 454 and 455:
436 Main Menu Appendix B The Analyz
- Page 456 and 457:
438 Main Menu Appendix B The Analyz
- Page 458 and 459:
440 Main Menu Appendix B The Graph
- Page 460 and 461:
442 Main Menu Appendix B The Graph
- Page 462 and 463:
444 Main Menu Appendix B The Tools
- Page 464 and 465:
446 Main Menu Appendix B The View M
- Page 466 and 467:
448 Main Menu Appendix B The Window
- Page 468 and 469:
450 Main Menu Appendix B The Help M
- Page 470 and 471:
452 Main Menu Appendix B The Layout
- Page 472 and 473:
Contents Row Functions . . . . . .
- Page 474 and 475:
456 Formula Functions Reference App
- Page 476 and 477:
458 Formula Functions Reference App
- Page 478 and 479:
460 Formula Functions Reference App
- Page 480 and 481:
462 Formula Functions Reference App
- Page 482 and 483:
464 Formula Functions Reference App
- Page 484 and 485:
466 Formula Functions Reference App
- Page 486 and 487:
468 Formula Functions Reference App
- Page 488 and 489:
470 Formula Functions Reference App
- Page 490 and 491:
472 Formula Functions Reference App
- Page 492 and 493:
474 Formula Functions Reference App
- Page 494 and 495:
476 Formula Functions Reference App
- Page 496 and 497:
478 Formula Functions Reference App
- Page 498 and 499:
480 Formula Functions Reference App
- Page 500 and 501:
482 Formula Functions Reference App
- Page 502 and 503:
484 Formula Functions Reference App
- Page 504 and 505:
486 Formula Functions Reference App
- Page 506 and 507:
488 Formula Functions Reference App
- Page 508 and 509:
490 Formula Functions Reference App
- Page 510 and 511:
492 Formula Functions Reference App
- Page 513 and 514:
Index JMP User Guide Symbols 468 !
- Page 515 and 516:
Index 497 levels in a report 171 re
- Page 517 and 518:
Index 499 delete expression 294 del
- Page 519 and 520:
Index 501 conditional clauses 302 c
- Page 521 and 522:
Index 503 range check 53 red triang
- Page 523 and 524:
Index 505 Marker functions 308 Mark
- Page 525 and 526:
Index 507 operating characteristic
- Page 527 and 528:
Index 509 report tables 183 reports
- Page 529 and 530:
Index 511 shapes. See drawing tools
- Page 531:
Index 513 units 160 univariate stat


