- Page 1 and 2:
grohe.com To Know How Maintenance &
- Page 3 and 4:
12/2008 - Copyright by GROHE Grohe
- Page 5 and 6:
Working with this book Know What "T
- Page 7 and 8:
Grohe Technology GROHE StarLight®
- Page 9 and 10:
Index of contents Special Fittings
- Page 11 and 12:
Product Overview Prod.No. Page Prod
- Page 13 and 14:
Product Overview Prod.No. Page Prod
- Page 15 and 16:
Single-lever Mixer Single-lever Mix
- Page 17 and 18:
Product Overview Tenso Single-lever
- Page 19 and 20:
Product Overview Single-lever Mixer
- Page 21 and 22:
Product Overview Single-lever Mixer
- Page 23 and 24:
Product Overview Eurostyle Single-l
- Page 25 and 26:
Notes Single-lever Mixer E 11
- Page 27 and 28:
Allure 32 146 32 147 Single-lever M
- Page 29 and 30:
Allure 32 148 32 149 Single-lever M
- Page 31 and 32:
Allure 19 309 Single-lever Mixer Po
- Page 33 and 34:
Allure 19 315 Single-lever Mixer 19
- Page 35 and 36:
Atrio 32 457 32 108 001 Single-leve
- Page 37 and 38:
Atrio 19 287 001 Single-lever Mixer
- Page 39 and 40:
Ectos 33 180 IP Single-lever Mixer
- Page 41 and 42:
Ectos 19 547 IP Single-lever Mixer
- Page 43 and 44:
Tenso 33 347 33 348 Single-lever Mi
- Page 45 and 46:
Tenso 19 289 Single-lever Mixer 33
- Page 47 and 48:
Tenso 19 050 Single-lever Mixer 19
- Page 49 and 50:
Taron 33 133 IP 33 524 IP Single-le
- Page 51 and 52:
Taron 19 532 Single-lever Mixer 19
- Page 53 and 54:
Chiara 33 001 33 418 Single-lever M
- Page 55 and 56:
Chiara 32 303 32 306 Single-lever M
- Page 57 and 58:
Chiara 19 155 Single-lever Mixer 19
- Page 59 and 60:
Lineare 32 109 33 848 Single-lever
- Page 61 and 62:
Lineare 33 849 Single-lever Mixer 3
- Page 63 and 64:
Lineare 19 297 Single-lever Mixer 1
- Page 65 and 66:
Europlus 33 153 001 33 553 001 Sing
- Page 67 and 68:
Europlus 19 536 001 Single-lever Mi
- Page 69 and 70:
Europlus 33 155 33 539 Single-lever
- Page 71 and 72:
Europlus 19 536 Single-lever Mixer
- Page 73 and 74:
Eurowing 33 085 33 468 Single-lever
- Page 75 and 76:
Eurowing 19 520 Single-lever Mixer
- Page 77 and 78:
Eurofresh 32 390 32 401 Single-leve
- Page 79 and 80:
Eurofresh 19 199 Single-lever Mixer
- Page 81 and 82:
Eurodisc 33 190 001 33 390 001 Sing
- Page 83 and 84:
Eurodisc 19 548 001 Single-lever Mi
- Page 85 and 86:
Eurodisc 33 190 33 391 Single-lever
- Page 87 and 88:
Eurodisc 19 548 Single-lever Mixer
- Page 89 and 90:
Essence 33 532 33 624 Single-lever
- Page 91 and 92:
Essence 19 285 Single-lever Mixer 1
- Page 93 and 94:
Concetto 32 202 32 211 Single-lever
- Page 95 and 96:
Concetto 19 346 Single-lever Mixer
- Page 97 and 98:
Eurostyle 33 558 001 33 591 001 Sin
- Page 99 and 100:
Eurostyle 19 506 001 Single-lever M
- Page 101 and 102:
Eurostyle 33 614 19 506 Single-leve
- Page 103 and 104:
Eurosmart 33 265 001 32 929 001 Sin
- Page 105 and 106:
Eurosmart 33 300 001 Single-lever M
- Page 107 and 108:
Eurosmart 19 451 001 Single-lever M
- Page 109 and 110:
Eurosmart 33 265 33 268 Single-leve
- Page 111 and 112:
Eurosmart 33 300 Single-lever Mixer
- Page 113 and 114:
Euroeco 33 131 33 405 Single-lever
- Page 115 and 116:
Euroeco 19 516 Single-lever Mixer 1
- Page 117 and 118:
Two handle faucets Two handle fauce
- Page 119 and 120:
Product Overview Aria Sentosa Z 16
- Page 121 and 122:
Notes Two handle faucets Z 5
- Page 123 and 124:
Allure 20 144 19 316 Two handle fau
- Page 125 and 126:
Atrio 21 019 24 027 Two handle fauc
- Page 127 and 128:
Atrio 20 000 20 008 Two handle fauc
- Page 129 and 130:
Atrio 25 010 26 003 Two handle fauc
- Page 131 and 132:
Aria 21 090 24 030 Two handle fauce
- Page 133 and 134:
Aria 20 147 25 081 Two handle fauce
- Page 135 and 136:
Sentosa 25 007 21 106 Two handle fa
- Page 137 and 138:
Sentosa Single-hole basin mixer 26
- Page 139 and 140:
Sinfonia Bath mixer 25 030 Shower m
- Page 141 and 142:
Florida 25 610 24 610 Two handle fa
- Page 143 and 144:
Costa Bath mixer 25 450 and variant
- Page 145 and 146:
Atlanta One-hole basin mixer 21 242
- Page 147 and 148:
Notes Two handle faucets Z 31
- Page 149 and 150: Grohtherm 1000 T 6 T 6 T 8 Grohther
- Page 151 and 152: Euroeco Safety Mixer T 32 Grohtherm
- Page 153 and 154: Thermostat shower mixer 34 624 Ther
- Page 155 and 156: Thermostat 19 656 Maintenance instr
- Page 157 and 158: Thermostat shower mixer 34 143 Ther
- Page 159 and 160: Thermostat shower mixer 19 236 Main
- Page 161 and 162: Thermostat shower mixer 34 169 Ther
- Page 163 and 164: Thermostat shower mixer 19 354 Ther
- Page 165 and 166: Thermostat for bath and/or shower 1
- Page 167 and 168: Thermostat shower mixer 34 679 Ther
- Page 169 and 170: Thermostat shower mixer 19 663 Ther
- Page 171 and 172: Thermostat shower mixer 34 179 Ther
- Page 173 and 174: Thermostat shower mixer 19 359 Ther
- Page 175 and 176: Thermostat shower mixer 34 692 Ther
- Page 177 and 178: Thermostat mixer 34 365 Maintenance
- Page 179 and 180: Thermostat basin mixer 34 018 Maint
- Page 181 and 182: Thermostat mixer 35 085 Maintenance
- Page 183 and 184: Thermostat shower mixer 34 027 Main
- Page 185 and 186: Adjusting of temperature: Grohtherm
- Page 187 and 188: Adjusting of temperature: Automatic
- Page 189 and 190: Maintenance Aquadimmer: Grohtherm 2
- Page 191 and 192: Adjustment of Economy Stop: Grohthe
- Page 193 and 194: T 46 Notes
- Page 195 and 196: Europlus E Euroeco Special S 4 S 4
- Page 197 and 198: Infrared-Electronic basin mixer 36
- Page 199: Single-lever basin mixer 33 118 Sin
- Page 203 and 204: Self-closing shower thermostat 1/2"
- Page 205 and 206: Self-closing pillar tap 36 100 Main
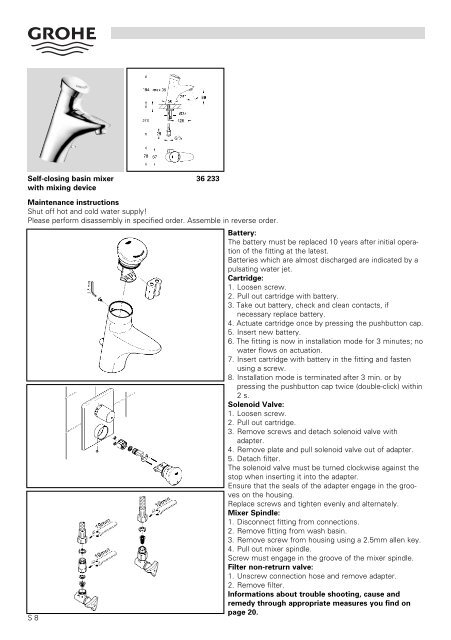
- Page 207 and 208: Self-closing basin mixer 36 109 wit
- Page 209 and 210: Self-closing pillar tap 36 173 and
- Page 211 and 212: Eurodisc SE, Controecon Further ser
- Page 213 and 214: Eurodisc SE Self-closing basin mixe
- Page 215 and 216: Kitchen Kitchen
- Page 217 and 218: Product overview Essence Alira K 14
- Page 219 and 220: Notes Kitchen K 5
- Page 221 and 222: Atrio 32 003 001 31 000 Kitchen Pos
- Page 223 and 224: K4 33 782 33 786 Kitchen Pos. Descr
- Page 225 and 226: Zedra 33 708 33 764 SD Kitchen Pos.
- Page 227 and 228: Minta 32 917 32 168 Kitchen Pos. De
- Page 229 and 230: Essence 32 105 32 171 Kitchen Pos.
- Page 231 and 232: Alira 32 998 SD 32 997 SD Kitchen P
- Page 233 and 234: Europlus 33 930 33 933 Kitchen Pos.
- Page 235 and 236: Eurodisc 33 770 33 334 001 Kitchen
- Page 237 and 238: Eurostyle 33 975 33 977 001 Kitchen
- Page 239 and 240: Eurosmart 33 281 33 202 001 Kitchen
- Page 241 and 242: Costa Single hole mixer 31 812 31 8
- Page 243 and 244: Kitchen Atlanta Wall sink mixer 31
- Page 245 and 246: Supra Single-hole sink mixer 31 426
- Page 247 and 248: Shower Systems Shower Systems
- Page 249 and 250: Notes Shower Systems B 3
- Page 251 and 252:
Aquatower 1000 27 015 Shower System
- Page 253 and 254:
Aquatower 2000 27 017 Shower System
- Page 255 and 256:
Aquatower 3000 27 202 Pos. Descript
- Page 257 and 258:
Freehander® Shower System exposed
- Page 259 and 260:
Aquatower 3000 Further service note
- Page 261 and 262:
Sanitary Systems Sanitary Systems
- Page 263 and 264:
Product overview DAL WC flush valve
- Page 265 and 266:
Product overview Uniset for WC Rapi
- Page 267 and 268:
WC electronic 38 393 SD 38 698 SD P
- Page 269 and 270:
Urinal Electronic 37 749 Sanitary S
- Page 271 and 272:
Urinal Electronic 37 713 Sanitary S
- Page 273 and 274:
Radar Electronic Set for final inst
- Page 275 and 276:
Urinal flush valves 37 017 37 021 P
- Page 277 and 278:
WC flush valves 37 139 Sanitary Sys
- Page 279 and 280:
WC flush valves 37 144 37 147 IK Sa
- Page 281 and 282:
WC flush valves 37 153 Sanitary Sys
- Page 283 and 284:
Concealed/exposed flushing cisterns
- Page 285 and 286:
Concealed/exposed flushing cisterns
- Page 287 and 288:
Concealed/exposed flushing cisterns
- Page 289 and 290:
Concealed/exposed flushing cisterns
- Page 291 and 292:
Concealed/exposed flushing cisterns
- Page 293 and 294:
Flushing mechanism Servo-set 37 078
- Page 295 and 296:
Uniset Uniset for WC 38 642 and var
- Page 297 and 298:
Uniset Uniset for WC 38 729 38 729
- Page 299 and 300:
Uniset Uniset for Bidet 37 578 37 5
- Page 301 and 302:
Rapid SL for WC Rapid SL for WC 38
- Page 303 and 304:
Rapid SL for WC and urinal Rapid SL
- Page 305 and 306:
Fault-Cause-Remedy Tectron Skate fo
- Page 307 and 308:
Fault-Cause-Remedy Tectron Skate fo
- Page 309 and 310:
Fault-Cause-Remedy Flush valve for
- Page 311 and 312:
Fault-Cause-Remedy Urinal flush val
- Page 313 and 314:
Fault-Cause-Remedy Urinal - Electro
- Page 315 and 316:
Fault-Cause-Remedy Urinal Electroni
- Page 317 and 318:
Concealed bodies Concealed bodies
- Page 319 and 320:
Product Overview Thermostats for sh
- Page 321 and 322:
Grohe Rapido Universal Single-lever
- Page 323 and 324:
Single-lever mixer for concealed in
- Page 325 and 326:
Thermostats for shower and bath 20
- Page 327 and 328:
Thermostats for shower and bath The
- Page 329 and 330:
Thermostats for shower and bath The
- Page 331:
Notes Concealed bodies UP15