OM t of c.iii - Vision Research Coordinating Center - Washington ...
OM t of c.iii - Vision Research Coordinating Center - Washington ...
OM t of c.iii - Vision Research Coordinating Center - Washington ...

Create successful ePaper yourself
Turn your PDF publications into a flip-book with our unique Google optimized e-Paper software.
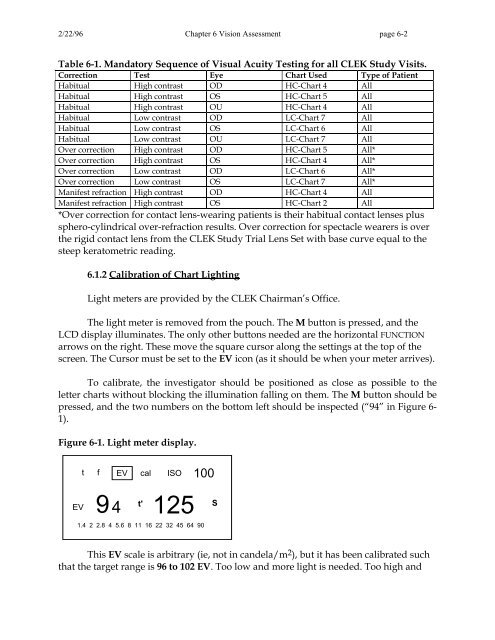
2/22/96 Chapter 6 <strong>Vision</strong> Assessment page 6-2<br />
Table 6-1. Mandatory Sequence <strong>of</strong> Visual Acuity Testing for all CLEK Study Visits.<br />
Correction Test Eye Chart Used Type <strong>of</strong> Patient<br />
Habitual High contrast OD HC-Chart 4 All<br />
Habitual High contrast OS HC-Chart 5 All<br />
Habitual High contrast OU HC-Chart 4 All<br />
Habitual Low contrast OD LC-Chart 7 All<br />
Habitual Low contrast OS LC-Chart 6 All<br />
Habitual Low contrast OU LC-Chart 7 All<br />
Over correction High contrast OD HC-Chart 5 All*<br />
Over correction High contrast OS HC-Chart 4 All*<br />
Over correction Low contrast OD LC-Chart 6 All*<br />
Over correction Low contrast OS LC-Chart 7 All*<br />
Manifest refraction High contrast OD HC-Chart 4 All<br />
Manifest refraction High contrast OS HC-Chart 2 All<br />
*Over correction for contact lens-wearing patients is their habitual contact lenses plus<br />
sphero-cylindrical over-refraction results. Over correction for spectacle wearers is over<br />
the rigid contact lens from the CLEK Study Trial Lens Set with base curve equal to the<br />
steep keratometric reading.<br />
6.1.2 Calibration <strong>of</strong> Chart Lighting<br />
Light meters are provided by the CLEK Chairman’s Office.<br />
The light meter is removed from the pouch. The M button is pressed, and the<br />
LCD display illuminates. The only other buttons needed are the horizontal FUNCTION<br />
arrows on the right. These move the square cursor along the settings at the top <strong>of</strong> the<br />
screen. The Cursor must be set to the EV icon (as it should be when your meter arrives).<br />
To calibrate, the investigator should be positioned as close as possible to the<br />
letter charts without blocking the illumination falling on them. The M button should be<br />
pressed, and the two numbers on the bottom left should be inspected (“94” in Figure 6-<br />
1).<br />
Figure 6-1. Light meter display.<br />
EV<br />
t f EV cal ISO<br />
9 4<br />
t'<br />
125<br />
100<br />
1.4 2 2.8 4 5.6 8 11 16 22 32 45 64 90<br />
S<br />
This EV scale is arbitrary (ie, not in candela/m 2 ), but it has been calibrated such<br />
that the target range is 96 to 102 EV. Too low and more light is needed. Too high and