Service Manual - AMS Neve
Service Manual - AMS Neve
Service Manual - AMS Neve
Create successful ePaper yourself
Turn your PDF publications into a flip-book with our unique Google optimized e-Paper software.
ES/2 TEST SOFTWARE<br />
SynchroNet ES/2 <strong>Service</strong> <strong>Manual</strong><br />
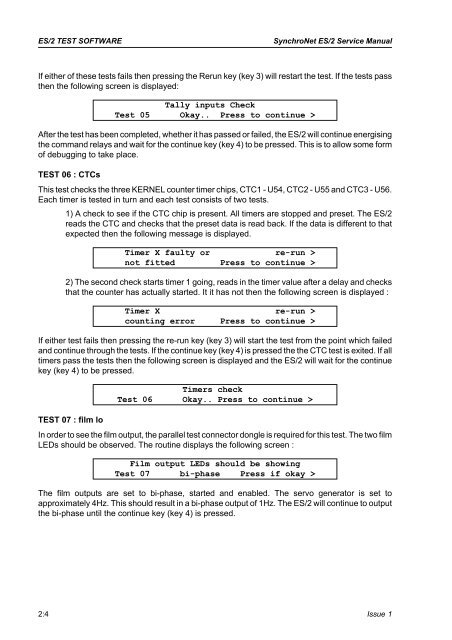
If either of these tests fails then pressing the Rerun key (key 3) will restart the test. If the tests pass<br />
then the following screen is displayed:<br />
Tally inputs Check<br />
Test 05 Okay.. Press to continue ><br />
After the test has been completed, whether it has passed or failed, the ES/2 will continue energising<br />
the command relays and wait for the continue key (key 4) to be pressed. This is to allow some form<br />
of debugging to take place.<br />
TEST 06 : CTCs<br />
This test checks the three KERNEL counter timer chips, CTC1 - U54, CTC2 - U55 and CTC3 - U56.<br />
Each timer is tested in turn and each test consists of two tests.<br />
1) A check to see if the CTC chip is present. All timers are stopped and preset. The ES/2<br />
reads the CTC and checks that the preset data is read back. If the data is different to that<br />
expected then the following message is displayed.<br />
Timer X faulty or re-run ><br />
not fitted Press to continue ><br />
2) The second check starts timer 1 going, reads in the timer value after a delay and checks<br />
that the counter has actually started. It it has not then the following screen is displayed :<br />
Timer X re-run ><br />
counting error Press to continue ><br />
If either test fails then pressing the re-run key (key 3) will start the test from the point which failed<br />
and continue through the tests. If the continue key (key 4) is pressed the the CTC test is exited. If all<br />
timers pass the tests then the following screen is displayed and the ES/2 will wait for the continue<br />
key (key 4) to be pressed.<br />
TEST 07 : film lo<br />
Timers check<br />
Test 06 Okay.. Press to continue ><br />
In order to see the film output, the parallel test connector dongle is required for this test. The two film<br />
LEDs should be observed. The routine displays the following screen :<br />
Film output LEDs should be showing<br />
Test 07 bi-phase Press if okay ><br />
The film outputs are set to bi-phase, started and enabled. The servo generator is set to<br />
approximately 4Hz. This should result in a bi-phase output of 1Hz. The ES/2 will continue to output<br />
the bi-phase until the continue key (key 4) is pressed.<br />
2:4 Issue 1


