


Create successful ePaper yourself
Turn your PDF publications into a flip-book with our unique Google optimized e-Paper software.
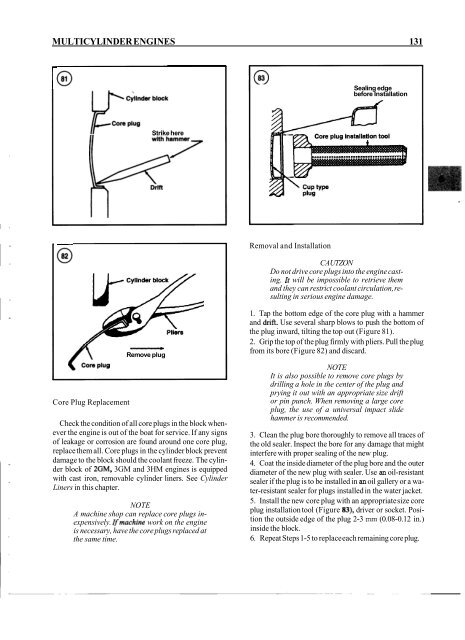
MULTICYLINDER ENGINES 131<br />
Sealing edge<br />
before Installation<br />
Strike here<br />
Removal and Installation<br />
CA UTZON<br />
Do not drive core plugs into the engine casting.<br />
It will be impossible to retrieve them<br />
and they can restrict coolant circulation, resulting<br />
in serious engine damage.<br />
Core Plug Replacement<br />
-<br />
Remove plug<br />
Check the condition of all core plugs in the block whenever<br />
the engine is out of the boat for service. If any signs<br />
of leakage or corrosion are found around one core plug,<br />
replace them all. Core plugs in the cylinder block prevent<br />
damage to the block should the coolant freeze. The cylinder<br />
block of 2GM, 3GM and 3HM engines is equipped<br />
with cast iron, removable cylinder liners. See Cylinder<br />
Liners in this chapter.<br />
NOTE<br />
A machine shop can replace core plugs inexpensively.<br />
Zfmachine work on the engine<br />
is necessary, have the core plugs replaced at<br />
the same time.<br />
1. Tap the bottom edge of the core plug with a hammer<br />
and drift. Use several sharp blows to push the bottom of<br />
the plug inward, tilting the top out (Figure 81).<br />
2. Grip the top of the plug firmly with pliers. Pull the plug<br />
from its bore (Figure 82) and discard.<br />
NOTE<br />
It is also possible to remove core plugs by<br />
drilling a hole in the center of the plug and<br />
prying it out with an appropriate size drift<br />
or pin punch. When removing a large core<br />
plug, the use of a universal impact slide<br />
hammer is recommended.<br />
3. Clean the plug bore thoroughly to remove all traces of<br />
the old sealer. Inspect the bore for any damage that might<br />
interfere with proper sealing of the new plug.<br />
4. Coat the inside diameter of the plug bore and the outer<br />
diameter of the new plug with sealer. Use an oil-resistant<br />
sealer if the plug is to be installed in an oil gallery or a water-resistant<br />
sealer for plugs installed in the water jacket.<br />
5. Install the new core plug with an appropriate size core<br />
plug installation tool (Figure 83), driver or socket. Position<br />
the outside edge of the plug 2-3 mm (0.08-0.12 in.)<br />
inside the block.<br />
6. Repeat Steps 1-5 to replace each remaining core plug.


