


Create successful ePaper yourself
Turn your PDF publications into a flip-book with our unique Google optimized e-Paper software.
GENERAL INFORMATION 23<br />
b. Remove the housing from the oven or hot plate and<br />
hold onto the housing with a kitchen potholder,<br />
heavy gloves or heavy shop cloths-it is hot.<br />
NOTE<br />
A suitable size socket and extension works<br />
well for removing and installing bearings.<br />
c. Hold the housing with the bearing side down and<br />
tap the bearing out. Repeat for all bearings in the<br />
housing.<br />
d. Prior to heating the bearing housing, place the new<br />
bearing in a freezer, if possible. Chilling a bearing<br />
will slightly reduce its outside diameter, while the<br />
heated bearing housing assembly will be slightly<br />
larger due to heat expansion. This will make bearing<br />
installation much easier.<br />
NOTE<br />
Always install bearings with the manufacturer<br />
b mark or number facing outward.<br />
e. While the housing is still hot, install the new bearing(~)<br />
into the housing. Install the bearings by hand,<br />
if possible. If necessary, lightly tap the bearing(s)<br />
into the housing with a socket placed on the outer<br />
bearing race. Do not install new bearings by driving<br />
on the inner bearing race. Install the bearing until it<br />
seats completely.<br />
i<br />
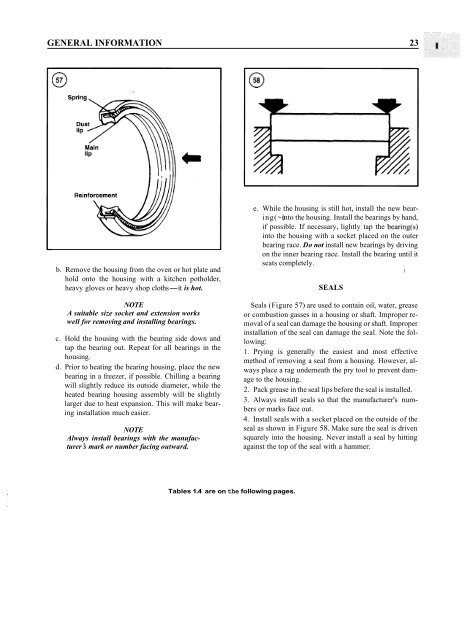
SEALS<br />
Seals (Figure 57) are used to contain oil, water, grease<br />
or combustion gasses in a housing or shaft. Improper removal<br />
of a seal can damage the housing or shaft. Improper<br />
installation of the seal can damage the seal. Note the following:<br />
1. Prying is generally the easiest and most effective<br />
method of removing a seal from a housing. However, always<br />
place a rag underneath the pry tool to prevent damage<br />
to the housing.<br />
2. Pack grease in the seal lips before the seal is installed.<br />
3. Always install seals so that the manufacturer's numbers<br />
or marks face out.<br />
4. Install seals with a socket placed on the outside of the<br />
seal as shown in Figure 58. Make sure the seal is driven<br />
squarely into the housing. Never install a seal by hitting<br />
against the top of the seal with a hammer.<br />
Tables 1.4 are on the following pages.


