


Create successful ePaper yourself
Turn your PDF publications into a flip-book with our unique Google optimized e-Paper software.
ELECTRICAL SYSTEM 185<br />
making or breaking any connection. Poor connections are<br />
a common cause of electrical arcs that cause explosions.<br />
Care and Inspection<br />
The following battery maintenance information applies<br />
to unsealed, wet-cell batteries. Although some of the procedures<br />
also apply to other types of batteries, consult the<br />
battery manufacturer for specific recommendations.<br />
1. Disconnect both battery cables (negative first, then<br />
positive) and remove the battery hold-down or retainer<br />
clamp. See Figure 1 for a typical open installation and<br />
Figure 2 for a typical enclosed installation.<br />
NOTE<br />
Some batteries have a carry strap built in<br />
for use in Step 2. See Figure 3.<br />
Test indicator<br />
2. Attach a battery carrier or carrier strap to the terminal<br />
posts and lift the battery from the battery tray. Remove the<br />
battery from the engine compartment.<br />
3. Check the entire battery case for cracks or other damage.<br />
4. If the battery has removable vent caps, cover the vent<br />
holes in each cap with small pieces of masking tape.<br />
NOTE<br />
Keep cleaning solution out of the battery<br />
cells in Step 5, or the electrolyte will be seriously<br />
weakened.<br />
Battery post cleaning tool<br />
5. Scrub the top of the battery with a stiff bristle brush,<br />
using a baking soda and water solution (Figure 4). Rinse<br />
the battery case with clear water and wipe it dry with a<br />
clean cloth or paper towels. Remove the masking tape<br />
from the filler cap vent holes, if so equipped.<br />
6. Inspect the battery tray or container in the engine compartment<br />
for corrosion. Remove and clean it, if necessary,<br />
with the baking soda and water solution. Rinse it with<br />
clear water and wipe it dry, then reinstall.<br />
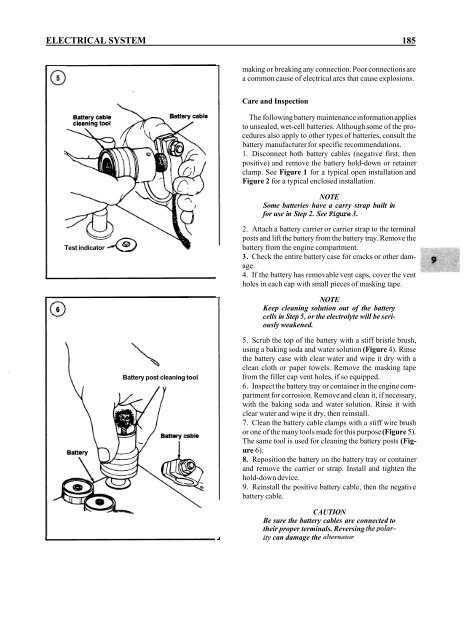
7. Clean the battery cable clamps with a stiff wire brush<br />
or one of the many tools made for this purpose (Figure 5).<br />
The same tool is used for cleaning the battery posts (Figure<br />
6).<br />
8. Reposition the battery on the battery tray or container<br />
and remove the carrier or strap. Install and tighten the<br />
hold-down device.<br />
9. Reinstall the positive battery cable, then the negative<br />
battery cable.<br />
CA UTION<br />
Be sure the battery cables are connected to<br />
their proper terminals. Reversing thepolarity<br />
can damage the alternatol:


