


You also want an ePaper? Increase the reach of your titles
YUMPU automatically turns print PDFs into web optimized ePapers that Google loves.
8 CHAPTER ONE<br />
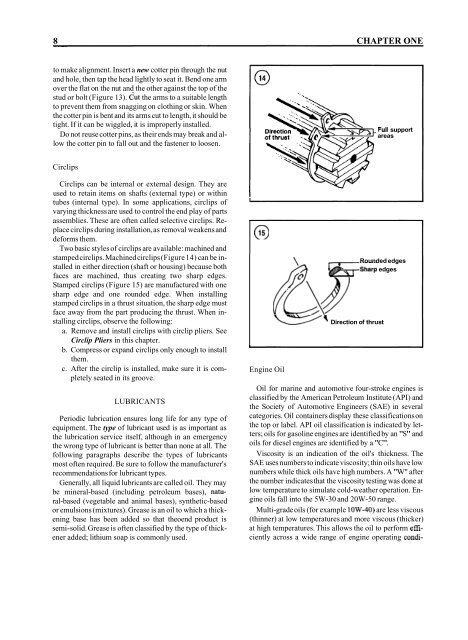
to make alignment. Insert a new cotter pin through the nut<br />
and hole, then tap the head lightly to seat it. Bend one arm<br />
over the flat on the nut and the other against the top of the<br />
stud or bolt (Figure 13). cut the arms to a suitable length<br />
to prevent them from snagging on clothing or skin. When<br />
the cotter pin is bent and its arms cut to length, it should be<br />
tight. If it can be wiggled, it is improperly installed.<br />
Do not reuse cotter pins, as their ends may break and allow<br />
the cotter pin to fall out and the fastener to loosen.<br />
Full support<br />
areas<br />
Circlips<br />
Circlips can be internal or external design. They are<br />
used to retain items on shafts (external type) or within<br />
tubes (internal type). In some applications, circlips of<br />
varying thickness are used to control the end play of parts<br />
assemblies. These are often called selective circlips. Replace<br />
circlips during installation, as removal weakens and<br />
deforms them.<br />
Two basic styles of circlips are available: machined and<br />
stamped circlips. Machined circlips (Figure 14) can be installed<br />
in either direction (shaft or housing) because both<br />
faces are machined, thus creating two sharp edges.<br />
Stamped circlips (Figure 15) are manufactured with one<br />
sharp edge and one rounded edge. When installing<br />
stamped circlips in a thrust situation, the sharp edge must<br />
face away from the part producing the thrust. When installing<br />
circlips, observe the following:<br />
a. Remove and install circlips with circlip pliers. See<br />
Circlip Pliers in this chapter.<br />
b. Compress or expand circlips only enough to install<br />
them.<br />
c. After the circlip is installed, make sure it is completely<br />
seated in its groove.<br />
LUBRICANTS<br />
Periodic lubrication ensures long life for any type of<br />
equipment. The type of lubricant used is as important as<br />
the lubrication service itself, although in an emergency<br />
the wrong type of lubricant is better than none at all. The<br />
following paragraphs describe the types of lubricants<br />
most often required. Be sure to follow the manufacturer's<br />
recommendations for lubricant types.<br />
Generally, all liquid lubricants are called oil. They may<br />
be mineral-based (including petroleum bases), natural-based<br />
(vegetable and animal bases), synthetic-based<br />
or emulsions (mixtures). Grease is an oil to which a thickening<br />
base has been added so that theoend product is<br />
semi-solid. Grease is often classified by the type of thickener<br />
added; lithium soap is commonly used.<br />
Engine Oil<br />
=sharp<br />
Rounded edges<br />
edges<br />
Direction of thrust<br />
Oil for marine and automotive four-stroke engines is<br />
classified by the American Petroleum Institute (API) and<br />
the Society of Automotive Engineers (SAE) in several<br />
categories. Oil containers display these classifications on<br />
the top or label. API oil classification is indicated by letters;<br />
oils for gasoline engines are identified by an "S" and<br />
oils for diesel engines are identified by a "C".<br />
Viscosity is an indication of the oil's thickness. The<br />
SAE uses numbers to indicate viscosity; thin oils have low<br />
numbers while thick oils have high numbers. A "W" after<br />
the number indicates that the viscosity testing was done at<br />
low temperature to simulate cold-weather operation. Engine<br />
oils fall into the 5W-30 and 20W-50 range.<br />
Multi-grade oils (for example 10W-40) are less viscous<br />
(thinner) at low temperatures and more viscous (thicker)<br />
at high temperatures. This allows the oil to perform eficiently<br />
across a wide range of engine operating condi-


