Surgivet® V1030 Hand-Held Pulse Oximeter
Surgivet® V1030 Hand-Held Pulse Oximeter
Surgivet® V1030 Hand-Held Pulse Oximeter

You also want an ePaper? Increase the reach of your titles
YUMPU automatically turns print PDFs into web optimized ePapers that Google loves.
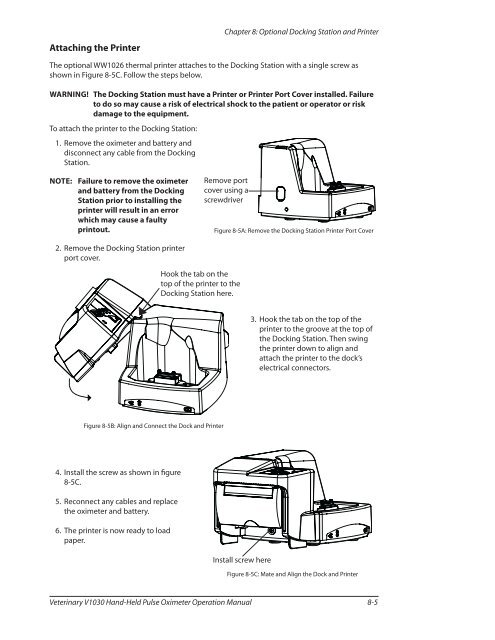
Attaching the Printer<br />
Chapter 8: Optional Docking Station and Printer<br />
The optional WW1026 thermal printer attaches to the Docking Station with a single screw as<br />
shown in Figure 8-5C. Follow the steps below.<br />
WARNING! The Docking Station must have a Printer or Printer Port Cover installed. Failure<br />
to do so may cause a risk of electrical shock to the patient or operator or risk<br />
damage to the equipment.<br />
To attach the printer to the Docking Station:<br />
1. Remove the oximeter and battery and<br />
disconnect any cable from the Docking<br />
Station.<br />
NOTE: Failure to remove the oximeter<br />
and battery from the Docking<br />
Station prior to installing the<br />
printer will result in an error<br />
which may cause a faulty<br />
printout.<br />
Remove port<br />
cover using a<br />
screwdriver<br />
Figure 8-5A: Remove the Docking Station Printer Port Cover<br />
2. Remove the Docking Station printer<br />
port cover.<br />
Hook the tab on the<br />
top of the printer to the<br />
Docking Station here.<br />
3. Hook the tab on the top of the<br />
printer to the groove at the top of<br />
the Docking Station. Then swing<br />
the printer down to align and<br />
attach the printer to the dock’s<br />
electrical connectors.<br />
Figure 8-5B: Align and Connect the Dock and Printer<br />
4. Install the screw as shown in figure<br />
8-5C.<br />
5. Reconnect any cables and replace<br />
the oximeter and battery.<br />
6. The printer is now ready to load<br />
paper.<br />
Install screw here<br />
Figure 8-5C: Mate and Align the Dock and Printer<br />
Veterinary <strong>V1030</strong> <strong>Hand</strong>-<strong>Held</strong> <strong>Pulse</strong> <strong>Oximeter</strong> Operation Manual 8-5

![Redemption Form [PDF] - SurgiVet](https://img.yumpu.com/37386077/1/190x245/redemption-form-pdf-surgivet.jpg?quality=85)
![Redemption Form [PDF] - SurgiVet](https://img.yumpu.com/37386066/1/190x245/redemption-form-pdf-surgivet.jpg?quality=85)