Connection to the SysKonnect SK-54P1 802.11g Wireless Print Server
Connection to the SysKonnect SK-54P1 802.11g Wireless Print Server
Connection to the SysKonnect SK-54P1 802.11g Wireless Print Server

You also want an ePaper? Increase the reach of your titles
YUMPU automatically turns print PDFs into web optimized ePapers that Google loves.
44 5 Novell NetWare Configuration<br />
To start <strong>the</strong> NDPS Manager in future, proceed as follows:<br />
1. enter <strong>the</strong> following command at <strong>the</strong> console: LOAD NDPSM.<br />
2. Select <strong>the</strong> NDPS Manager object.<br />
To start <strong>the</strong> NDPS Manager whenever you bring up <strong>the</strong> server, add a command like <strong>the</strong> following<br />
<strong>to</strong> your server's Au<strong>to</strong>exec.ncf file:<br />
LOAD NDPSM <strong>SysKonnect</strong>MGR.TeSupp<br />
The last item is <strong>the</strong> name of <strong>the</strong> NDPS Manager object you wish <strong>to</strong> load.<br />
Creating an NDPS <strong>Print</strong>er Agent<br />
To create Public Access <strong>Print</strong>ers using <strong>the</strong> NDPS Manager Object in NetWare Administra<strong>to</strong>r,<br />
proceed as follows:<br />
1. Start <strong>the</strong> NDPS Manager object you will be using <strong>to</strong> control <strong>the</strong> printer agent.<br />
2. At <strong>the</strong> identification page, click <strong>the</strong> PRINTER AGENT LIST.<br />
3. Click NEW.<br />
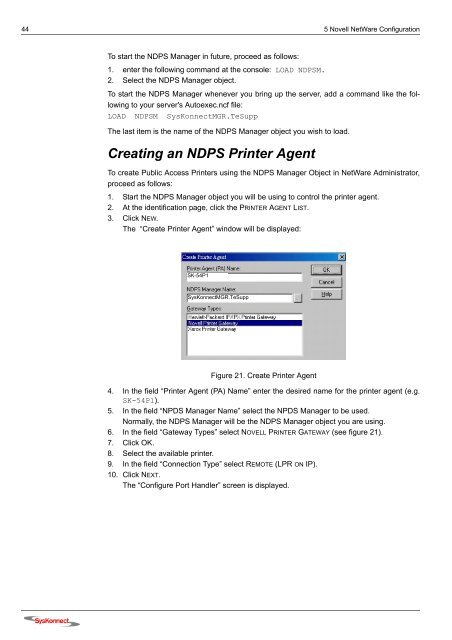
The “Create <strong>Print</strong>er Agent” window will be displayed:<br />
<strong>SK</strong>-<strong>54P1</strong><br />
<strong>SysKonnect</strong>MGR.TeSupp<br />
Figure 21. Create <strong>Print</strong>er Agent<br />
4. In <strong>the</strong> field “<strong>Print</strong>er Agent (PA) Name” enter <strong>the</strong> desired name for <strong>the</strong> printer agent (e.g.<br />
<strong>SK</strong>-<strong>54P1</strong>).<br />
5. In <strong>the</strong> field “NPDS Manager Name” select <strong>the</strong> NPDS Manager <strong>to</strong> be used.<br />
Normally, <strong>the</strong> NDPS Manager will be <strong>the</strong> NDPS Manager object you are using.<br />
6. In <strong>the</strong> field “Gateway Types” select NOVELL PRINTER GATEWAY (see figure 21).<br />
7. Click OK.<br />
8. Select <strong>the</strong> available printer.<br />
9. In <strong>the</strong> field “<strong>Connection</strong> Type” select REMOTE (LPR ON IP).<br />
10. Click NEXT.<br />
The “Configure Port Handler” screen is displayed.