XProtect Express 1.1; Administrator's Manual - Milestone
XProtect Express 1.1; Administrator's Manual - Milestone
XProtect Express 1.1; Administrator's Manual - Milestone

Create successful ePaper yourself
Turn your PDF publications into a flip-book with our unique Google optimized e-Paper software.
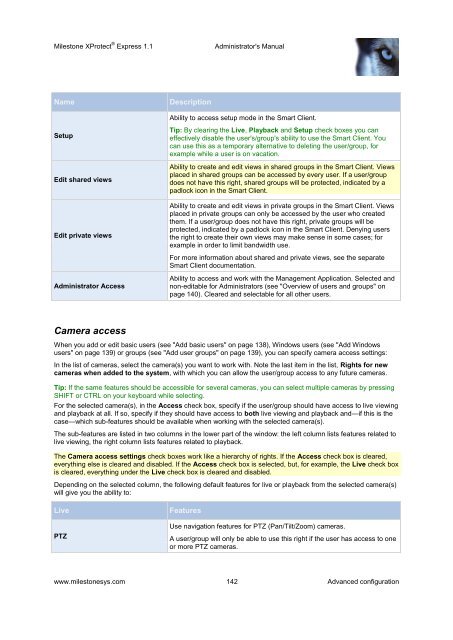
<strong>Milestone</strong> <strong>XProtect</strong> ® <strong>Express</strong> <strong>1.1</strong><strong>Administrator's</strong> <strong>Manual</strong>NameSetupEdit shared viewsEdit private viewsAdministrator AccessDescriptionAbility to access setup mode in the Smart Client.Tip: By clearing the Live, Playback and Setup check boxes you caneffectively disable the user's/group's ability to use the Smart Client. Youcan use this as a temporary alternative to deleting the user/group, forexample while a user is on vacation.Ability to create and edit views in shared groups in the Smart Client. Viewsplaced in shared groups can be accessed by every user. If a user/groupdoes not have this right, shared groups will be protected, indicated by apadlock icon in the Smart Client.Ability to create and edit views in private groups in the Smart Client. Viewsplaced in private groups can only be accessed by the user who createdthem. If a user/group does not have this right, private groups will beprotected, indicated by a padlock icon in the Smart Client. Denying usersthe right to create their own views may make sense in some cases; forexample in order to limit bandwidth use.For more information about shared and private views, see the separateSmart Client documentation.Ability to access and work with the Management Application. Selected andnon-editable for Administrators (see "Overview of users and groups" onpage 140). Cleared and selectable for all other users.Camera accessWhen you add or edit basic users (see "Add basic users" on page 138), Windows users (see "Add Windowsusers" on page 139) or groups (see "Add user groups" on page 139), you can specify camera access settings:In the list of cameras, select the camera(s) you want to work with. Note the last item in the list, Rights for newcameras when added to the system, with which you can allow the user/group access to any future cameras.Tip: If the same features should be accessible for several cameras, you can select multiple cameras by pressingSHIFT or CTRL on your keyboard while selecting.For the selected camera(s), in the Access check box, specify if the user/group should have access to live viewingand playback at all. If so, specify if they should have access to both live viewing and playback and—if this is thecase—which sub-features should be available when working with the selected camera(s).The sub-features are listed in two columns in the lower part of the window: the left column lists features related tolive viewing, the right column lists features related to playback.The Camera access settings check boxes work like a hierarchy of rights. If the Access check box is cleared,everything else is cleared and disabled. If the Access check box is selected, but, for example, the Live check boxis cleared, everything under the Live check box is cleared and disabled.Depending on the selected column, the following default features for live or playback from the selected camera(s)will give you the ability to:LivePTZFeaturesUse navigation features for PTZ (Pan/Tilt/Zoom) cameras.A user/group will only be able to use this right if the user has access to oneor more PTZ cameras.www.milestonesys.com 142 Advanced configuration