Tecnai on-line help manual -- Alignments - UT Southwestern
Tecnai on-line help manual -- Alignments - UT Southwestern
Tecnai on-line help manual -- Alignments - UT Southwestern
- No tags were found...

You also want an ePaper? Increase the reach of your titles
YUMPU automatically turns print PDFs into web optimized ePapers that Google loves.
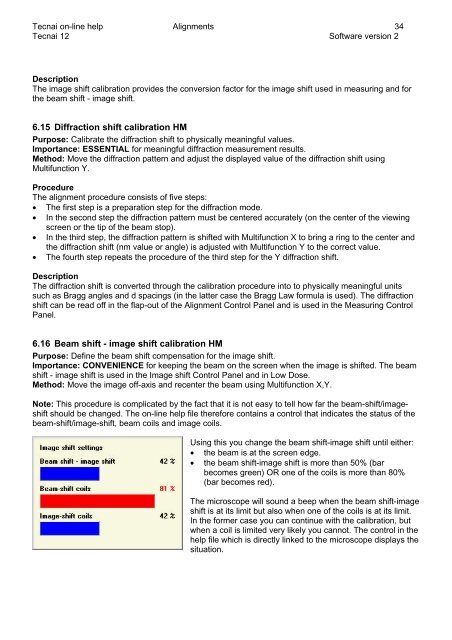
<str<strong>on</strong>g>Tecnai</str<strong>on</strong>g> <strong>on</strong>-<strong>line</strong> <strong>help</strong> <strong>Alignments</strong> 34<str<strong>on</strong>g>Tecnai</str<strong>on</strong>g> 12 Software versi<strong>on</strong> 2Descripti<strong>on</strong>The image shift calibrati<strong>on</strong> provides the c<strong>on</strong>versi<strong>on</strong> factor for the image shift used in measuring and forthe beam shift - image shift.6.15 Diffracti<strong>on</strong> shift calibrati<strong>on</strong> HMPurpose: Calibrate the diffracti<strong>on</strong> shift to physically meaningful values.Importance: ESSENTIAL for meaningful diffracti<strong>on</strong> measurement results.Method: Move the diffracti<strong>on</strong> pattern and adjust the displayed value of the diffracti<strong>on</strong> shift usingMultifuncti<strong>on</strong> Y.ProcedureThe alignment procedure c<strong>on</strong>sists of five steps:• The first step is a preparati<strong>on</strong> step for the diffracti<strong>on</strong> mode.• In the sec<strong>on</strong>d step the diffracti<strong>on</strong> pattern must be centered accurately (<strong>on</strong> the center of the viewingscreen or the tip of the beam stop).• In the third step, the diffracti<strong>on</strong> pattern is shifted with Multifuncti<strong>on</strong> X to bring a ring to the center andthe diffracti<strong>on</strong> shift (nm value or angle) is adjusted with Multifuncti<strong>on</strong> Y to the correct value.• The fourth step repeats the procedure of the third step for the Y diffracti<strong>on</strong> shift.Descripti<strong>on</strong>The diffracti<strong>on</strong> shift is c<strong>on</strong>verted through the calibrati<strong>on</strong> procedure into to physically meaningful unitssuch as Bragg angles and d spacings (in the latter case the Bragg Law formula is used). The diffracti<strong>on</strong>shift can be read off in the flap-out of the Alignment C<strong>on</strong>trol Panel and is used in the Measuring C<strong>on</strong>trolPanel.6.16 Beam shift - image shift calibrati<strong>on</strong> HMPurpose: Define the beam shift compensati<strong>on</strong> for the image shift.Importance: CONVENIENCE for keeping the beam <strong>on</strong> the screen when the image is shifted. The beamshift - image shift is used in the Image shift C<strong>on</strong>trol Panel and in Low Dose.Method: Move the image off-axis and recenter the beam using Multifuncti<strong>on</strong> X,Y.Note: This procedure is complicated by the fact that it is not easy to tell how far the beam-shift/imageshiftshould be changed. The <strong>on</strong>-<strong>line</strong> <strong>help</strong> file therefore c<strong>on</strong>tains a c<strong>on</strong>trol that indicates the status of thebeam-shift/image-shift, beam coils and image coils.Using this you change the beam shift-image shift until either:• the beam is at the screen edge.• the beam shift-image shift is more than 50% (barbecomes green) OR <strong>on</strong>e of the coils is more than 80%(bar becomes red).The microscope will sound a beep when the beam shift-imageshift is at its limit but also when <strong>on</strong>e of the coils is at its limit.In the former case you can c<strong>on</strong>tinue with the calibrati<strong>on</strong>, butwhen a coil is limited very likely you cannot. The c<strong>on</strong>trol in the<strong>help</strong> file which is directly linked to the microscope displays thesituati<strong>on</strong>.