Heavy Duty Balanced Opposed Compressors
Heavy Duty Balanced Opposed Compressors
Heavy Duty Balanced Opposed Compressors

You also want an ePaper? Increase the reach of your titles
YUMPU automatically turns print PDFs into web optimized ePapers that Google loves.
FOR MODELS: JG AND JGA SECTION 5 - MAINTENANCE<br />
Crosshead - Installation<br />
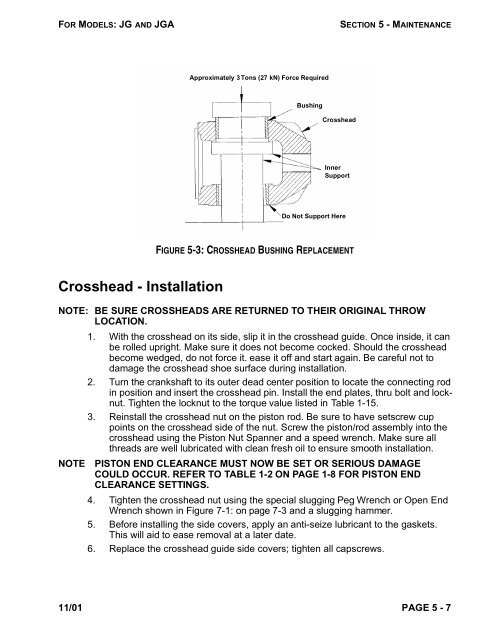
Approximately 3 Tons (27 kN) Force Required<br />
Bushing<br />
Crosshead<br />
Inner<br />
Support<br />
Do Not Support Here<br />
FIGURE 5-3: CROSSHEAD BUSHING REPLACEMENT<br />
NOTE: BE SURE CROSSHEADS ARE RETURNED TO THEIR ORIGINAL THROW<br />
LOCATION.<br />
1. With the crosshead on its side, slip it in the crosshead guide. Once inside, it can<br />
be rolled upright. Make sure it does not become cocked. Should the crosshead<br />
become wedged, do not force it. ease it off and start again. Be careful not to<br />
damage the crosshead shoe surface during installation.<br />
2. Turn the crankshaft to its outer dead center position to locate the connecting rod<br />
in position and insert the crosshead pin. Install the end plates, thru bolt and locknut.<br />
Tighten the locknut to the torque value listed in Table 1-15.<br />
3. Reinstall the crosshead nut on the piston rod. Be sure to have setscrew cup<br />
points on the crosshead side of the nut. Screw the piston/rod assembly into the<br />
crosshead using the Piston Nut Spanner and a speed wrench. Make sure all<br />
threads are well lubricated with clean fresh oil to ensure smooth installation.<br />
NOTE PISTON END CLEARANCE MUST NOW BE SET OR SERIOUS DAMAGE<br />
COULD OCCUR. REFER TO TABLE 1-2 ON PAGE 1-8 FOR PISTON END<br />
CLEARANCE SETTINGS.<br />
4. Tighten the crosshead nut using the special slugging Peg Wrench or Open End<br />
Wrench shown in Figure 7-1: on page 7-3 and a slugging hammer.<br />
5. Before installing the side covers, apply an anti-seize lubricant to the gaskets.<br />
This will aid to ease removal at a later date.<br />
6. Replace the crosshead guide side covers; tighten all capscrews.<br />
11/01 PAGE 5 - 7