Heavy Duty Balanced Opposed Compressors
Heavy Duty Balanced Opposed Compressors
Heavy Duty Balanced Opposed Compressors

Create successful ePaper yourself
Turn your PDF publications into a flip-book with our unique Google optimized e-Paper software.
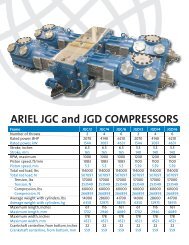
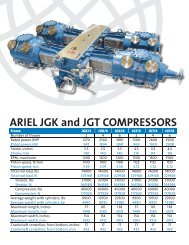
FOR MODELS: JG AND JGA SECTION 5 - MAINTENANCE<br />
The drilled hole will relieve most of the shrink, and a couple of good radial hits with a hammer<br />
and chisel will open the sprocket enough so it can be easily removed.<br />
Installation<br />
Encircle the sprocket with wire. Suspend the sprocket from the wire and heat it with a small<br />
propane torch. When it has attained a yellow glow, approximately 400°F (240°C), it can be<br />
slipped over the auxiliary end of the crankshaft. Hold the sprocket in position with high temperature<br />
gloves or two pieces of clean wood, rotating it slightly to make sure it is square,<br />
until it has cooled enough to shrink on the crankshaft. DO NOT TOUCH HOT SURFACES<br />
WITHOUT PROPER INSULATION TO PREVENT INJURY<br />
Main Bearings - Removal and Installation<br />
Bearings must be replaced if they show signs of wear or scoring. Wear will be indicated by<br />
the bronze showing through the babbitted surface. It is recommended that bearing be<br />
replaced any time the bearing caps are removed.<br />
If replacement bearings are needed, the old bearing halves can easily be slid out, new bearings<br />
slid in (untabbed end first), and snapped into place. Locate tabs in the notches in the<br />
bearing saddles and bearing caps. It is recommended that the bearings be replaced any<br />
time that the bearing caps are removed.<br />
Crankshaft - Installation<br />
Hit Here with<br />
Chisel and Hammer<br />
FIGURE 5-6: CRANKSHAFT - CHAIN SPROCKET<br />
1. Move the connecting rods to their full outer position. While the crankshaft is<br />
being lowered very slowly into the crankcase (if suspended by a crane with a<br />
nylon sling), one person should grasp the drive end and slowly maneuver the<br />
11/01 PAGE 5 - 11